
When you make purchases through links on this site, The Track Ahead may earn an affiliate commission. Also, these posts are based off my own experiences. I am not responsible for any action you take as a result of reading this. Learn More
On select 13th generation Ford F-150’s (2015-2020), auto start-stop was offered as a way to conserve fuel consumption and reduce emissions. The auto start-stop feature works by shutting off the engine when the vehicle is stopped and is restarted again once your foot comes off the brake pedal. According to Ford, these vehicles are outfitted with a heavy duty battery and starter to compensate for the higher number of starts and stops.
When I purchased my 2020 Ford F-150, I swore to myself that I wouldn’t be labeled as a Luddite and would give auto start-stop a chance. But after a year of driving the truck, I find that every time I drive it and come to the first stop and the engine auto shuts off, I get incredibly agitated and immediately reach for the auto start-stop button to disable it.
Some folks have gotten used to the start-stop feature while others are adamantly opposed to it. For those who can’t stand auto start-stop, there are a number of ways to permanently disable the feature. These methods vary in cost, ease of installation, and have varying effects on other features of the vehicle. I’ve compiled all of the ways to permanently disable auto start-stop on the 13th gen Ford F-150 and I hope it helps you determine what is best for you if you choose to do it.
How to Permanently Disable Auto Start-Stop on the 13th Generation Ford F-150
There are a variety of methods for permanently disabling the auto start-stop feature on these vehicles, but I’m breaking it up into several categories:
Behavior Alterations (No physical modification): Options 1-2
Disconnecting Electrical Connectors: Options 3-4
Physical/Electronic Modification: Options 5-9
- Press the auto-start stop button every time you start the vehicle
- Don’t depress the brake pedal all the way when stopped
- Unplug BMS connector from negative terminal of the car battery
- Unplug trailer wiring connector in driver’s side footwell
- Jumper two leads behind auto start-stop switch inside dashboard
- Plug a trailer light test plug into the trailer towing connector
- Plug an auto start-stop eliminator behind auto start-stop switch inside dashboard
- Plug device into the OBD II port to program/disable auto start-stop using FORScan software
- Plug device into the OBD II port that memorizes the last auto start-stop setting
Behavior Alterations (No Physical Modification)
I categorize this first section as behavioral as you simply just change your driving behavior. If you don’t want to physically modify anything on your vehicle, these are the only options available to disable the auto start-stop feature. If these options don’t work for you, then you will need to alternatively perform some level of modification (see next sections).
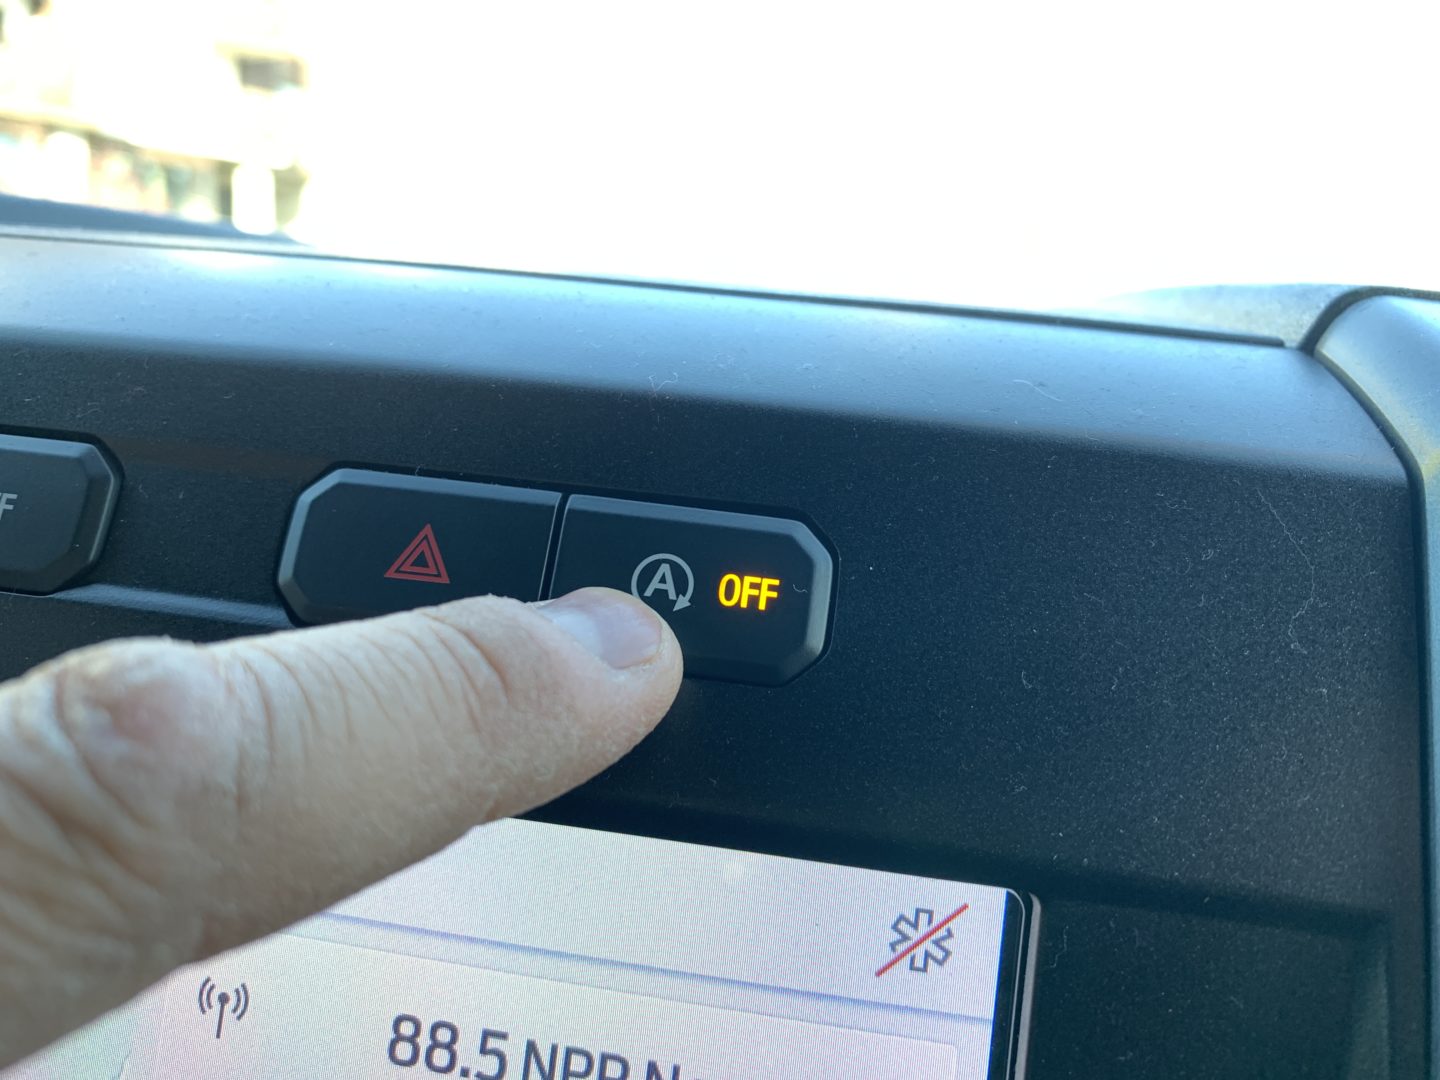
1. Press the auto-start stop button every time you start the vehicle
This first option is the most straight-forward option: simply press the auto start-stop button on the center dashboard (located above the navigation screen) every time you start your vehicle. This temporarily turns off the auto start-stop feature until you shut the vehicle off. If you can remember to do this every time you start up your truck and don’t mind doing so, then this method is the easiest option for you.
For me, I would always forget and it won’t be until the first stop where the engine shuts off that I remember to press the button. At that point, I’ve already become annoyed with the feature. I understand that it may be inconsequential, but this minor annoyance every time I drive my truck is still something that aggravates me.
2. Don’t depress the brake pedal all the way when stopped
When at a stop, you can depress the brake pedal just enough so that the vehicle does not move, yet not pressed down all the way down so that the auto start-stop feature activates. If you depress the brake pedal all the way down as you normally might do, the engine will shut off. So, if you can train yourself to depress the brake pedal just to the right middle-ground where it keeps the vehicle stopped, but also does not activate the engine shut-off, then you this might be a good solution for you.

Disconnecting Electrical Connectors
These set of options are are very easy to do with varying pros/cons for each option. It’s as simple as disconnecting an electrical connector. However, be aware that some feature(s) of the vehicle will be disabled as a result of these modifications. Some of these features may include safety functions as well, so it is not something to take lightly.
Many folks who begin looking into disabling the auto start-stop feature might take this path as these are simple things you can easily do yourself. I highly recommend understanding exactly what features will be disabled so you can determine whether the trade-off is acceptable to you and the passengers of your vehicle.
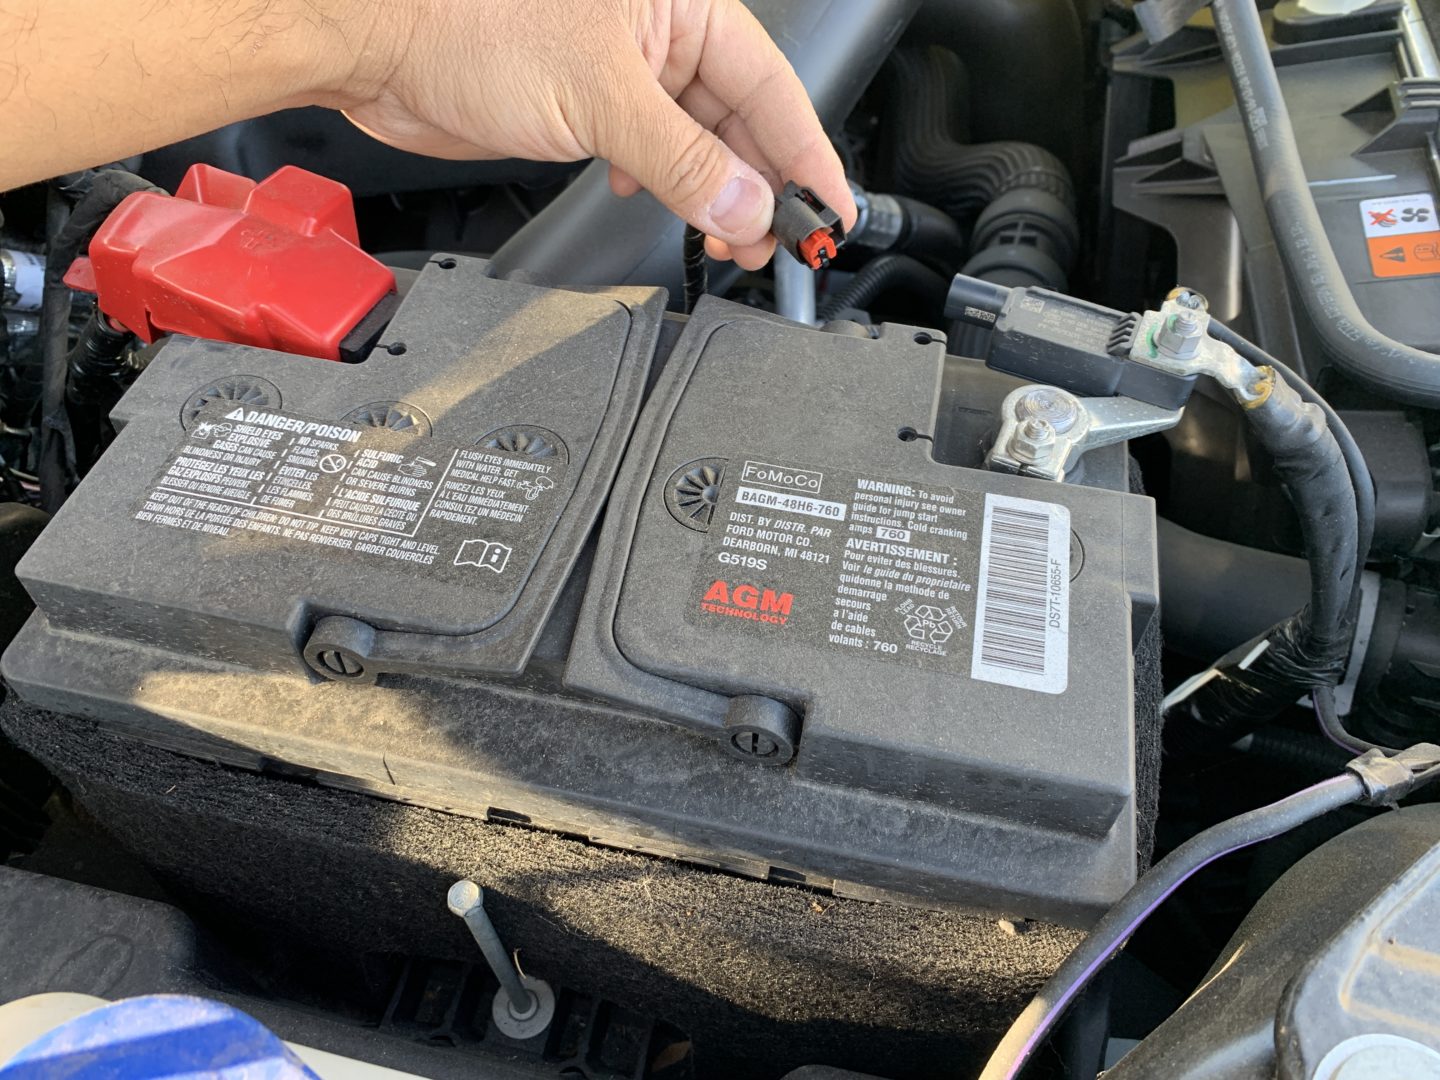
3. Unplug BMS connector from negative terminal of car battery
There is a plug located at the car battery, which if disconnected, will disable the BMS (Battery Monitoring System). The BMS is a smart battery monitoring and management system, mainly aimed at extending the life of the battery. Some features of the BMS include: intelligent charging, voltage monitoring of the battery, and cutting off accessories if there is too much battery drain. Another feature which would not function (which in this scenario you are looking to disable) is the auto start-stop feature.
If you unplug the BMS cable located at the negative terminal of the battery, the BMS will be disabled. Your vehicle will still run and work regularly with the exception of the smart battery features. Because the auto start-stop feature is disabled when the BMS is disabled, then disconnecting the BMS cable will disable auto start-stop as well.
I’m not sure exactly how I personally feel about this option. It seems like a hack way of permanently disabling auto start-stop through the BMS system, but it does work with minimal effort. It only affects the battery management system of the vehicle and does not seem to affect safety features such as the options that deal with the trailer connectors. To my understanding, the BMS helps with extending the life of the battery and keeps the whole electrical system in check.
4. Unplug trailer wiring connector in driver’s side footwell
Located near the brake pedal on the left side of the footwell is the trailer module (TRM). Within the trailer module there are several connectors. The bottom-most connector can be disconnected, which will disable auto start-stop. However, if you hook up a trailer, your turn signals and brake lights won’t work. The biggest issue here is if you forget that the connector is unplugged and you use a trailer; this presents a serious safety issue.
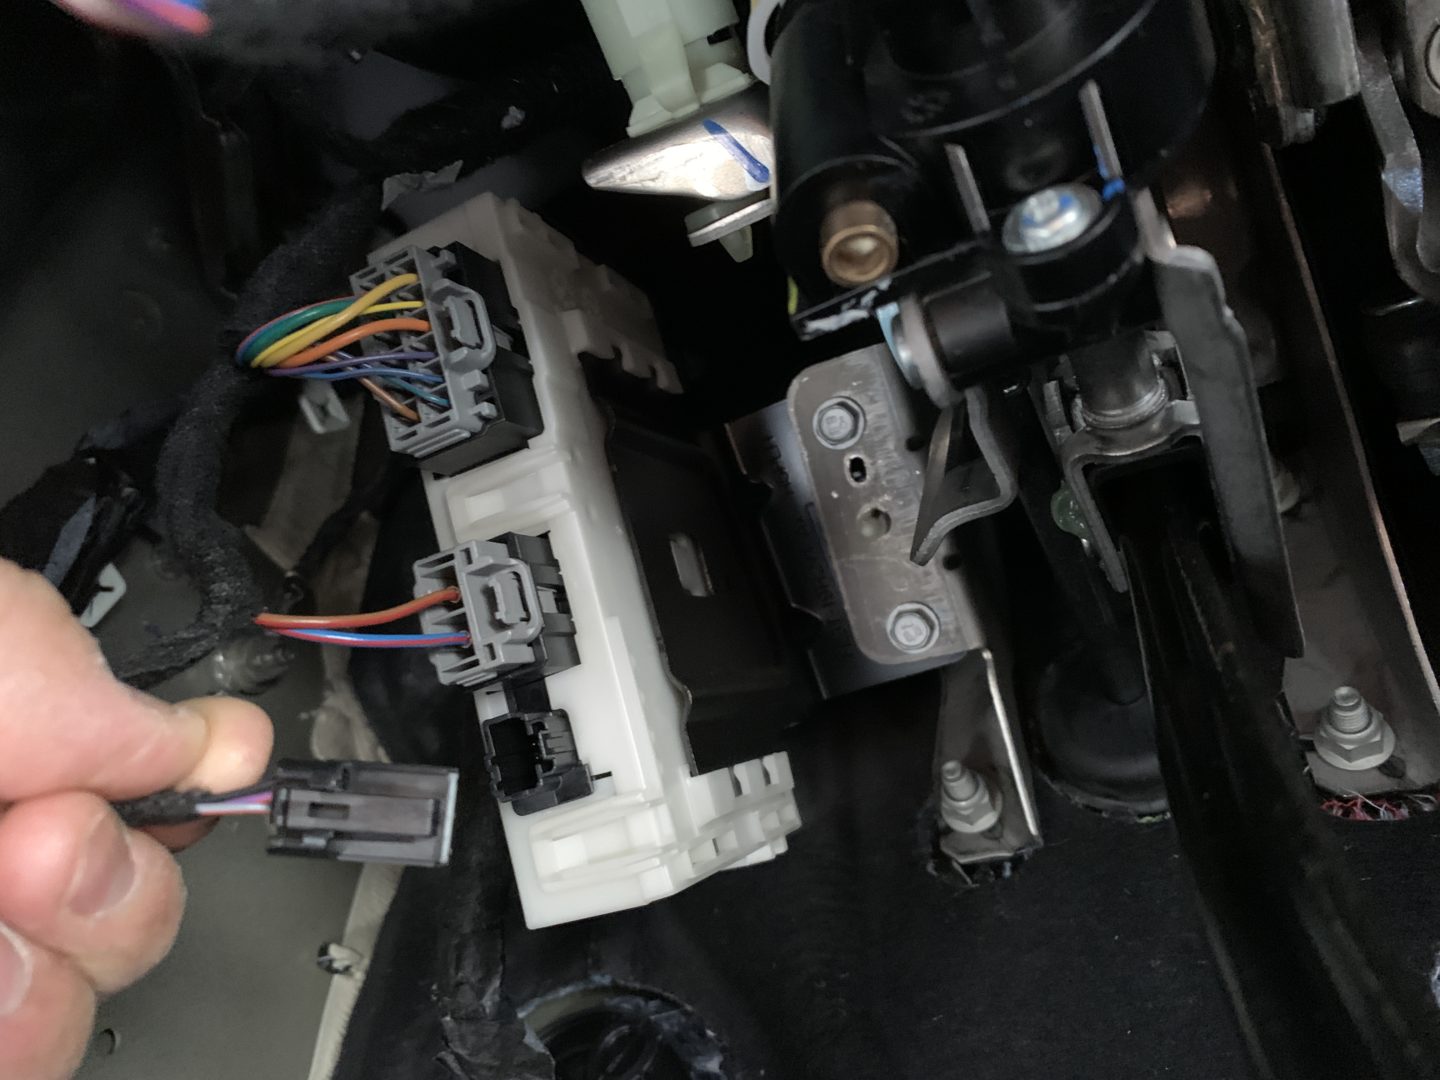
This option may not be an issue if you never tow anything. However, the danger lies with when you do tow. In fact, if you don’t tow much, perhaps it is more likely you will forget that this connector is unplugged. When you do go to hook up a trailer and connect the trailer light connector through the plug in the back of the truck, you may be driving without those necessary trailer lights. For this reason, I don’t recommend this option as the safety risk posed is high.
Physical/Electronic Modification
The following options require some kind of modification to your vehicle, which means either plugging something in or modifying else on the vehicle. I’d recommend going with one of the options for a plug-in device as they tend to be more safe-to-use, should not deactivate any safety features, and can be easily removed if you ever need to.
5. Jumper two leads behind auto start-stop switch inside dashboard
It’s possible to jumper two leads behind the auto start-stop switch inside the dashboard in order to permanently deactivate the auto start-stop feature. Although this option works, there are a few main issues with this solution.
First, depending on how it is jumpered, it could be a safety hazard as the jumper can come loose or may not be a proper jumper wire; this could lead to a fire. And second, because the two leads behind the switch have been jumpered, you cannot re-activate auto start-stop by pressing the button; you must remove the jumper in order to re-enable the auto start-stop switch.
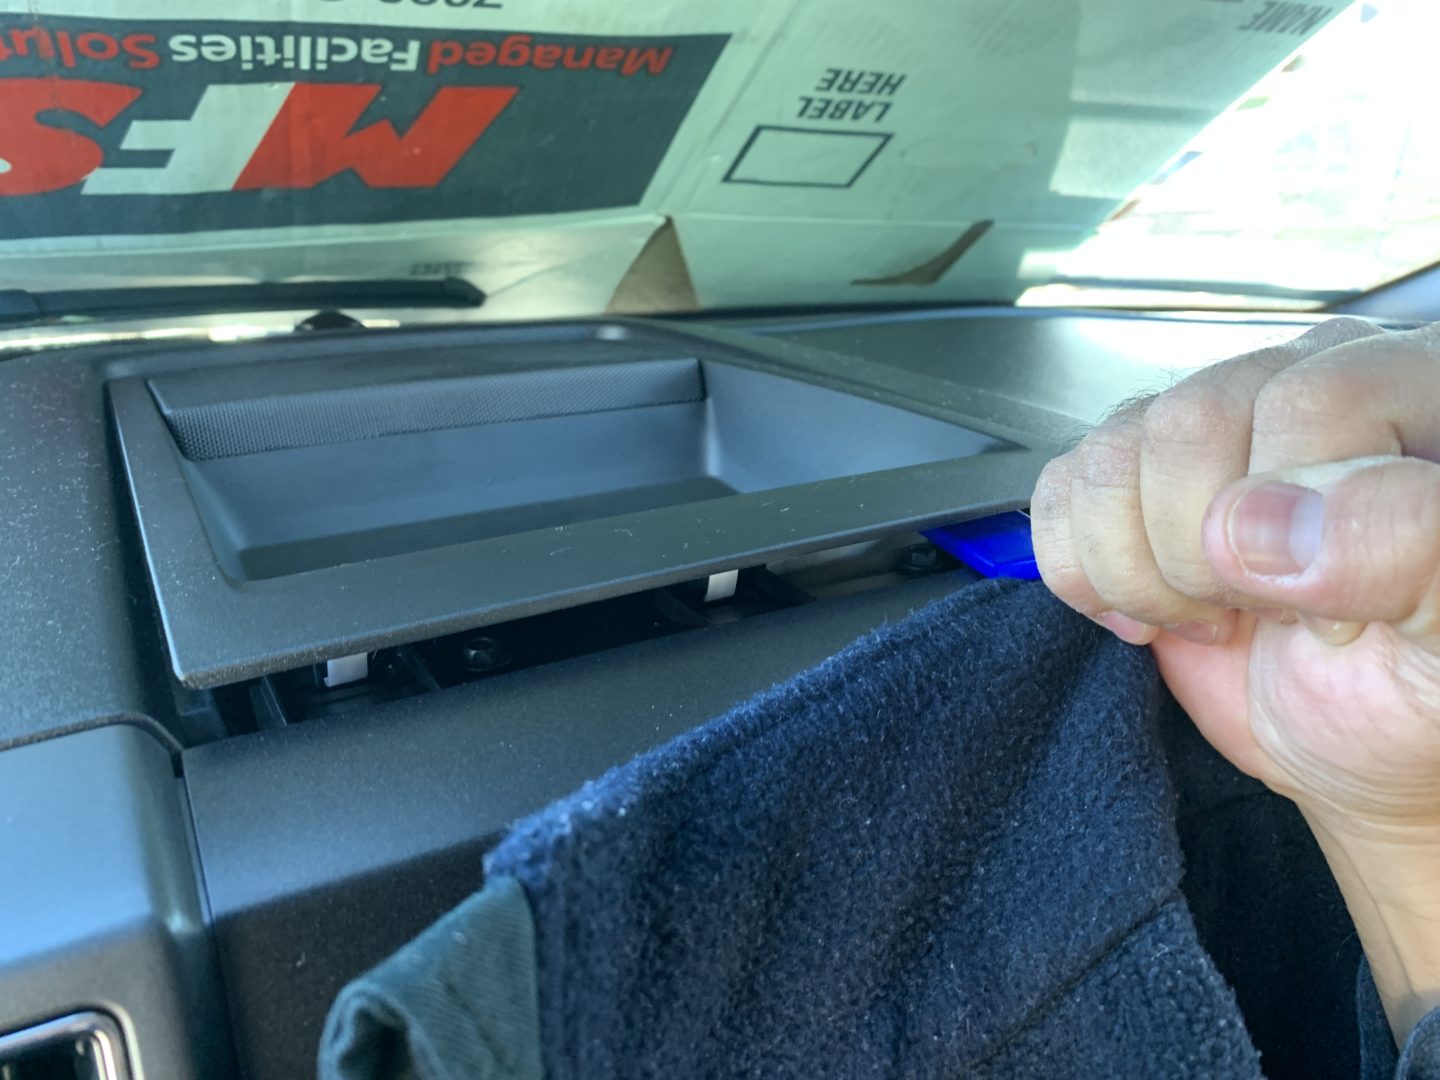
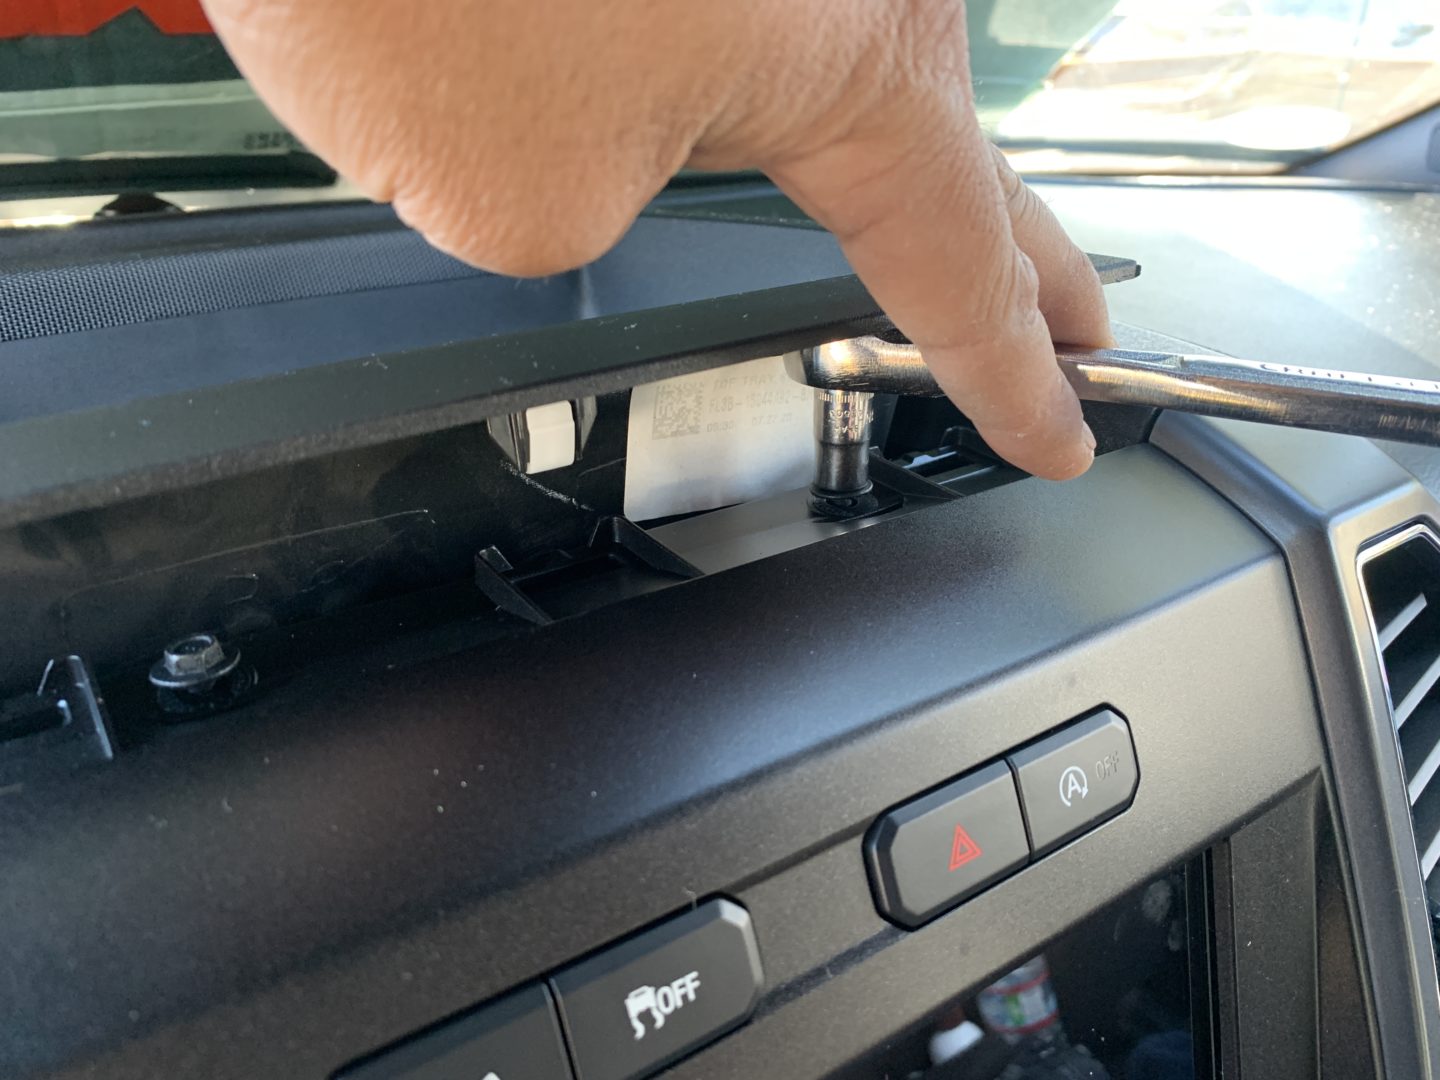
If you wish to continue with this option, you can pop up the front of the dashboard tray located above the switch location using a trim tool. Although a trim tool is plastic, you should still try to protect your trim when prying with the trim tool. Pulling up on the tray requires a good amount of force. The front portion of the tray is held in place with three tabs.
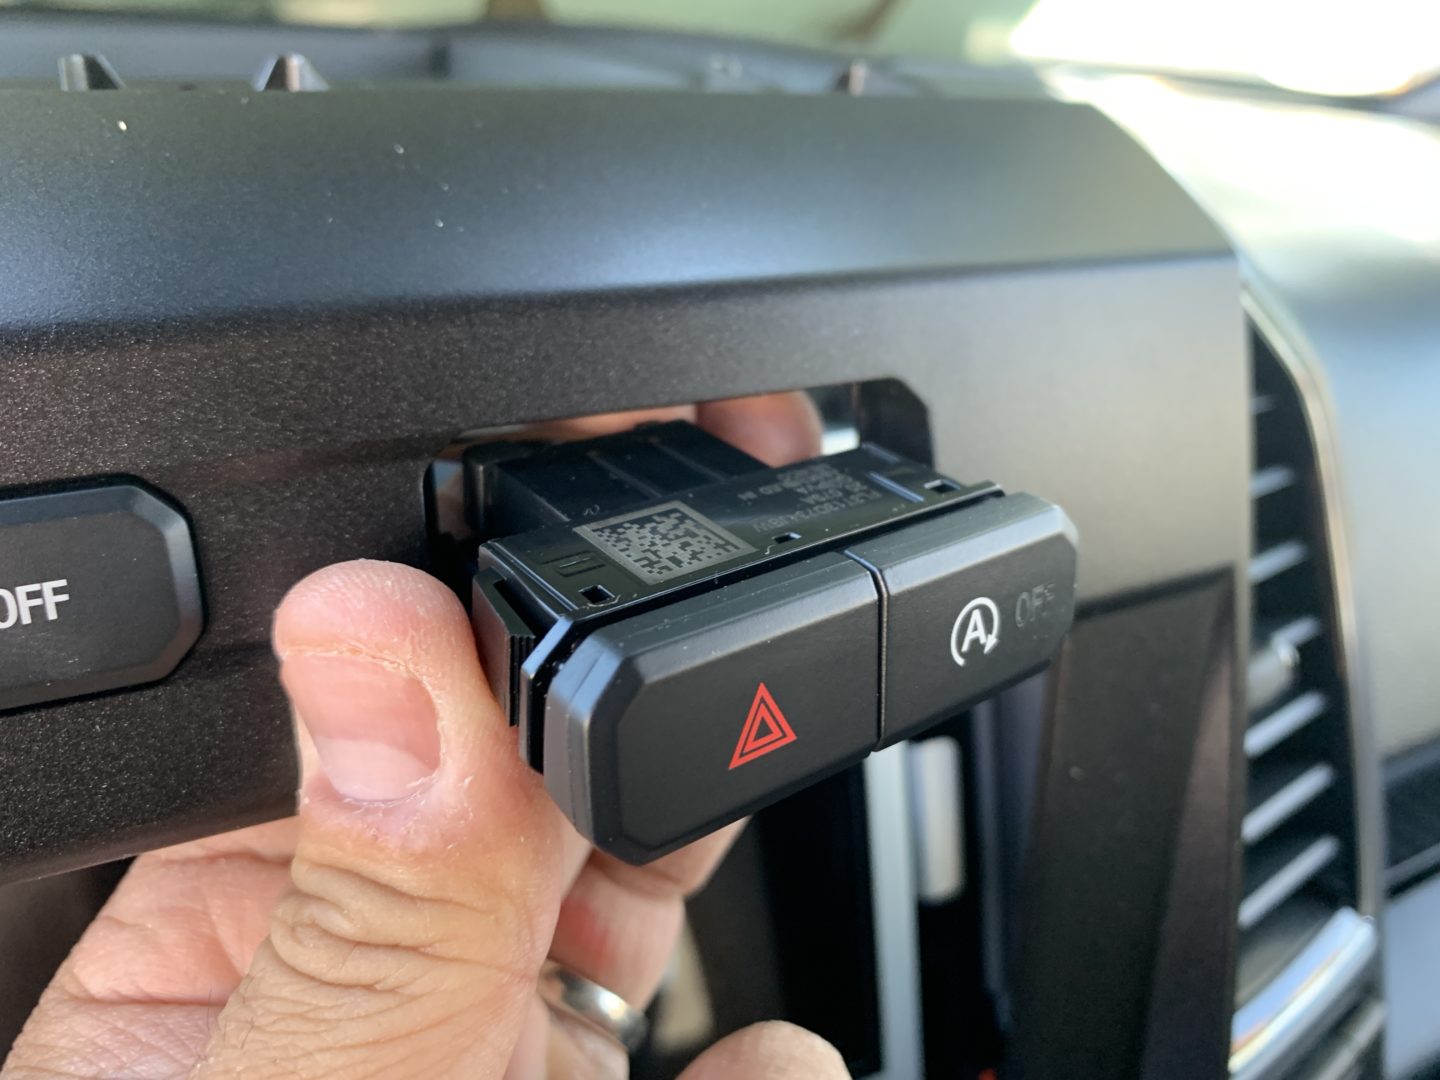
Once you’ve pulled the front of the tray up, remove the (2 qty) 7mm screws located underneath. Usually smaller 1/4″ drive socket sets will have the smaller 7mm size you need. Pull back on the front trim piece until it comes loose. Press inwards on the two tabs behind the switch and it will be released from the bezel.

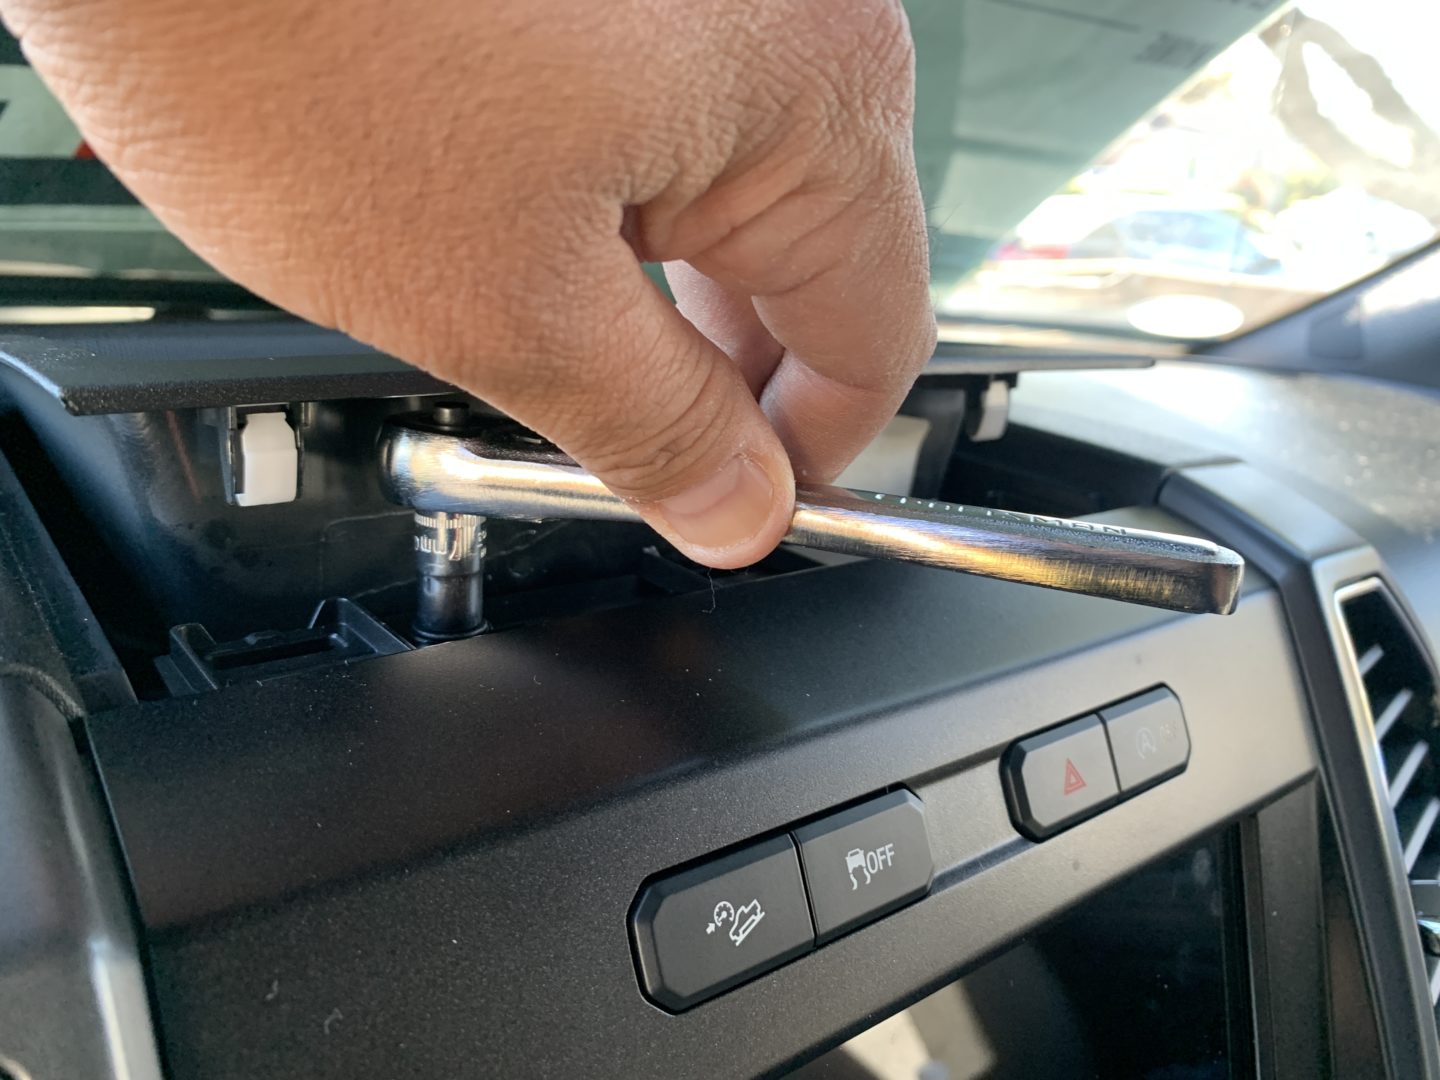

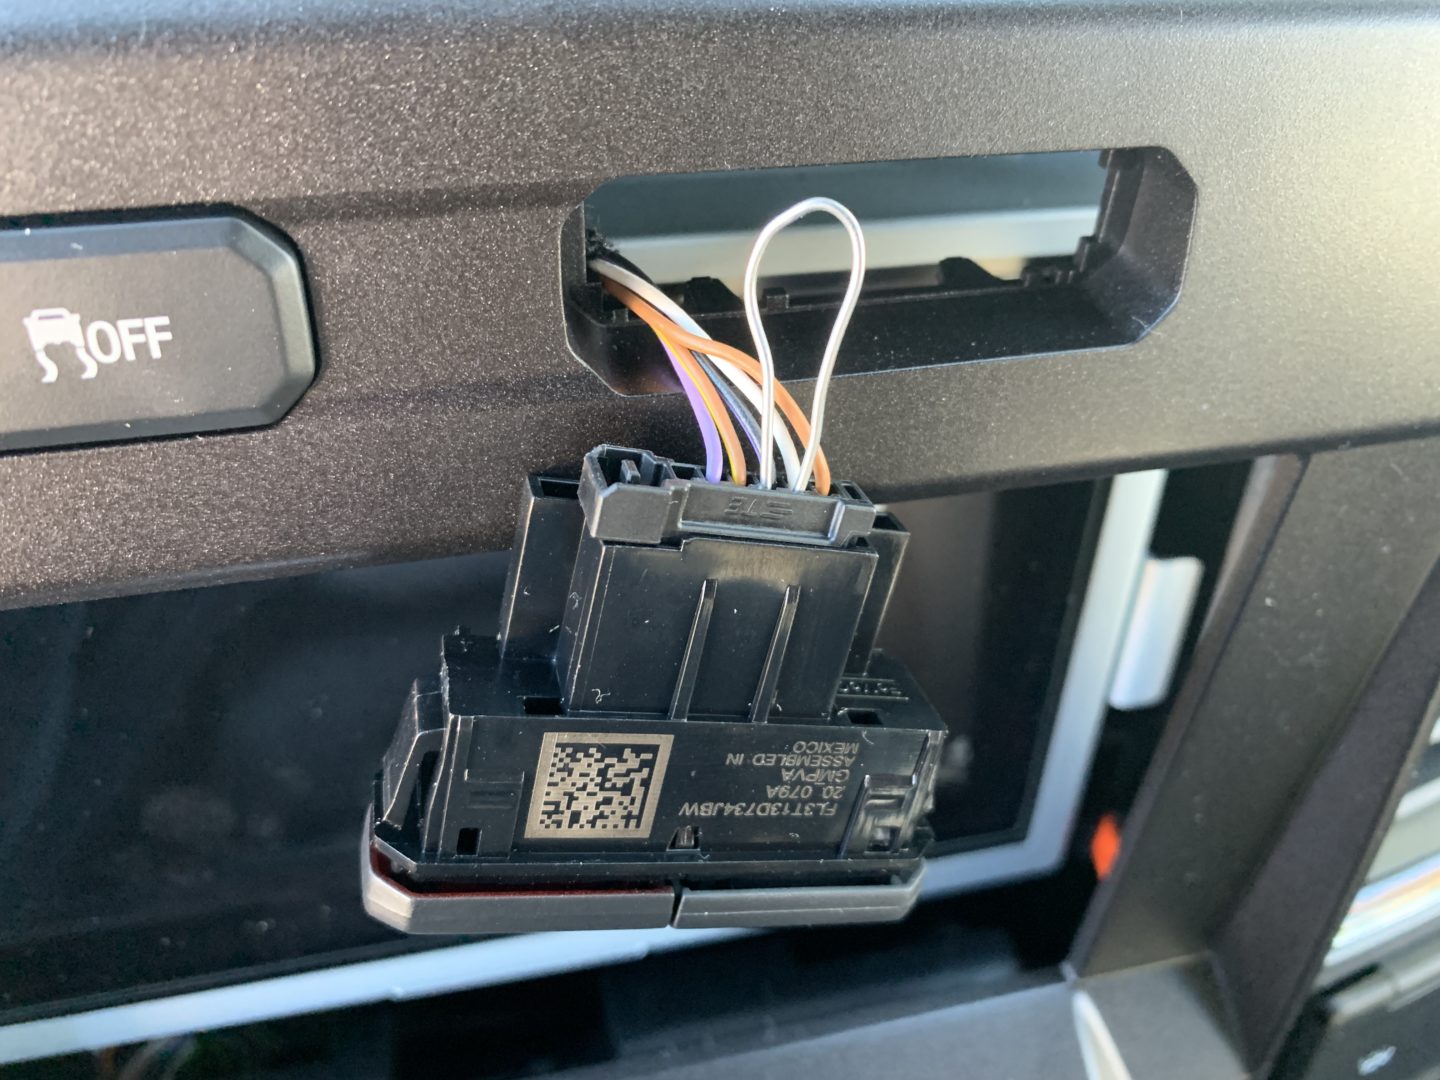
Use a solid core wire to jumper between the white wire and the wire next to it, a black/purple (black wire with purple stripe). If you must use this option, ensure that the jumper wire cannot come loose. It would also be wise to use a jumper wire that has wire insulation so prevent short circuiting.
Because of the potential for a short circuit or fire, I wouldn’t recommend this option. Also, your switch is bypassed so you cannot operate it. I probably wouldn’t do this option unless I had a surefire way of keeping the jumper wire secured and properly insulated.
6. Plug a trailer light test plug into the trailer towing connector
This option is similar to option 4 in that this relates to the trailer and to towing, but it does have some differences. If you use a trailer light test plug and plug it into the trailer towing connector, it fools the vehicle into thinking you are pulling a trailer. Therefore, the vehicle goes into ‘tow’ mode and makes some changes to improve transmission operation. This can mean a change in shift points, added engine braking, and decreased fuel economy amongst other things. Also, safety features like cross traffic detection, rear proximity sensors, and the backup camera will be disabled.
Hopkins 47345 4 Wire Flat Adapter
This is one of my least favorite options because it disables safety features of your truck. An easier and cheaper alternative to this option is Option 4 if you plan to permanently disable auto start-stop via the trailer connections.
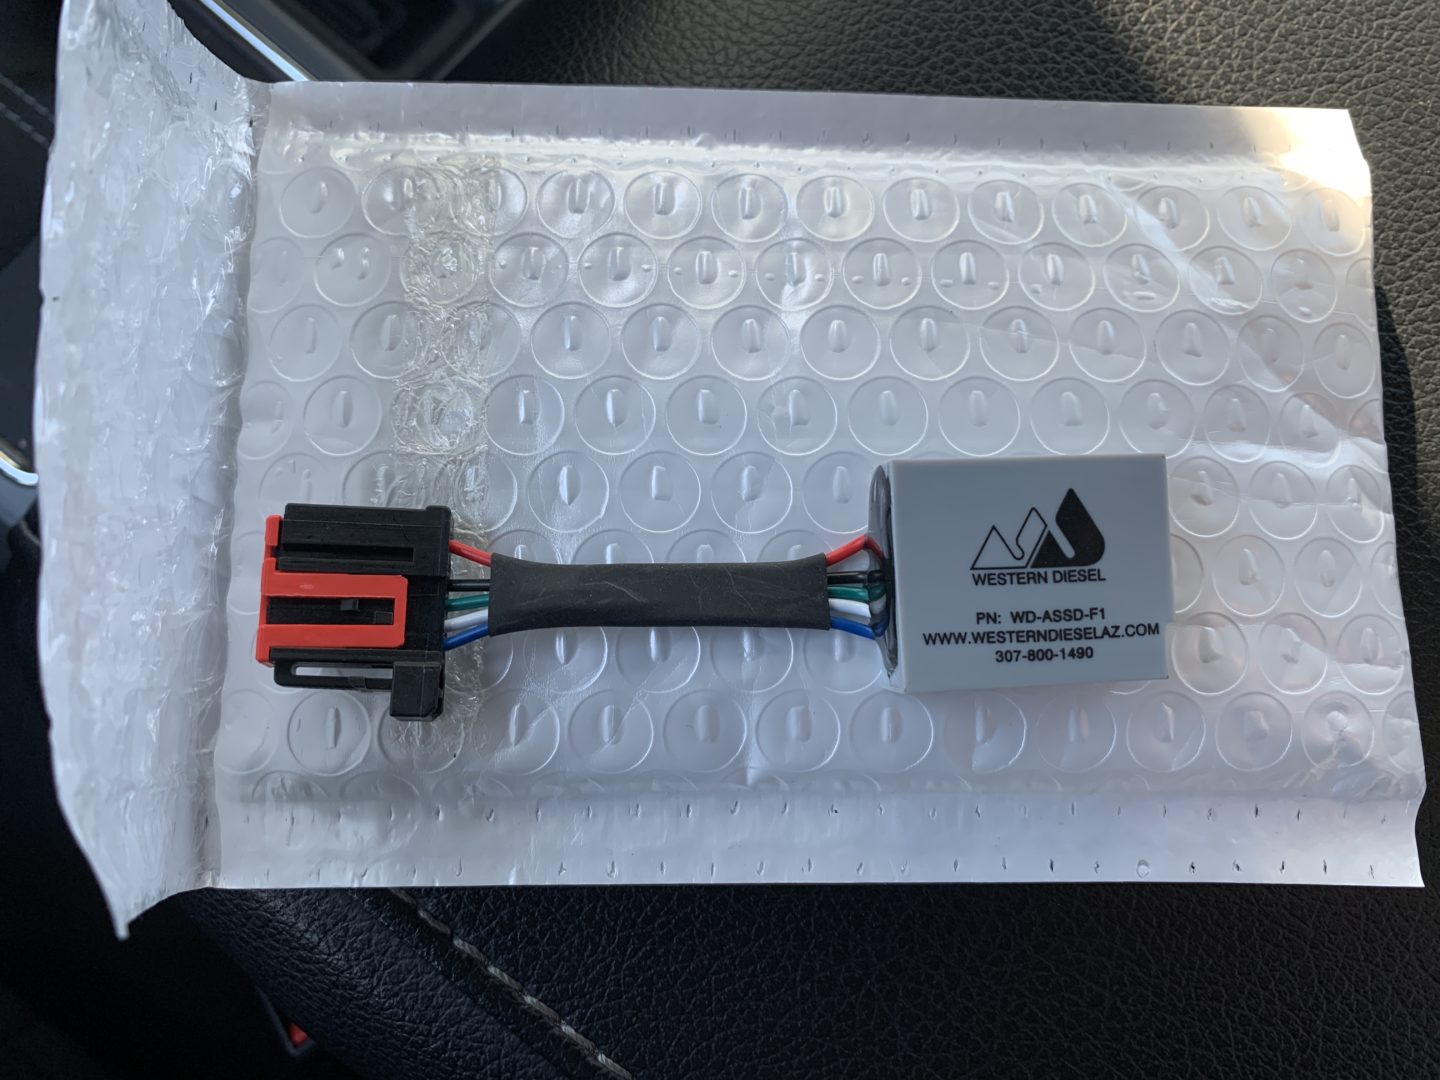
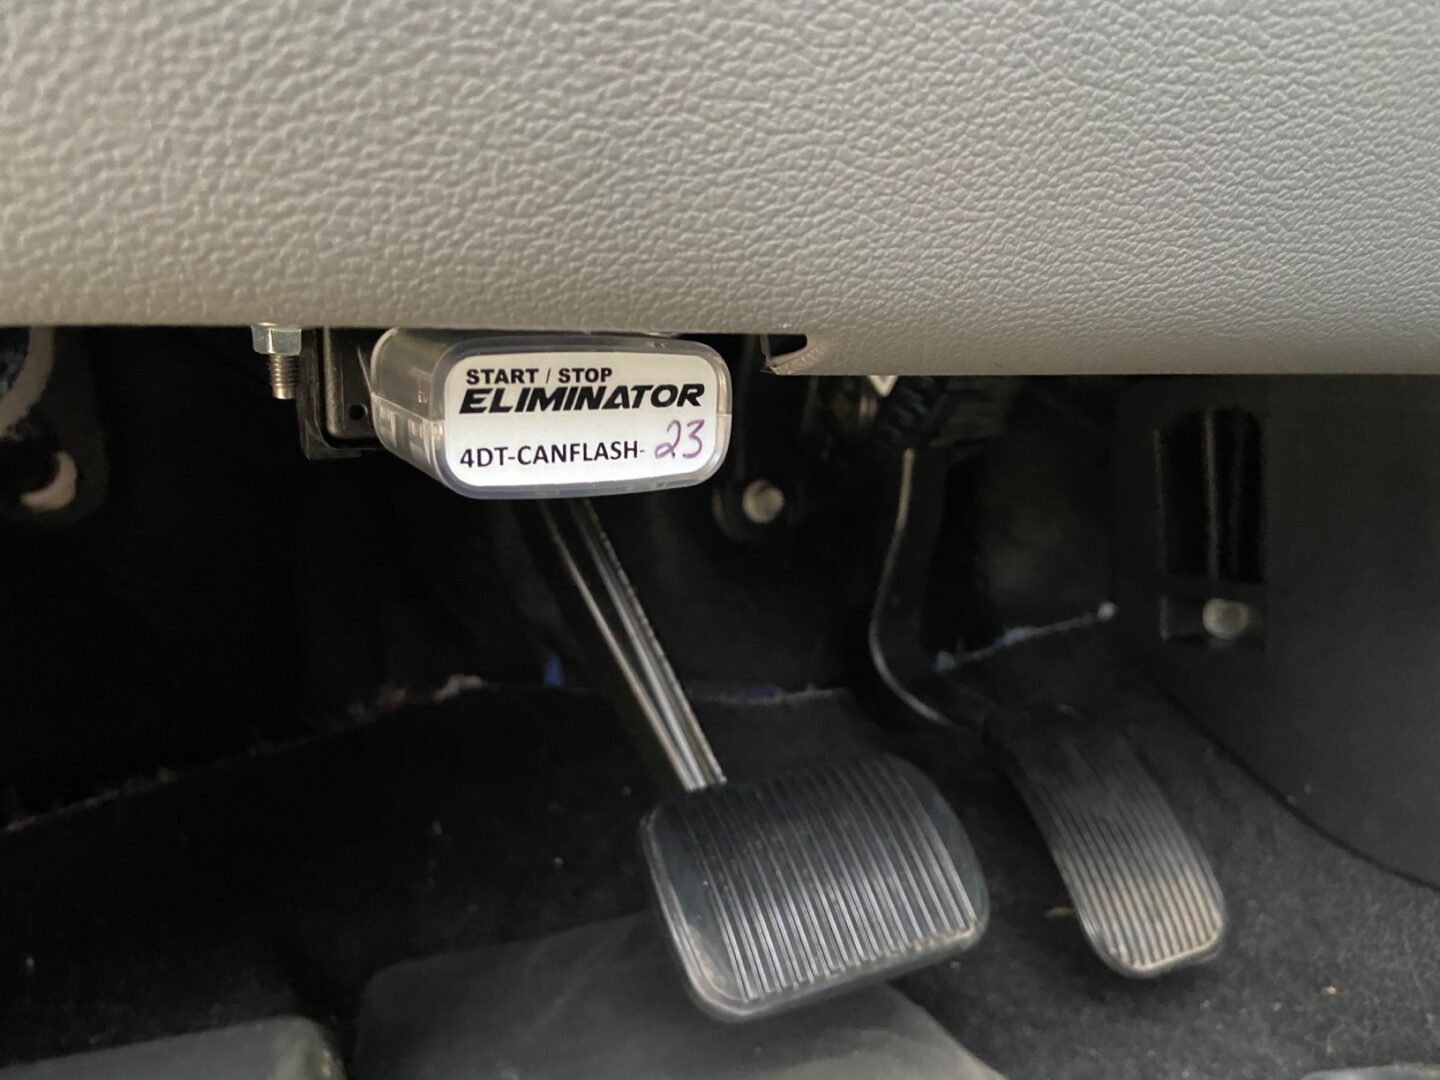
7. Plug an auto start-stop eliminator module behind auto start-stop switch inside dashboard
A safer option is to purchase a plug-and-play auto start-stop eliminator, which plugs in between the auto start-stop switch and the connector behind it. This doesn’t disable any safety features, is less likely of a safety hazard than say using a jumper wire, and allows use of your auto start-stop switch. What the auto start-stop eliminator does is remember the last position of the auto start-stop switch.
As of this writing, there two main auto start-stop eliminators on the market that plug into the back of the start-stop switch: TRL Automotive and Western Diesel. Here is a little bit of information on each:
AutoStop Eliminator (TRL Automotive)
This auto start-stop eliminator has multiple programmed module harnesses that can plug behind the auto start stop switch. Depending on what type of switch you have on your truck, you will need to purchase a particular type of harness in order for the eliminator to work. Here is the harness guide from their website:

Purchase the Autostop Eliminator from TRL Auto ($90-$100)
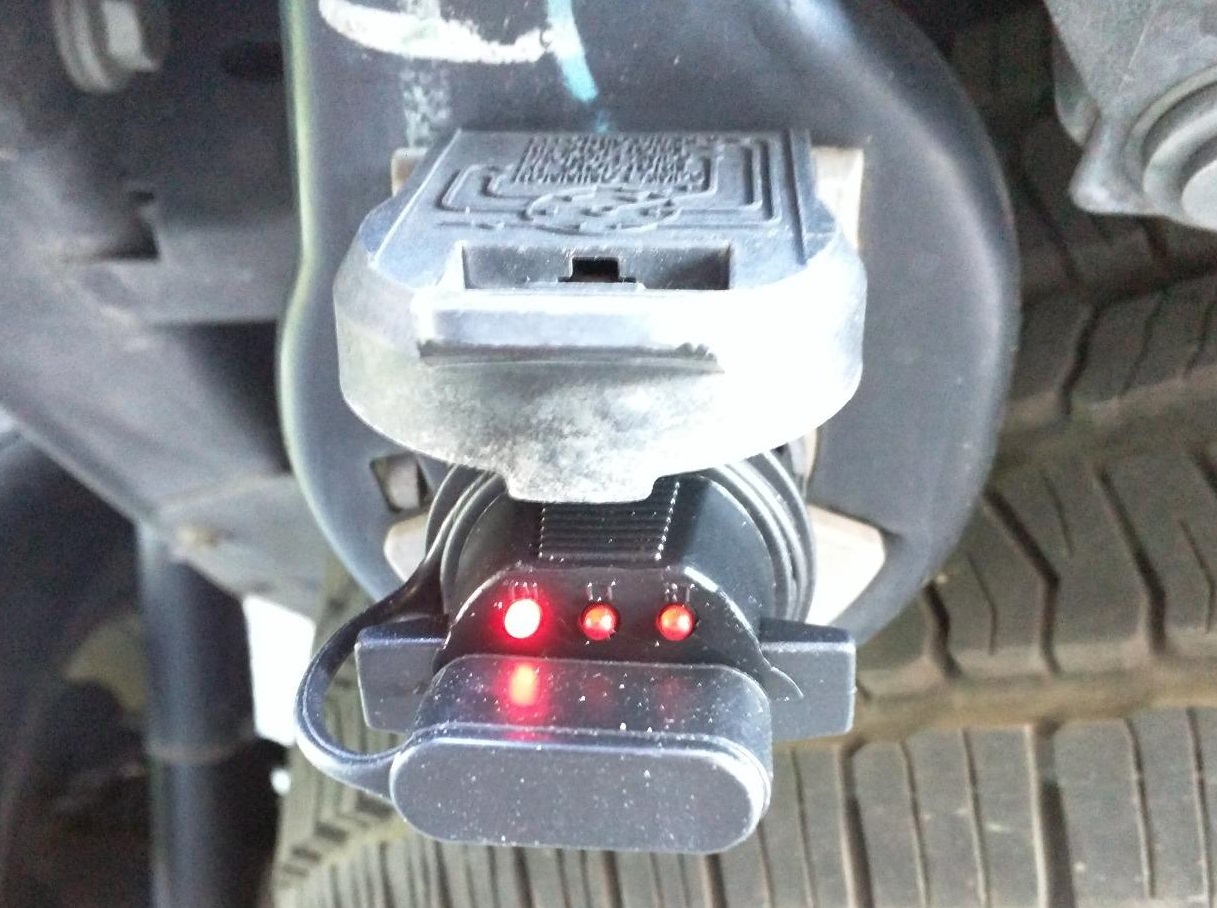
Auto Start Stop Eliminator (Western Diesel)
As of this writing, the Western Diesel Auto Start Stop Eliminator works on 2015-2018 Ford F-150’s that have auto start-stop. This one costs about $55, and should work well if you have an F150 that is the year 2015-2018. Obviously if you’ve got a 2019 or 2020, then it’s not going to work for you.
I personally tried this on my 2020 Ford F-150 when the product was originally advertised to work for the 13th gen F-150 and it would intermittently work for me. It just wasn’t reliable enough, so only consider getting this if you have a 2015-2018 Ford F-150.
Auto Start Stop Eliminator (Western Diesel) for 2015-2018 Ford F-150
Installation of an Auto Start-Stop Eliminator
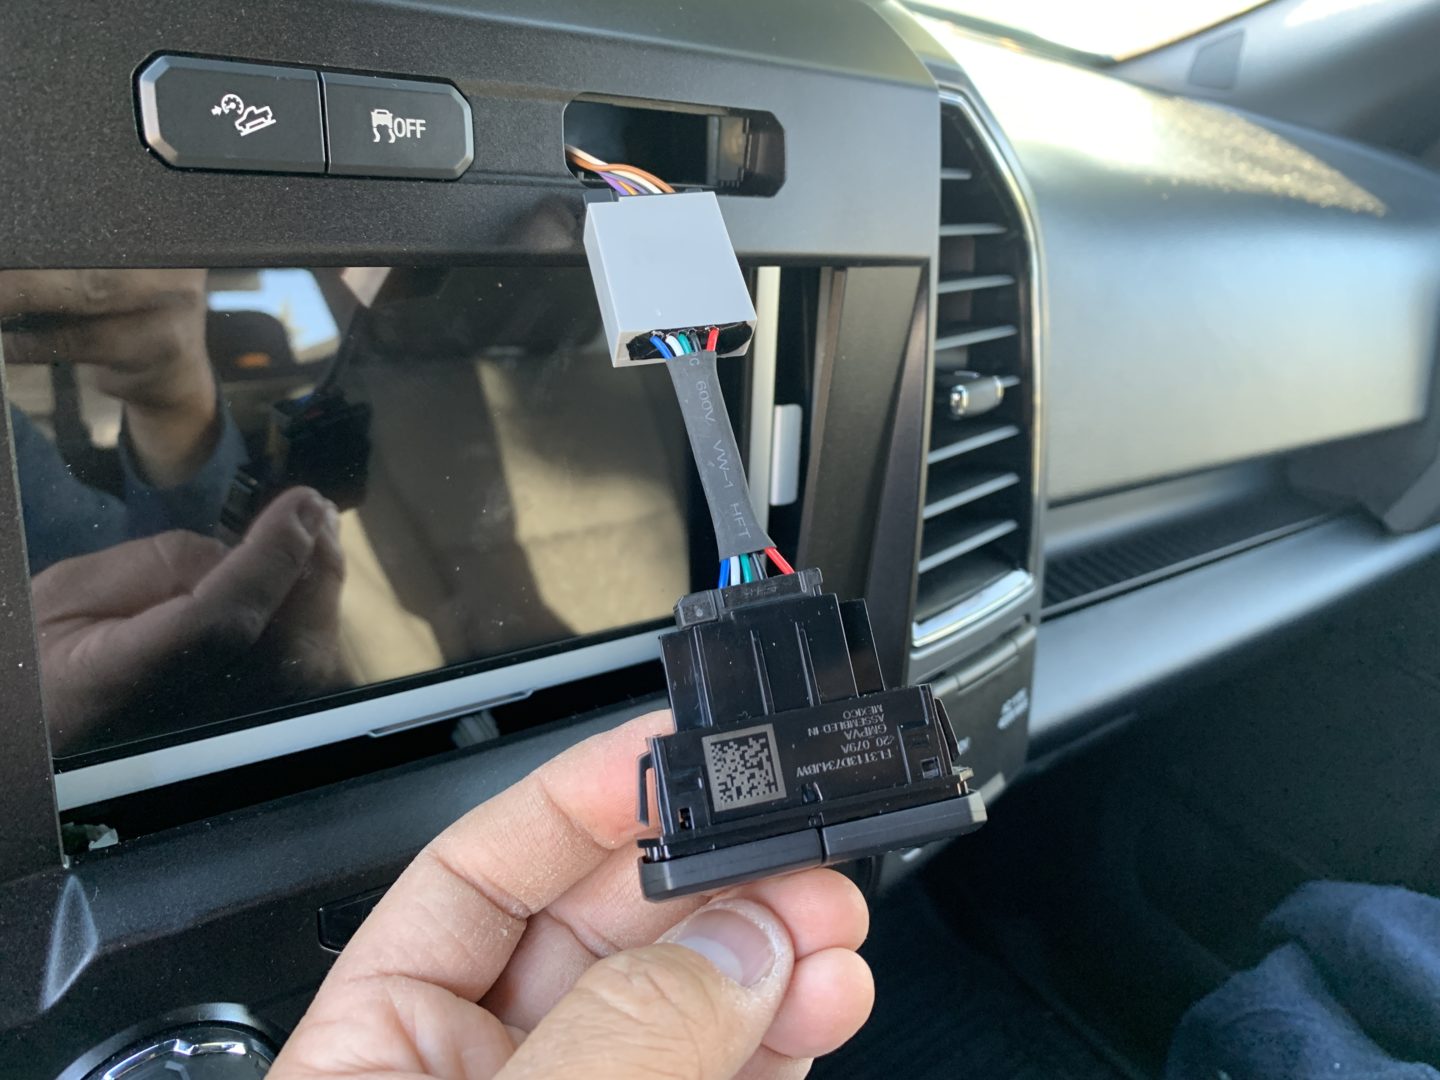
To install the auto start stop eliminator, you will need access to behind the auto start-stop switch. Pop up the front of the dashboard tray located above the switch location using a trim tool. Although a trim tool is plastic, you should still try to protect your trim when prying with the trim tool. Pulling up on the tray requires a good amount of force. The front portion of the tray is held in place with three tabs.
Once you’ve pulled the front of the tray up, remove the (2 qty) 7mm screws located underneath. Usually smaller 1/4″ drive socket sets will have the smaller 7mm size you need. Pull back on the front trim piece until it comes loose. Press inwards on the two tabs behind the switch and it will be released from the bezel.
Disconnect the electrical connector and plug it into the Auto Start Stop Eliminator. Then on the other end of the Auto Start Stop Eliminator, plug it into the back of the auto start-stop switch. Replace everything back in place and you’ll have permanently and safely disabled the Auto Start-Stop feature.
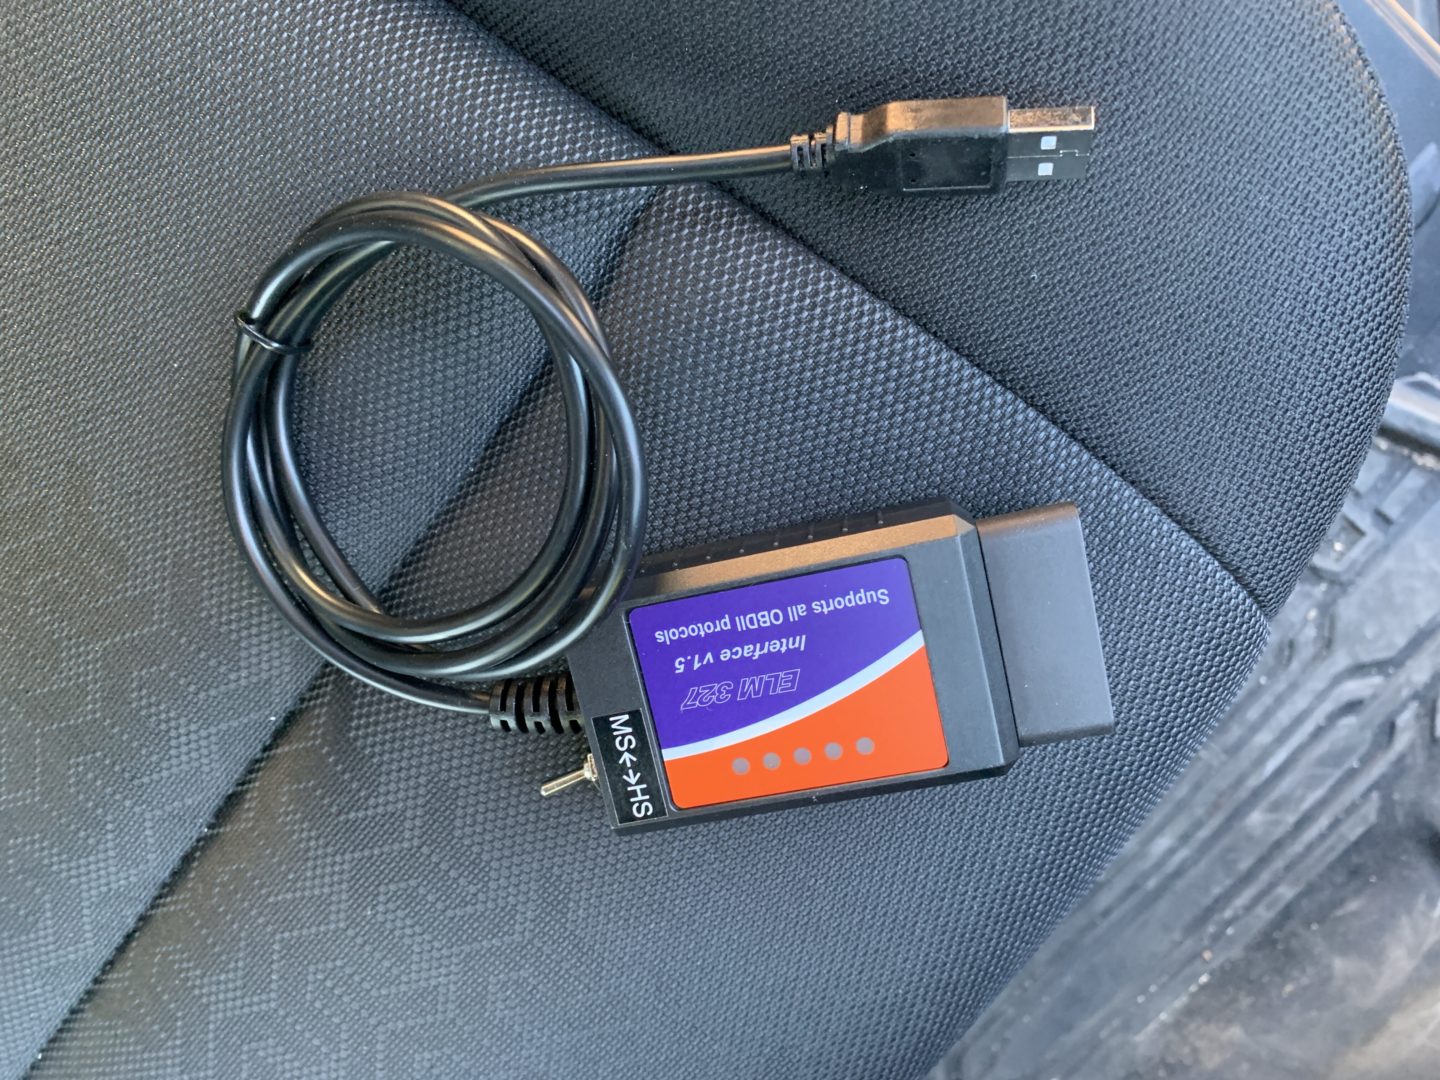
8. Plug device into the OBD II port to disable auto start-stop using FORScan software
Using an OBD II link adapter plugged into your diagnostic port and using the FORScan software, you will be able to disable the Battery Monitoring System (BMS), which will in turn disable the auto start-stop feature. This is the equivalent to Option 3, which is disconnecting the BMS connector from the negative terminal of the battery, but it also offers some other features to disable the light on the auto start-stop switch and the warning prompt on the instrument cluster. However, it still disables the BMS, which is not ideal if you want the smart battery monitoring/management features to still work.

If you plan to use FORScan, you will need to program the following codes to disable BMS, which in-turn disables auto start-stop:
| Feature Name | Module | Address | Value change | Value change | Value change | Notes |
|---|---|---|---|---|---|---|
| Auto Start/Stop Disable – by disabling BMS (Battery Management System) | BCM | 726-48-02 | x0xx | xxxx | xxxx | |
| Auto Start/Stop Disable – by disabling BMS (Battery Management System) | FCIM | 7A7-01-01 | xxxx | x0xx | xxxx | (optional – disables switch) |
| Auto Start/Stop Disable – by disabling BMS (Battery Management System) | IPC | 720-01-01 | xxxx | 1xxx | xxxx | (optional – disables stop/start message center in the trip/fuel IPC menu) |
The full public spreadsheet for 2015-2020 Ford F-150’s FORScan codes is available here.
Here are some of the most popular FORScan adapters you can purchase on Amazon that will work with the FORScan software. For an in-depth tutorial on using FORScan, I will be posting that here when it is complete.
FORScan ELM327 OBD2 USB Adapter
OBDLink EX FORScan OBD Adapter
9. Plug device into the OBD II port that memorizes the last auto start-stop setting
This is another non-invasive device that simply plugs into the OBD II port and memorizes the last start-stop setting of the auto start-stop switch. This is easier to employ than the Auto Start Stop Eliminator that plugs into the back of the switch because you don’t need to get inside the dashboard.
This OBD II device simply plugs into the OBD II port that is located in the driver’s side footwell. Aside from the ease of installation, the device also maintains the use of the auto start-stop switch on the dashboard. This product used to be more expensive than the other auto start stop eliminators that plug into the back of the start/stop switch, but now is about the same price (~$100). Sometimes, you might need to use the OBD II port; luckily this device is easy to remove as you just need to disconnect it from the port.
4Dtech OBD2 Auto Start/Stop Eliminator
There are a couple things to note for these devices. First, this device is programmed to memorize the last setting of the auto start-stop function rather than disabling the function altogether.
The second thing is that I’ve sometimes heard people say you shouldn’t leave anything plugged into the OBD II port permanently. This is because OBD II ports are normally always powered on and therefore leaving a device plugged in all the time can potentially drain the battery. However, if you drive your vehicle regularly (which constantly recharges you battery), this may not be an issue at all.
Comparing Options to Permanently Disable Auto Start-Stop on the 13th Generation Ford F-150
| Type | Option | Ease of Modification? | Allows Use of Start-Stop Button? | Disables Other Vehicle Features/Functions? | Cost |
|---|---|---|---|---|---|
| Behavioral Alteration | 1. Press the auto-start stop button every time you start the vehicle | N/A: No vehicle modification required | Yes | No | $0 |
| Behavioral Alteration | 2. Don’t depress the brake pedal all the way when stopped | N/A: No vehicle modification required | Yes | No | $0 |
| Unplug Connector | 3. Unplug BMS connector from negative terminal of car battery | Easy: unplug connector under hood | No | Yes, BMS functions | $0 |
| Unplug Connector | 4. Unplug trailer wiring connector in driver’s side footwell | Easy: unplug connector inside cabin | No | Yes, trailer lights, safety features | $0 |
| Physical/Electronic Modification | 5. Jumper two leads behind auto start-stop switch inside dashboard | Medium: remove trim to gain access behind switch | No | No | $0-$5 |
| Physical/Electronic Modification | 6. Plug a trailer light test plug into the trailer towing connector | Easy: insert test plug into trailer connector rear of truck | No | Yes, trailer lights, safety features | $10 |
| Physical/Electronic Modification | 7. Plug an auto start-stop eliminator module behind auto start-stop switch inside dashboard | Medium: remove trim to gain access behind switch | Yes | No | $50-$100 |
| Physical/Electronic Modification | 8. Plug device into the OBD II port to disable auto start-stop using FORScan software | Hard: easy to insert OBD II device into OBD II port, but requires FORScan software and programming the vehicle properly | No | Yes, BMS functions | $20-$60 |
| Physical/Electronic Modification | 9. Plug device into the OBD II port that memorizes the last auto start-stop setting | Easy: insert device into OBD II port in cabin | Yes | No | $100 |
Conclusion on Permanently Disabling Auto Start-Stop on the 13th Gen Ford F-150
From this post, you’ve seen that there are lots of different options out there for permanently disabling the auto start-stop feature on the 13th generation Ford F-150’s. In my opinion, if you can get away without modifying your vehicle at all, then I would go this route. This means everytime you get in your car, press the start/stop button in the center dash. If you can do this everytime, then you’ve eliminated the problem without spending a dime.
Best options without modifying: Option 1
If you just can’t make the driving behavior change as mentioned previously, then my recommendation is to go with a plug-in device that goes into the back of the auto start-stop switch or into the OBD II port. Not only are these safer options as they should be developed, manufactured, and tested by these companies selling the product, but they also are easily reversible and still maintain function of the auto start-stop switch if you need it. Another plus is that there will be no trace of it for warranty purposes if that is a concern of yours. The only downside is that these products can be a bit pricey, so you can expect to spend somewhere between $50-$100 for these types of devices.
I would also include the disconnecting of the BMS connector from the negative terminal of the battery as a recommended option. This solution is very easy to do, and should not affect the safety features/functions of the vehicle. The only thing affected is the BMS system, which may reduce the life of the battery; but many folks compare the disabling of the BMS system to reverting back to a traditional car battery system. So, you may lose out on the newer smart battery monitoring/management features, but the vehicle should generally operate the same as if you did not disconnect it. Finally, it’s very easy to reconnect the BMS connector to return it to its original condition should you need to.
Last is the disabling of the BMS via FORScan. I wouldn’t recommend this if you are not technologically familiar with the programming as it can be easy to screw things up if you’re not careful. However, it is a more elegant solution to disabling the BMS rather than leaving the BMS connector unplugged at the battery.
Best options with modification: Options 7, 8, 9
I would not recommend going with any of the other options as they either disable certain safety features of the vehicle or may lead to potential hazards later down the road. These options include jumpering the auto start stop switch, and the other two options for dealing with the trailer/towing operations.
")
")


")


")
: 13th Gen Ford F-150")
4 Comments
Option five doesn’t work!
Glad I wasted three hours!
It actually worked for me, but I also noted at the bottom of my post that I don’t recommend this option. Some of these options are more temporary fixes, but still very popular options that many F150 owners still use.
Scott, I’m amazed at the level of care you put into this article. This is super helpful as I’m researching 13th gen F-150s to purchase for work.
The internet has a definite issue with quality these days, it is becoming more important to find reliable websites and bookmark them for future use. I just did for this one.
Thanks!
Glad it has helped you! I totally understand the issue with data quality online these days, so I only hope to do my best research on these topics and provide that info to you, the reader. Thanks for the kind words.