When you make purchases through links on this site, The Track Ahead may earn an affiliate commission. Also, these posts are based off my own experiences. I am not responsible for any action you take as a result of reading this. Learn More
Replacing the brake pads and brake rotors on the 5th generation Honda Odyssey (years 2018-2024) is a rather straight-forward process and is very similar to what you’d expect on most of other cars that have disc wheel brakes on four wheels. The only thing that is a bit different is if you’re not used to working with the electric parking brake (also called the EPB), which can be found on newer vehicles.
If you don’t handle the electric parking brake properly, you can manage to damage it when you’re installing new brake pads. However, I will show you how to safely remove and retract the parking brake so that you can install new brake pads. And of course, I’ll be providing a step-by-step guide to replacing the brake pads and rotors on the 5th gen Honda Odyssey.
There are a number of reasons that you might want to change your brake pads and/or rotors. The obvious one is if your brake pad level is low, or if you’ve worn down your brake pads completely, you’ll hear a metallic grinding noise from the backing pad of your brake pads.
However, on these vehicles many people experience vibration when they brake (especially at high speeds or under heavier braking.) The solution to this is usually to replace both brake pads and brake rotors. Unfortunately, this seems to occur far earlier than the expected replacement interval for the brakes. If you experience this shaking or vibration issue on your 2018-2024 Honda Odyssey, you’re not alone.
Shaking/Vibration When Braking on the 5th Gen Honda Odyssey
Personally, I’ve replaced the brake pads and rotors on my Honda Odyssey not because the brake pads were wearing low, but because of the vibration I had when I pressed on the brake pedal. The shaking in the brake pedal was more pronounced when I was braking hard especially going downhill. This issue is quite common on these vehicles as you find reports of 5th gen Honda Odyssey (2018-2024) owners experiencing these issues only a few years into owning their new vehicle.
Generally, a common reason for feeling vibration while braking is because the brake rotors are “warped”. This can happen due to overheating of the brake rotors or from uneven wear on the rotors over time. This term is also used to describe uneven transfer of brake pad deposits onto the brake rotor.
This phenomenon called pad transfer, leaves the surface of the brake rotor unsmooth. Because of this now uneven surface on the brake rotor, the car will shake/vibrate when the brake pad contacts the rotor during braking.
The only solution to this issue is to replace the brake pads and either resurface or replace the brake rotors. If you compare the cost and convenience of resurfacing your existing brake rotors versus buying new ones outright, it almost always makes sense to buy new brake rotors. It is also best practice to do a bedding procedure after installing new brake pads/rotors, which involves performing a series of brake applications in order to transfer a thin, but even layer of brake pad material onto the brake rotors. This prevents the issue of uneven brake pad material transferring onto the rotors later down the road.
This write-up will guide you through the process of replacing the brake pads and the brake rotors on the 5th Gen Honda Odyssey (years 2018-2024), as well as how to safely remove and reinstall the electric parking brake on the rear. Finally, I’ll provide a brake bedding procedure to ensure you minimize the chance of vibration, resulting in premature replacement of your brakes in the future.
Tools/Materials for this Job
Brake Pads and Rotors
Probably the most popular brand for brakes for the 5th generation Honda Odyssey (2018-2024) is PowerStop. They’re a reputable brand and are available at most retailers that sell brake parts. Some of the other reputable brands that offer both brake pads and rotors for our vehicles is Wagner, Raybestos, Centric, and Bosch amongst others.
PowerStop Brakes
PowerStop offers both brake pads and rotors separately, but they also make it easy to order them together in a bundle (e.g. front brake pads and rotors, rear brake pads and rotors, all brake pads and rotors.) Because of the many choices that PowerStop offers, it can be a bit confusing to differentiate one from another. Here is a breakdown of the various products that they offer.
Essentially with the PowerStop brake pads, they offer the Z26, Z23, Z17, and Z16 brake pads for the 5th generation Honda Odyssey. The Z26 are meant for high performance (strangely, only offered for the rear), Z23 is for a performance upgrade for a daily-driver, and Z17 and Z16 are actually the same daily-driver “stock replacement” brake pads but the Z17 includes brake hardware while the Z16 does not.
PowerStop Brake Pads
Z26 Street Performance Carbon-Fiber/Ceramic: Rear (Z26-1698)
Z23 Evolution Sport Carbon-Fiber/Ceramic: Front (Z23-2089) / Rear (Z23-1698)
Z17 Evolution Plus Ceramic: Front (Z17-2089) / Rear (Z17-1698)
Z16 Evolution Ceramic: Front (Z16-2089) / Rear (Z16-1698)
For PowerStop brake rotors, there are quite a few different options just like with the brake pads. There is the standard semi-coated brake rotors (good corrosion resistance), the Evolution Geomet coated (excellent corrosion resistance), and the Extreme Performance which is a drilled and slotted rotor (also with excellent corrosion resistance.) Also, the better corrosion resistant rotors will look better in the long run as you won’t have as many corroded (i.e. rusted) parts visible through the wheel.
PowerStop Brake Rotors
Semi-Coated: Front (JBR1590SCR) / Rear (JBR1756SCR)
Evolution Geomet Coated: Front (JBR1590EVC) / Rear (JBR1756EVC)
Extreme Performance Drilled & Slotted: Front (JBR1590XBR) / Rear (JBR1756XPR)
Finally, if you want to make things easy, you can simply get a brake pad and rotor kit. Most brake manufacturers don’t offer this, but PowerStop offers a few options. These options offer something different for everyone, but if you’re looking for a stock replacement with good braking ability, you can go with Z17 Stock kit. The Z17 Evolution Geomet Kit will come with the better corrosion resistant brake rotors. The Z23 kit has the upgraded brake pads, as well as the drilled and slotted rotors. Finally, there is a Z26 performance kit that is only offered for the rear, but is supposed to have the best braking ability out of these options.
PowerStop Brake Pad & Rotor Set
Z17 Stock Replacement Kit: Front & Rear (KOE7923) / Front (KOE7670) / Rear (KOE7903)
Z17 Evolution Geomet Kit: Front & Rear (CRK7923) / Front (CRK7670) / Rear (CRK7903)
Z23 Evolution Sport Brake Upgrade Kit: Front & Rear (K7923) / Front (K7670) / Rear (K7903)
Z26 Street Warrior Performance Kit: Rear (K790326)
Wagner, Raybestos, Centric Brakes
These brakes are some of the other popular brands for brake parts and I name these specific ones because they are well-known brands in the industry. They all offer both brake pads and brake rotors, as opposed to other manufacturers who may only offer one or the other. I don’t think you can go wrong if you go with any of these brake pads/rotors as long as they are the correct fitting ones.
Raybestos
Element3 EHT Ceramic Brake Pads: Front (EHT2089H) / Rear (EHT1954H)
Element3 Coated Brake Rotors: Front (981053FZN) / Rear (982311FZN)
Centric
Posi Quiet Ceramic Brake Pads: Front (105.60120) & Rear (105.19540)
Plain 120 Series Brake Rotors: Front (120.40092) & Rear (120.40099)
Wagner
QuickStop Ceramic Brake Pads: Front (ZD2089) / Rear (ZD1954)
Honda OEM Brakes
Finally, you can always stick with OEM (Original Equipment Manufacturer) brakes as you can guarantee that they will be a perfect fit and of decent quality. I would normally say you can always trust OEM parts, but as I’ve mentioned at the beginning of this post, there seem to be quite a number of 5th generation Honda Odyssey owners who have experienced brake vibration while braking.
Given that this seems to be a recurring issue, it seems like it could be due to the OEM brake pads. Furthermore, it seems that there was a change in the rear OEM brake pad design (part number 43022-TZ5-A11 replaces old part number 43022-TZ5-A10), which leads me to believe that there could have been an issue with the previous rear brake pad design.
Honda OEM Brake Pads: Front (45022-THR-A01) / Rear (43022-TZ5-A11)
Honda OEM Brake Rotors : Front (45251-TK8-A02) / Rear (42510-THR-A00)
As you can see, there’s plenty of options to choose from with brake pads and brake rotors and you should choose what you think is best for you. PowerStop certainly makes it easy to buy the parts individually or as a bundle. Personally, I prefer blank rotors (no slotted, no vented, no cross-drilled, etc.) and a good set of ceramic brake pads. I don’t really need anything “high performance” as I usually feel that modern day stock/OEM brakes are quite good already. Since the aftermarket options perform well and cost less than OEM parts, I ended up going aftermarket.
Floor Jack
BIG RED Torin Low Profile Aluminum/Steel Floor Jack, 1.5 Ton (3,000 lb) Capacity
Jack Stands
Big Red Torin Steel Jack Stands: 3 Ton (6,000 lb) Capacity, Red, 2 Count
Wheel Chocks
MaxxHaul Rubber Heavy Duty Wheel Chock (2-Pack)
Nitrile Gloves
Any brake job is a dirty job and it makes it so much easier to work when you’re not dealing with dirty hands. Plus, if you’re touching brake dust (possibly carcinogenic), you don’t want to be touching it with your bare hands.
MedPride Nitrile Gloves (Box/100): Small / Medium / Large / X-Large
Mechanics Tool Set
You’ll need a variety of sockets and a ratchet for this job. A mechanics tool set like this one that has sockets going up to 19mm and a 13mm combination wrench will be needed to do the brakes. The tool set should also include a Phillips head bit if you are replacing the brake rotors. If you’re shopping for a mechanics tool set, I recommend taking a look at this guide I put together to help you choose the best one for your needs.
Impact Driver/Cordless Drill
Typically, I do most of my work on cars with hand tools. However, the one thing that really helped on removing the brake rotors was using an impact drill. The impact drill along with a large Phillips bit allowed me to remove the screw holding the brake rotors in place. I initially tried with a Phillips head screwdriver and I just couldn’t break it loose. So hopefully you already have an impact driver (cordless drill might work) since it only helped on this one small part of the job.
DEWALT 20V MAX* Cordless Impact Driver Kit, Brushless, 1/4-inch (DCF787C2)
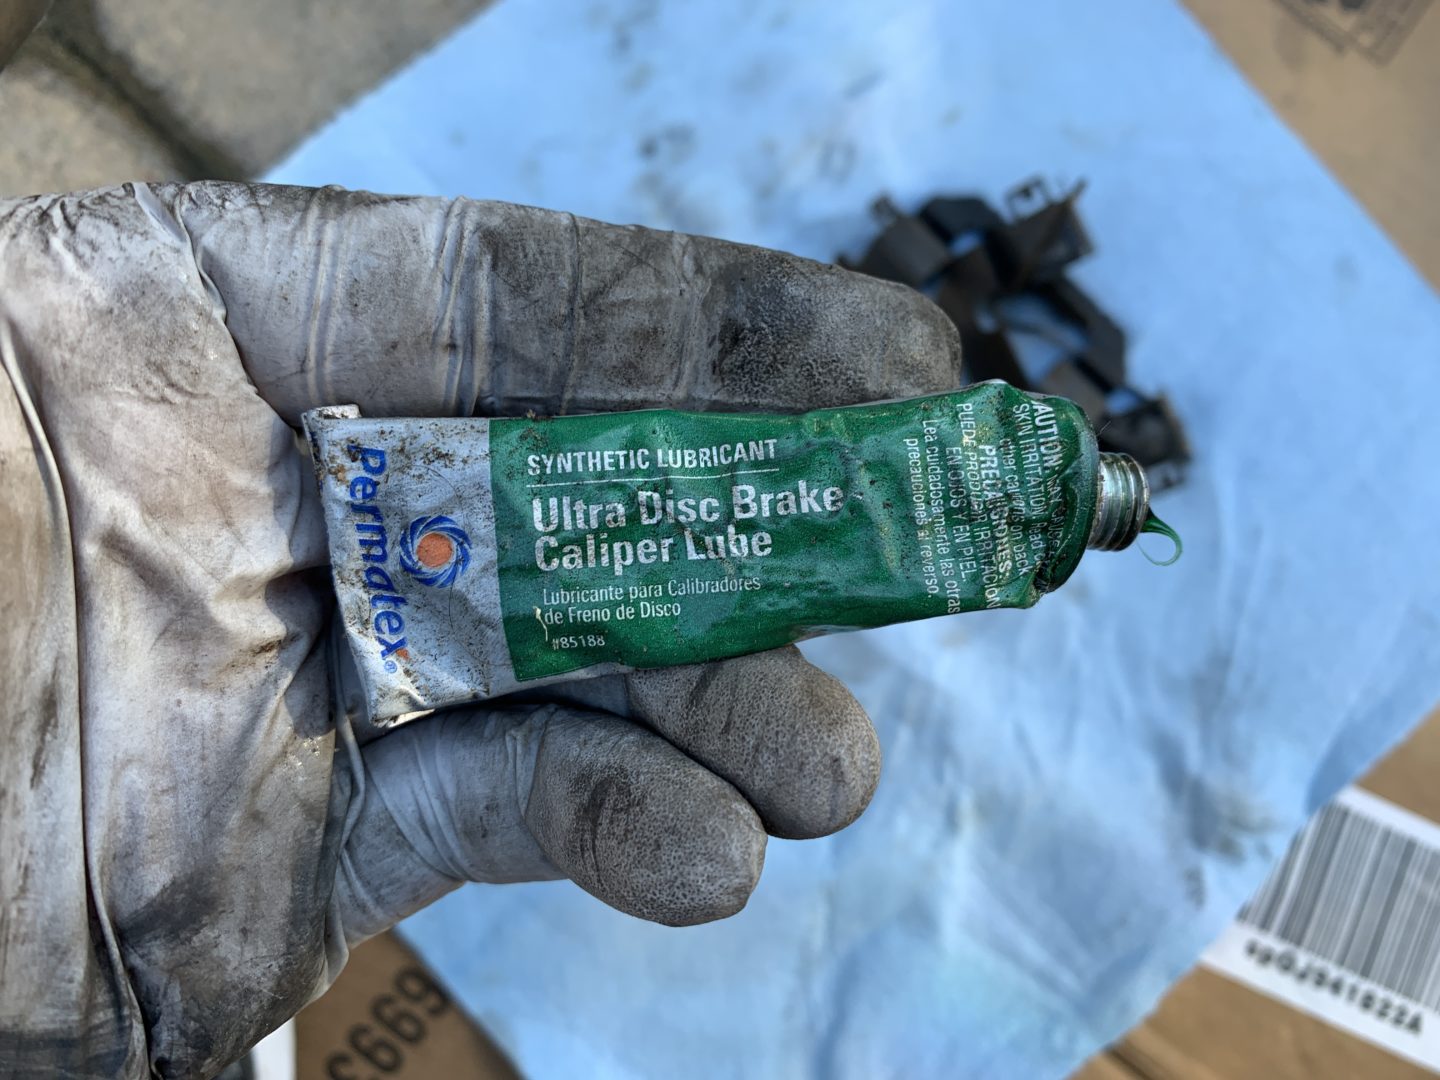
Brake Hardware Lubricant
It’s always a good idea to lube any moving parts in your brake system during a brake job to keep things working efficiently and more quietly.
Permatex Ultra Disc Brake Caliper Lube, 0.5 oz.
Brake Parts Cleaner
Make sure to have plenty of brake parts cleaner on hand. It not only cleans up the mess that is always present when working on brakes, but it is used to keep you safe. Since brake dust has heavy metals and may contain material that is carcinogenic, you want to minimize the amount of brake dust that becomes airborne. Spraying everything down with brake cleaner helps to minimize the kicking-up of brake dust.
CRC BRAKLEEN Brake Parts Cleaner – Non-Flammable -1lb 3 Oz
P100 Respirator
Even if you use brake parts cleaner, it is still possible for you to inhale some brake dust when doing a brake job. So, to ensure you keep yourself safe, consider using a P100 respirator. P100 has better filtration than N95 including filtering out asbestos, which may be found in brake dust.
3M Half Facepiece Reusable Respirator with P100 Particulate Filters
Caliper Piston Compressor Tool (or C-Clamp)
Required for retracting the brake caliper piston so that you can fit new brake pads during installation. You can also use a C-clamp, but it’s a little harder to use as it’s hard to find a flat surface on the brake rotor to clamp against. However, a C-clamp is still doable.
Lisle Dual Piston Brake Caliper Compressor or Irwin 6 in. C-Clamp
Torque Wrench
Sure, you can tighten everything without a torque wrench, but why wouldn’t you for such an important system on your car such as the brake system.
TEKTON 3/8 Inch Drive Click Torque Wrench (10-80 ft.-lb.) | 24330
Torx Sockets/Bits
These Torx socket bits are only needed if you’re working on the rear brakes on this generation Honda Odyssey. The Torx bit is needed to remove the electric parking brake actuator so that you can replace the rear brake pads and rotors.
LEXIVON Torx Bit Socket Set, 13-Piece Star T8 – T60 Set
How to Replace the Front Brake Pads and Rotors
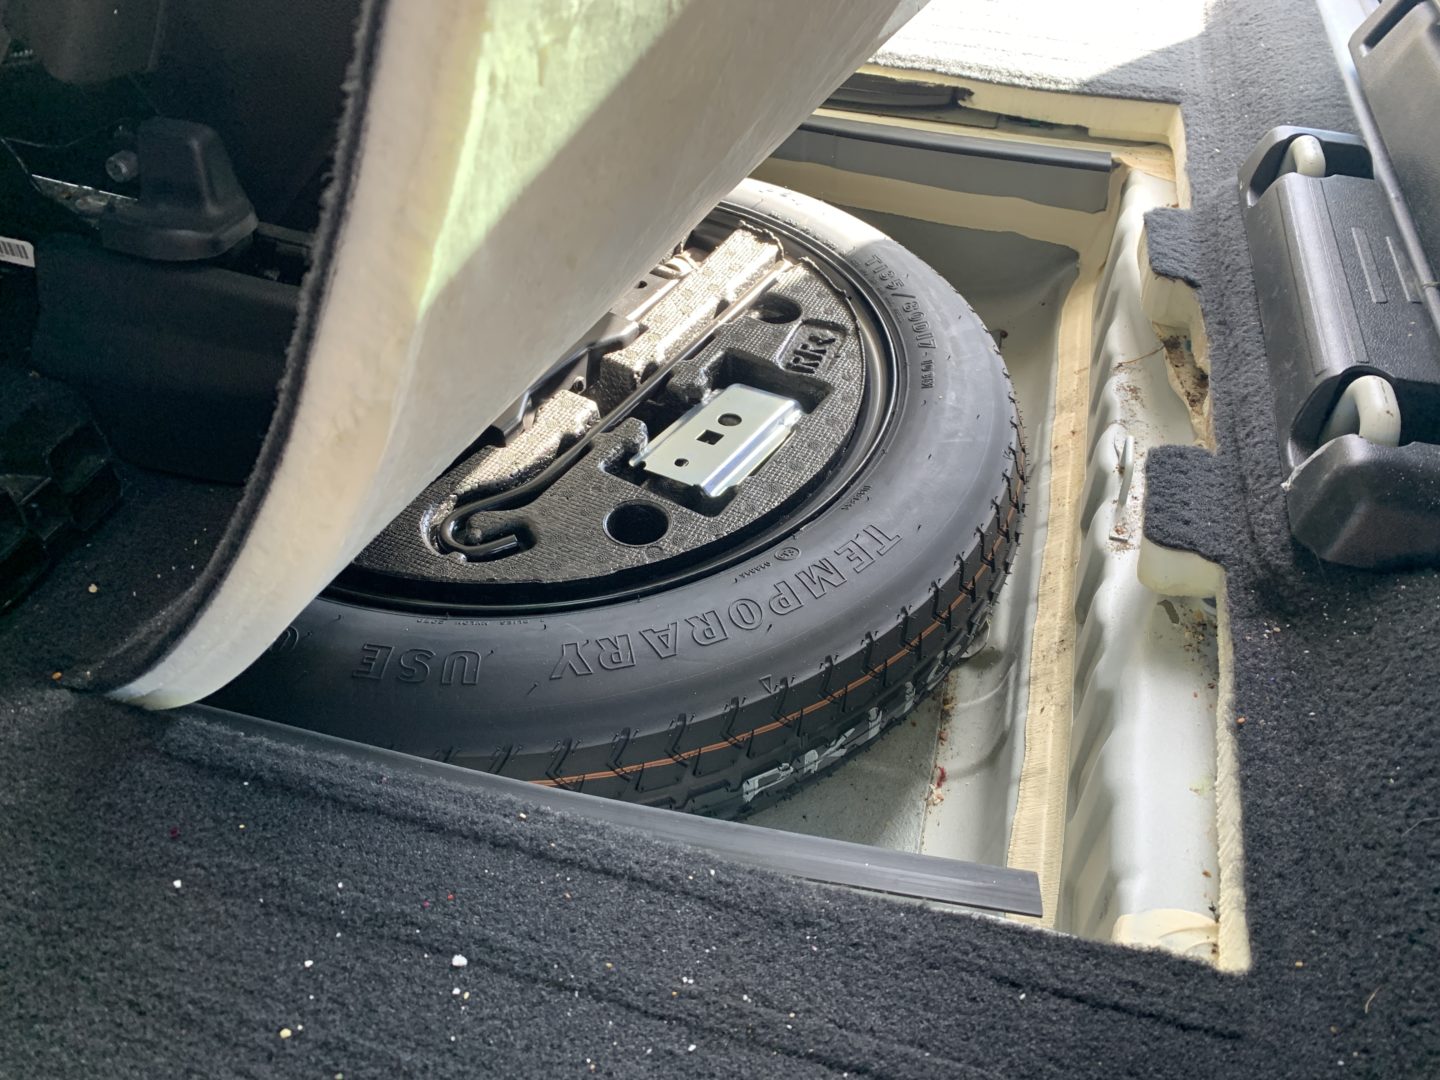
Lug Wrench Location
First, if you don’t know where your spare tire and lug wrench are in the 2018-2024 Honda Odyssey, you can find it inside of the vehicle under the floor board. In the middle row, smack dab in the middle in the floorboard, there is an access door that opens up and gives you access to the spare tire and tools. You’ll need the lug wrench here to remove your wheels in order to complete the brake job. Before jacking up the vehicle, break loose all of your lug nuts first.
Jacking Up The Front of the Vehicle
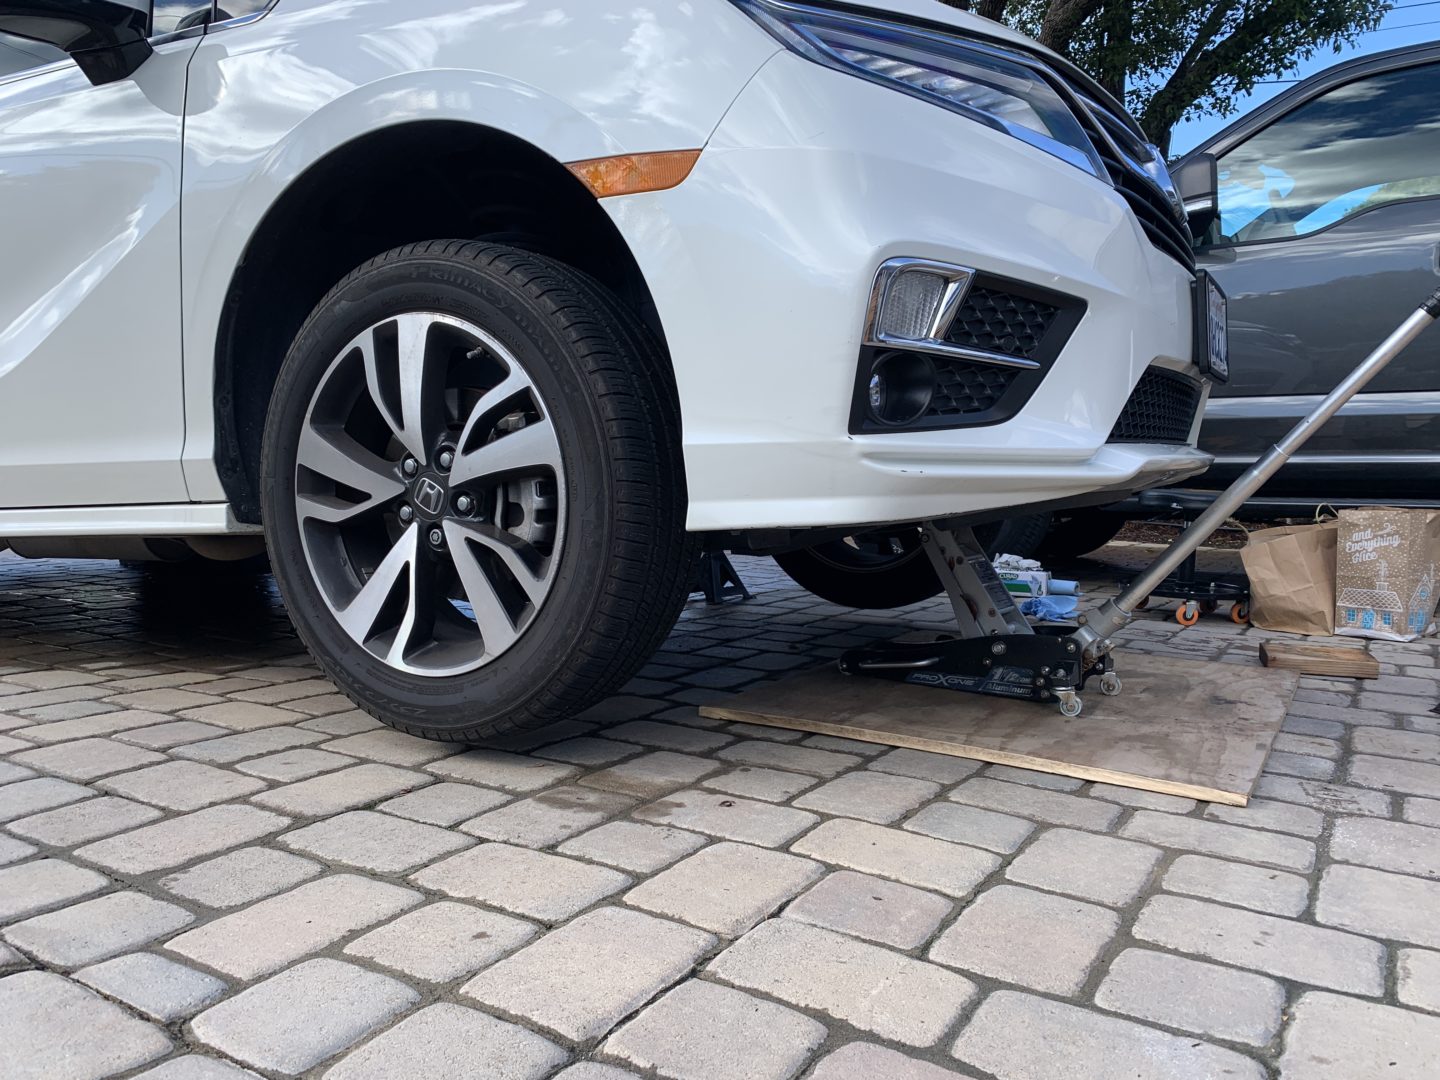
Next, it is easiest to jack up the vehicle with a floor jack so that you can lift up the entire front or entire rear with one lift. I guess it’s possible to jack up the vehicle using the scissor lift jack that comes with the vehicle, but it’ll take you much longer to do.
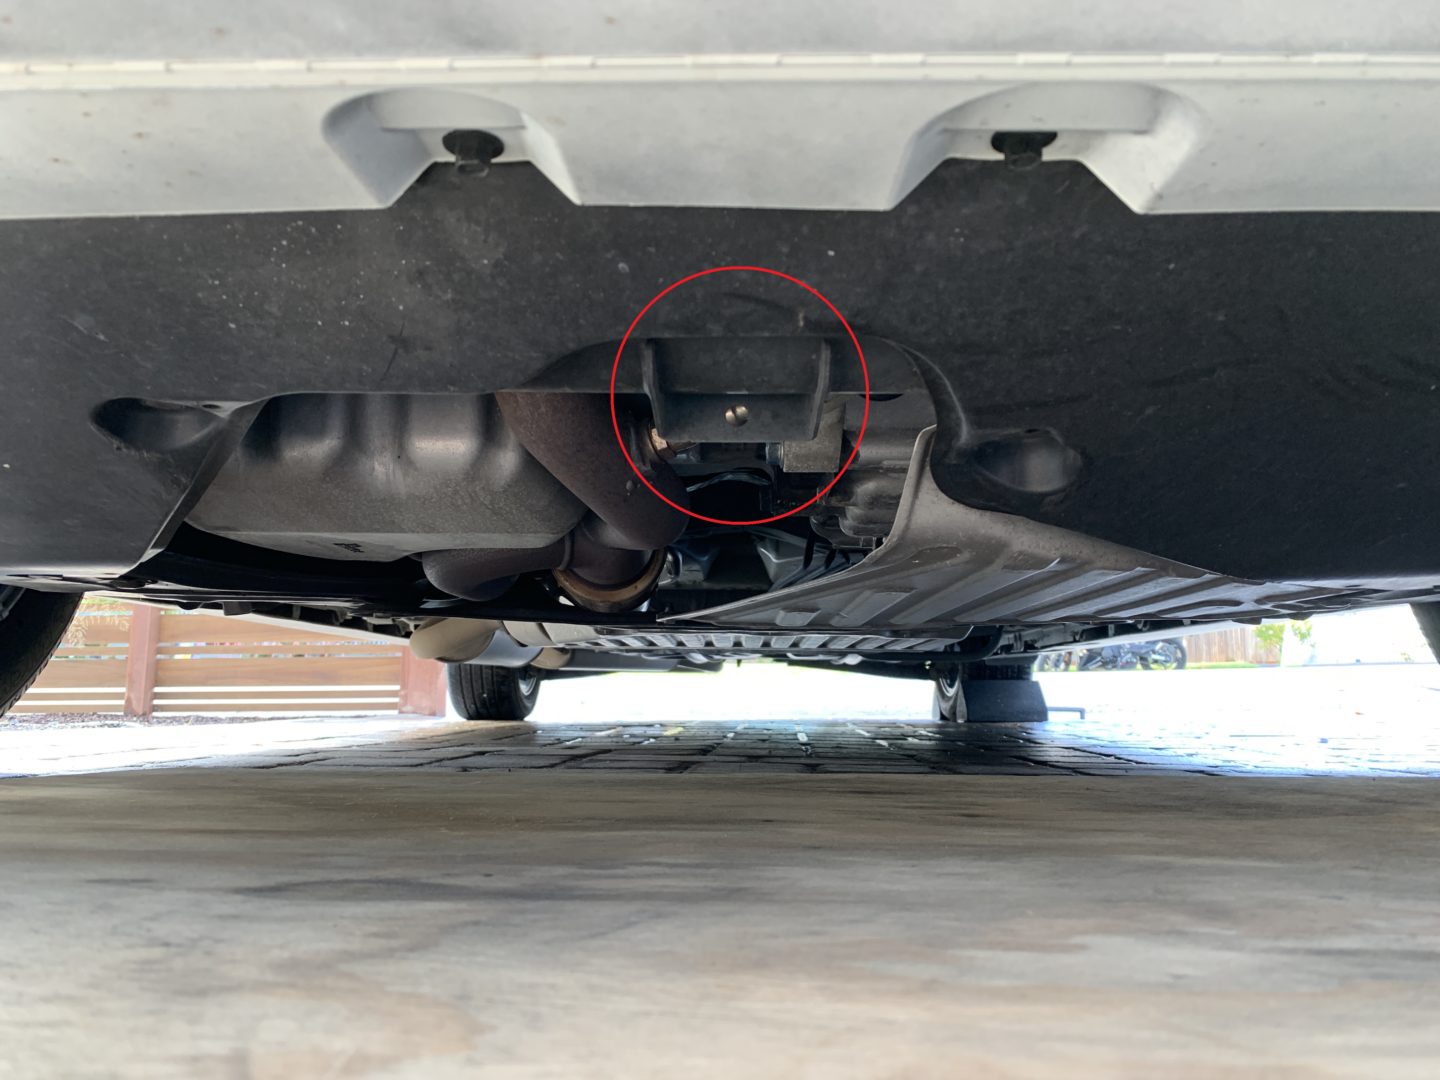
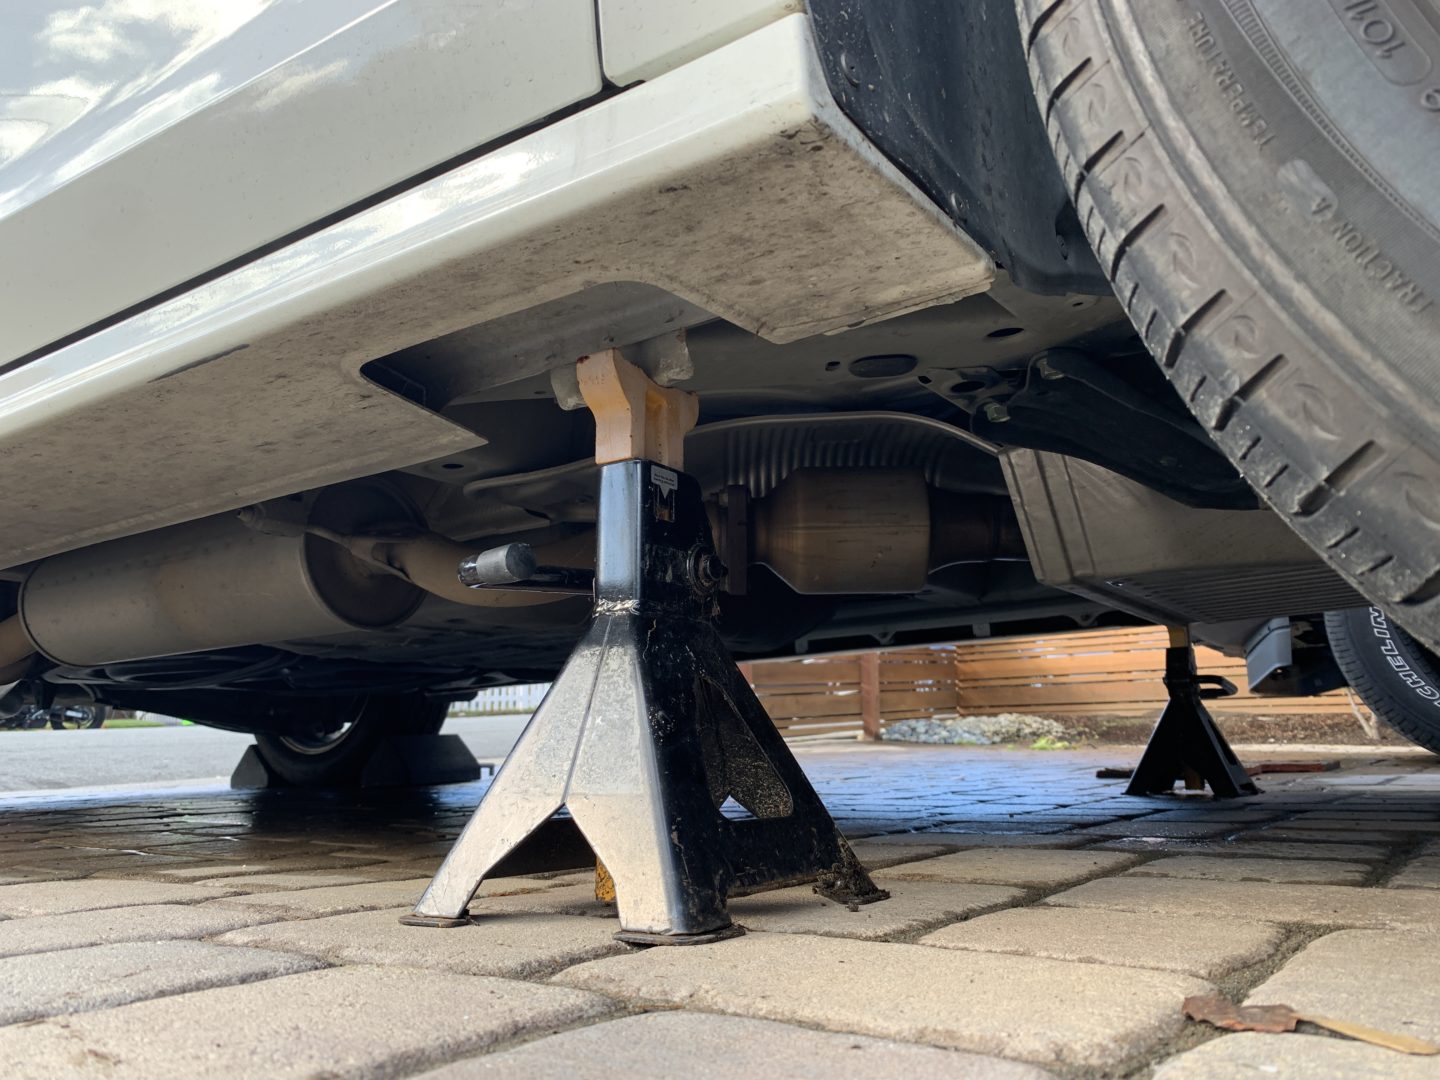
The front of the vehicle has a lift point as shown below. This bracket is called out in the service repair manual as the front jacking point for a floor jack. Ensure you follow all safety protocols like chocking your wheel and placing safety jack stands in the proper locations. The owner’s manual shows you where the jacking points are for the jack stands; I also have more information on the locations on another post.
After the vehicle is on jack stands, remove the lug nuts and the wheels.

Now, you will have access to the front brakes. If you’re only replacing the front brake pads and are not planning to change out the front brake rotors, then skip down to the section on this post where we loosen and pivot up the caliper body. If you are replacing the brake rotors along with the brake pads, proceed with this tutorial.

Replacing the Front Brake Pads and Rotors
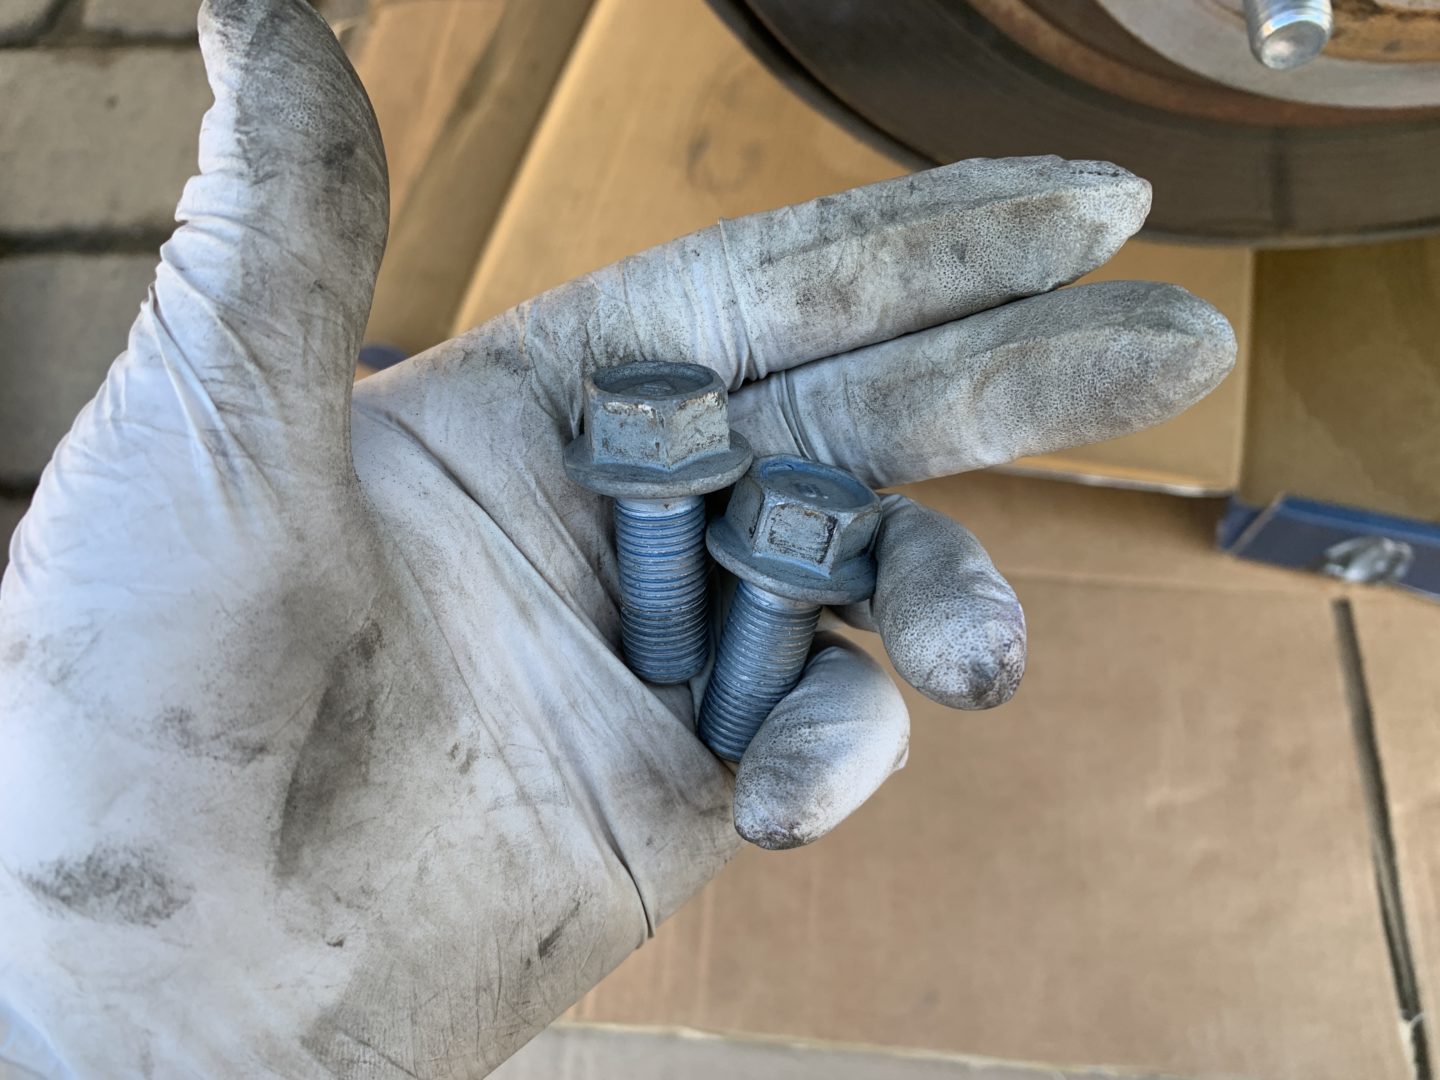
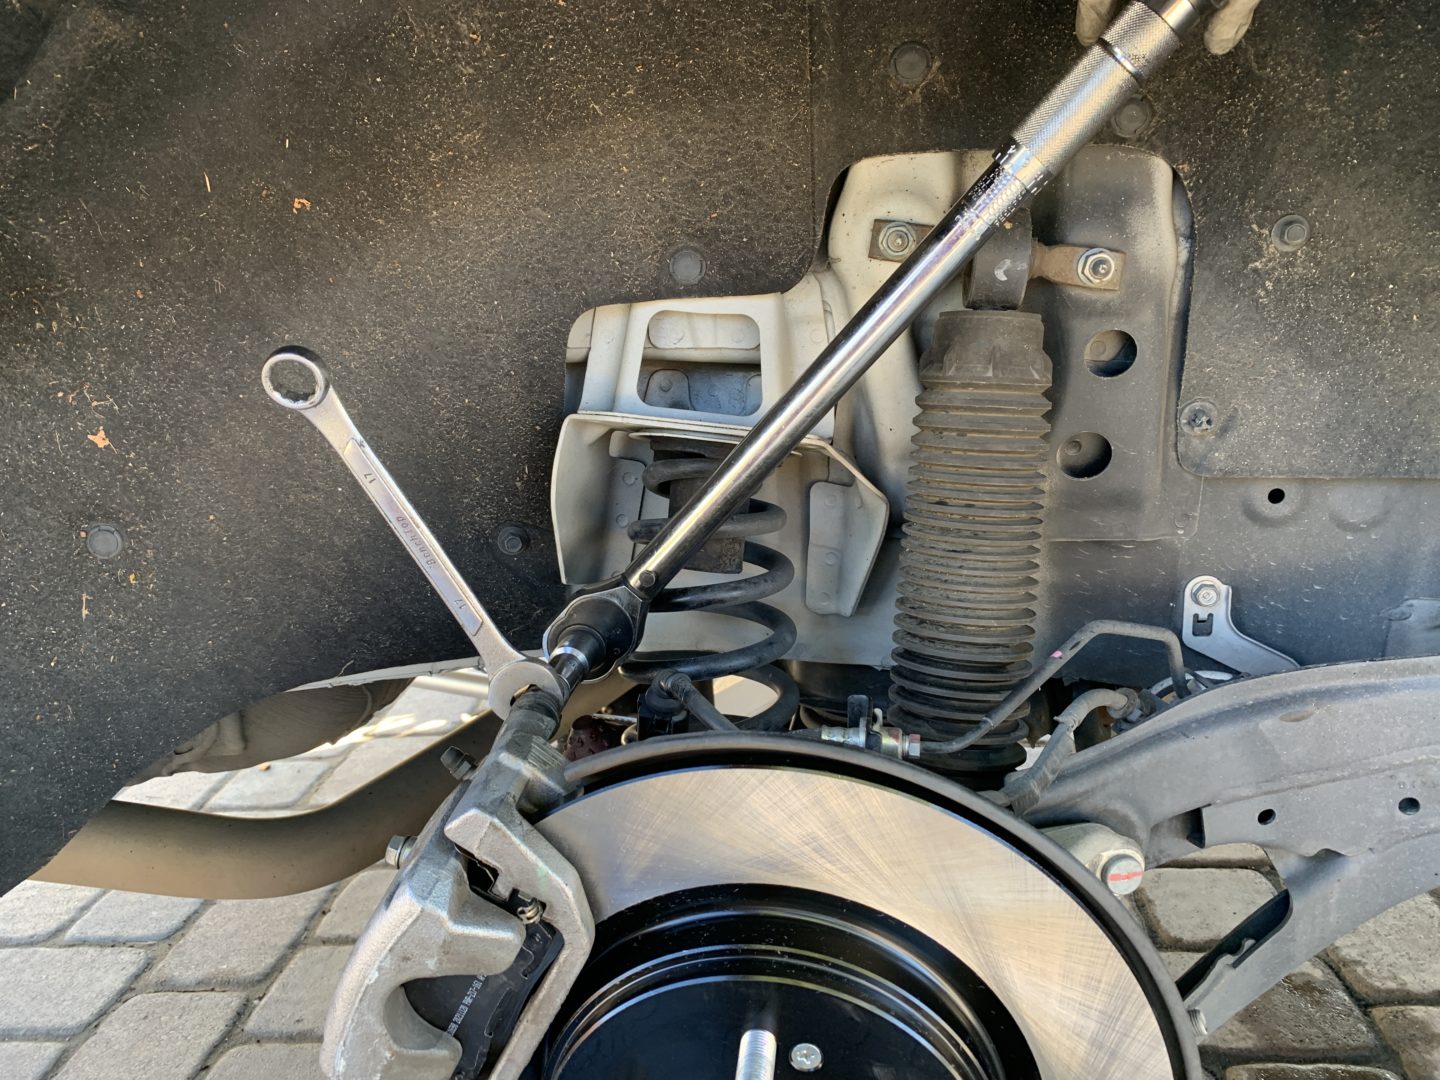
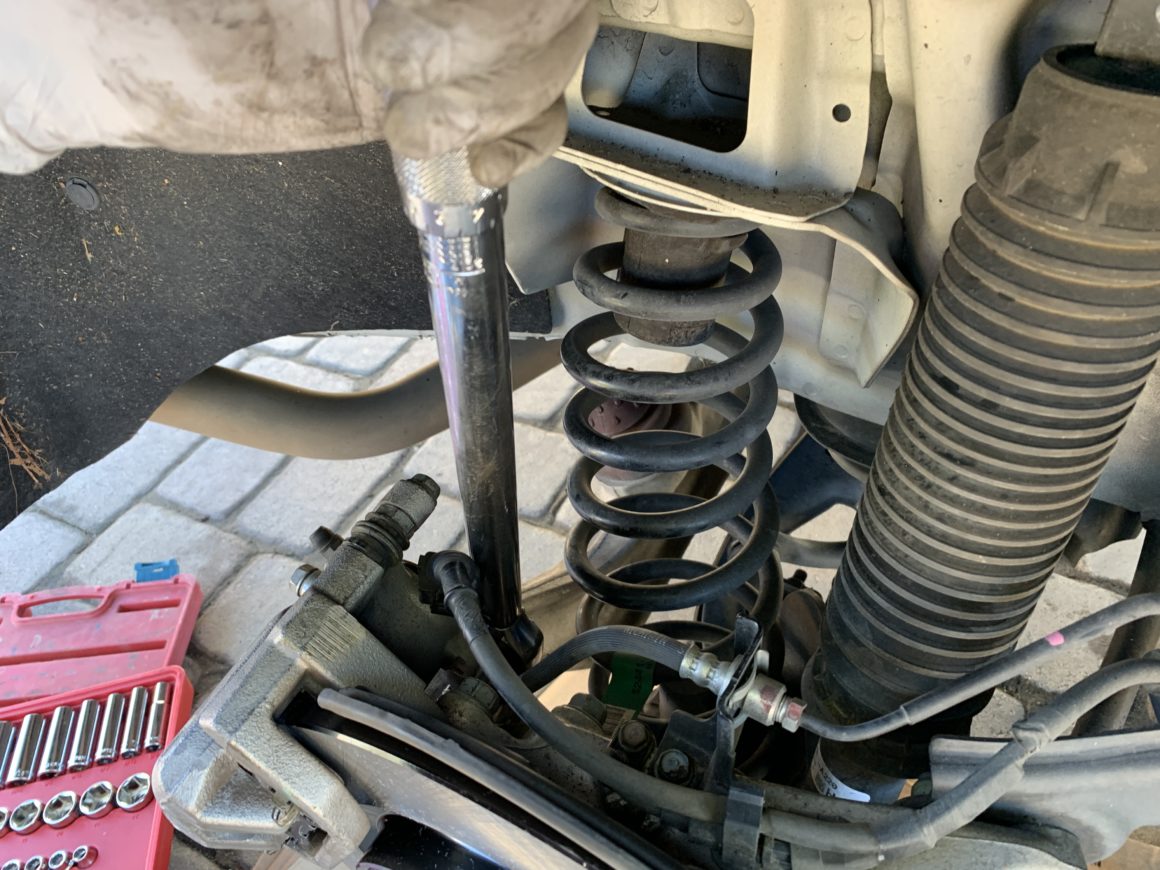
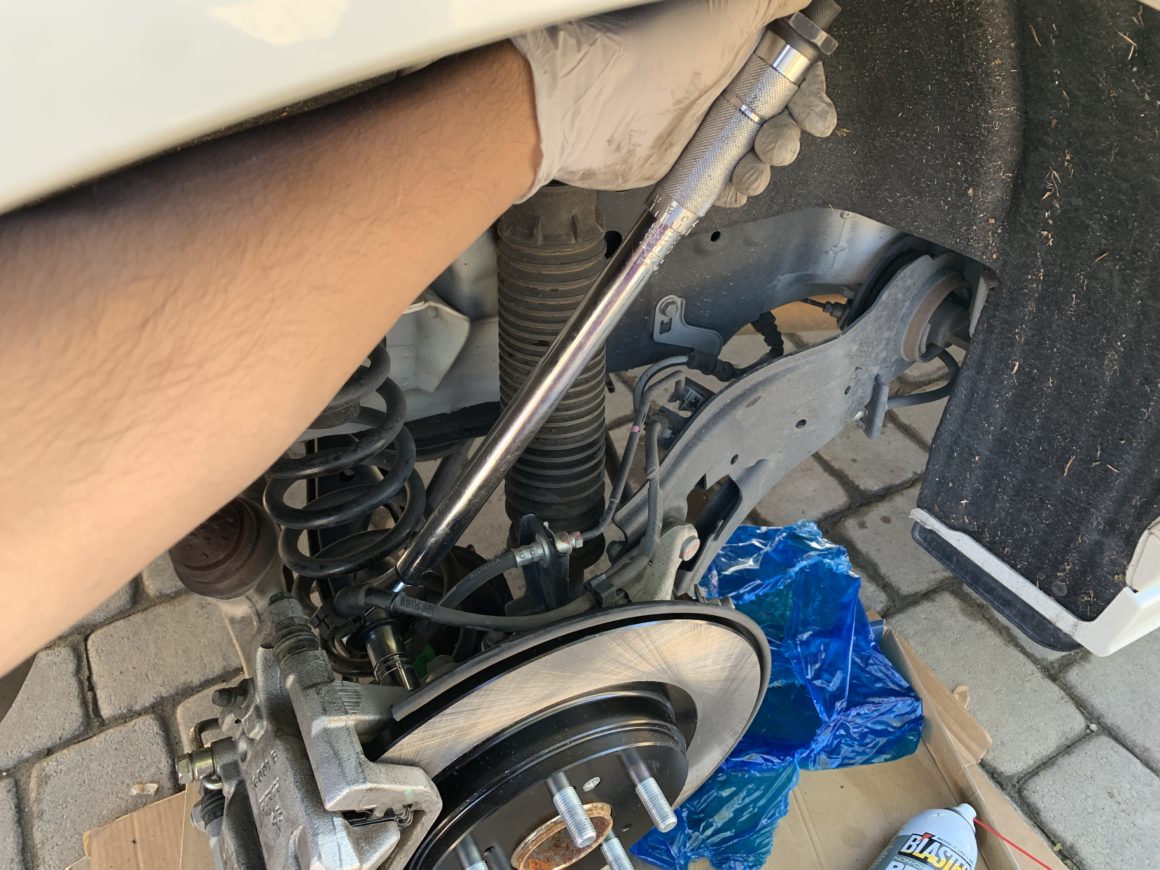
To remove the front brake caliper, you’ll need to remove the (2 qty) 19mm caliper mounting bolts located right behind the brake caliper. A breaker bar works great for breaking these bolts loose, as it may be difficult to do so with a standard length ratchet. These are the only bolts that keep the brake caliper from dropping and possibly damaging the connected brake hose. Use something like a wire to hold the caliper up; I ended up tying it to the suspension spring for support.


If you need some more slack, you can use a 12mm socket to remove the clip that holds the rubber brake hose to the vehicle. It’s not totally necessary, but does help to give you some more flexibility when supporting the brake caliper off to the side.


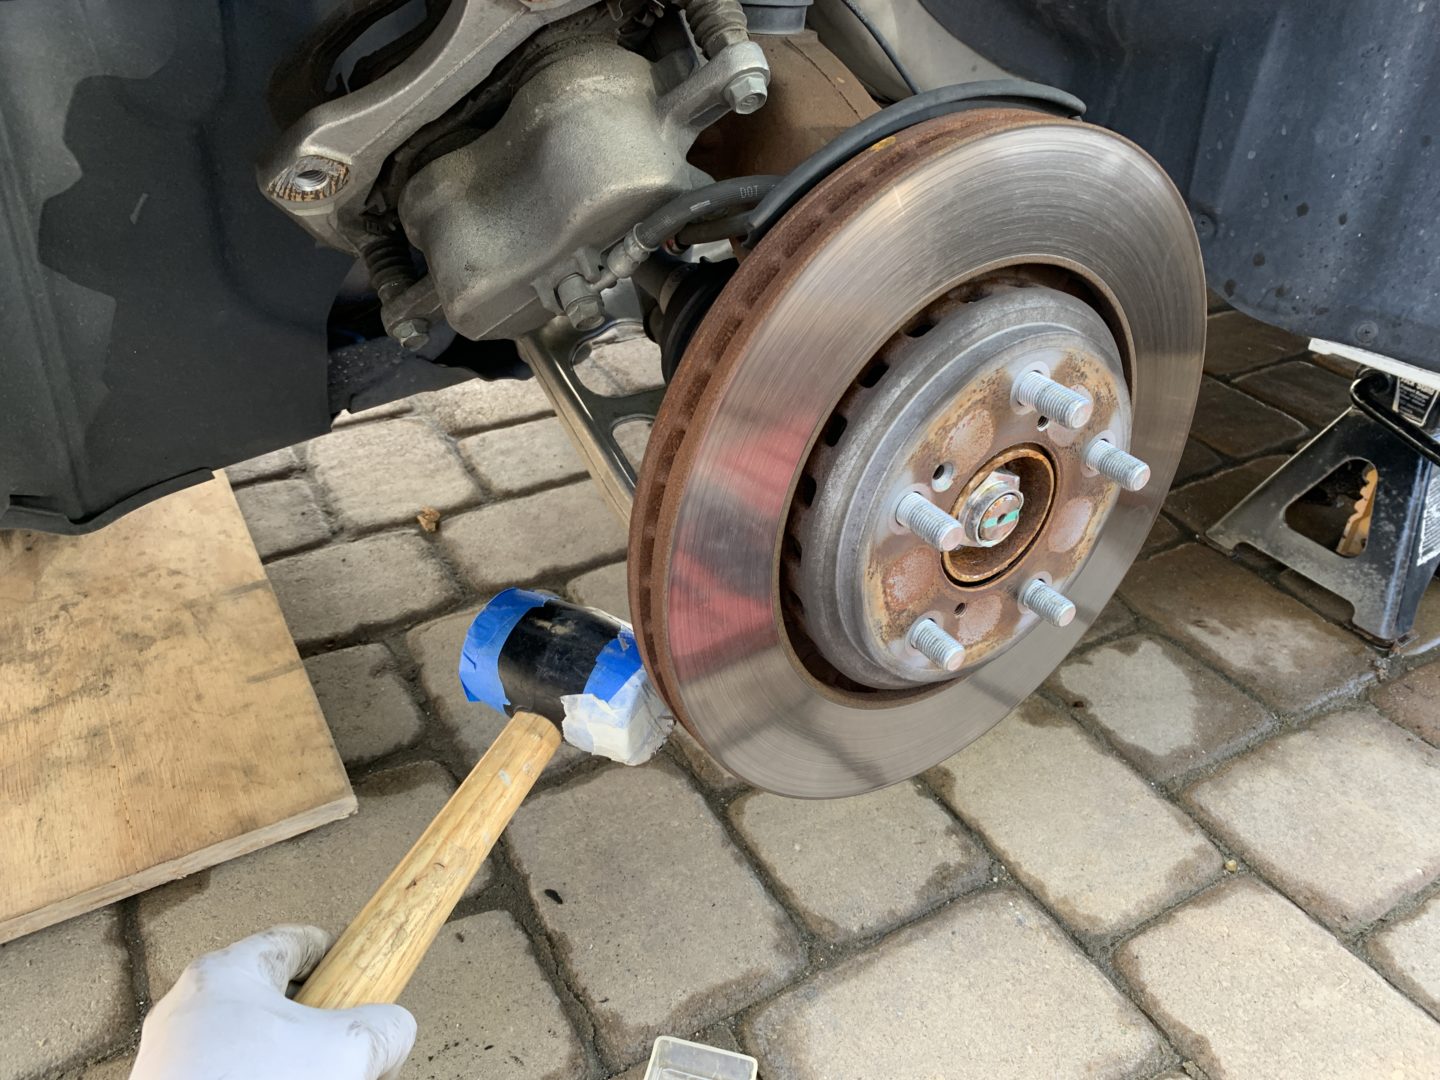
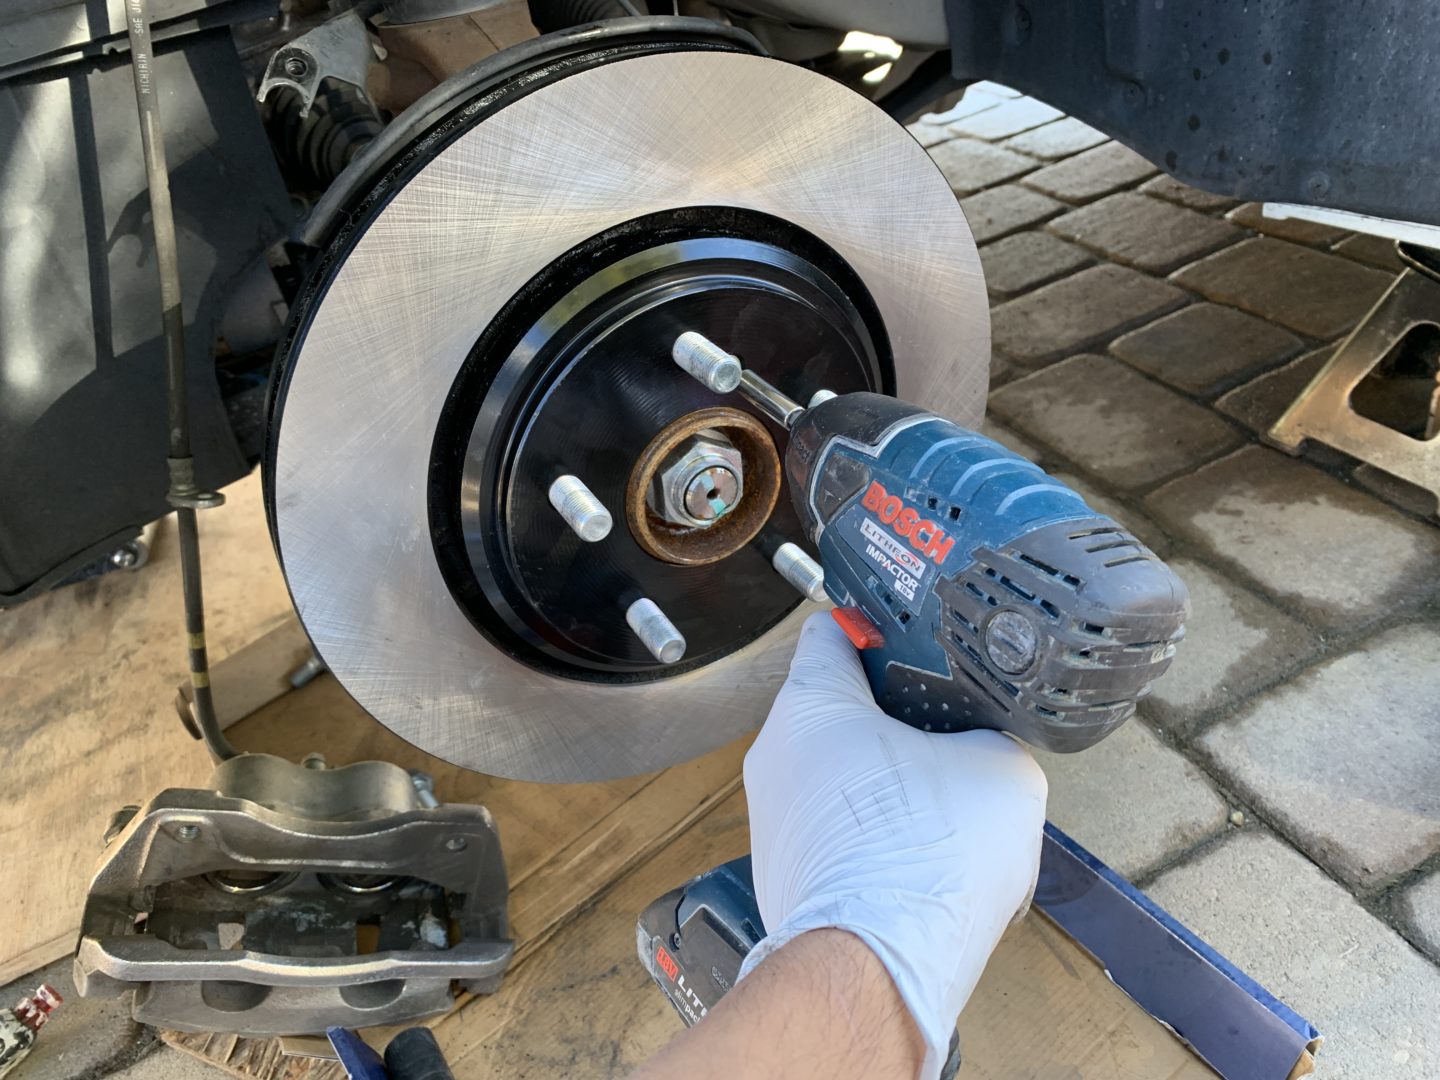
Now, with the brake caliper removed, you have full access to the brake rotor. The brake rotor is held in place with a screw that has a flat Phillips head. You really need to ensure you have a large and thick Phillips head bit, otherwise you’ll easily strip the screw head. Using a large and thick Phillips head bit (see photo below), it is easy to use an impact gun to remove. I tried using a Philips head screwdriver and I just didn’t have the leverage to be able to break this screw loose.
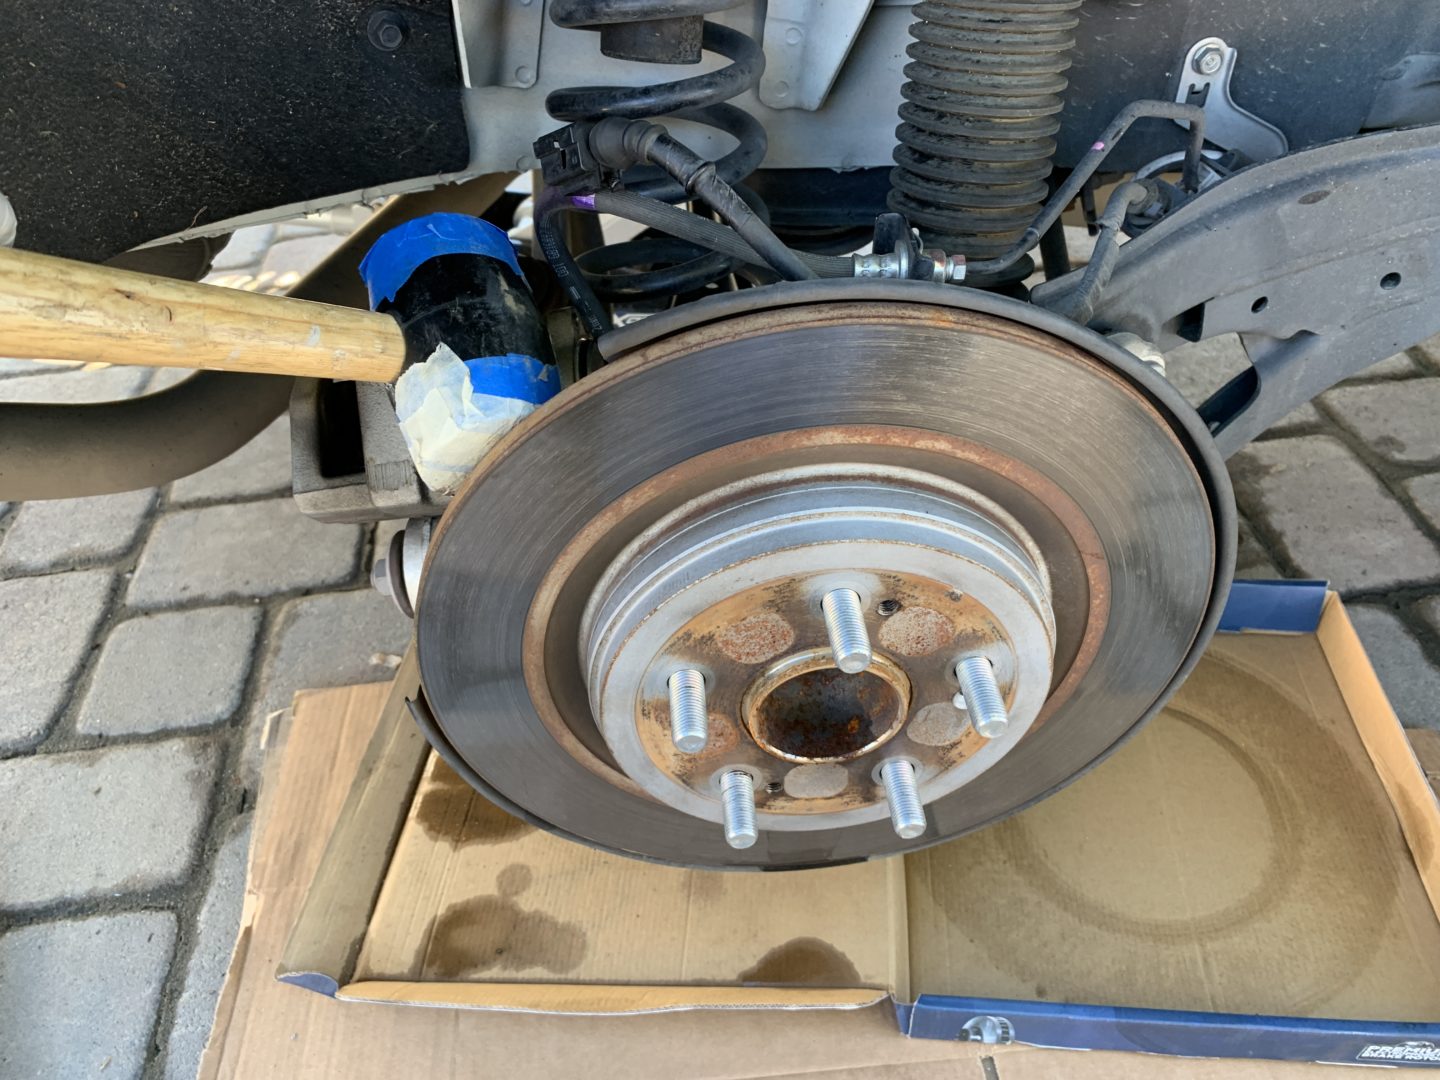
Finally with the screw removed, use a mallet to tap the rotor off (tap all around the rotor hitting it out towards you.) You could also use (2 qty) 8 x 1.25mm bolts to screw into the openings in the rotor to push it away from the hub, but you’ll need to find these exact size bolts in order to use this method. If your brake rotor isn’t seized onto your hub, then the mallet works just fine. However, if you do have a rust problem and the mallet just isn’t cutting it, then using the two bolts will most certainly get the brake rotor off.


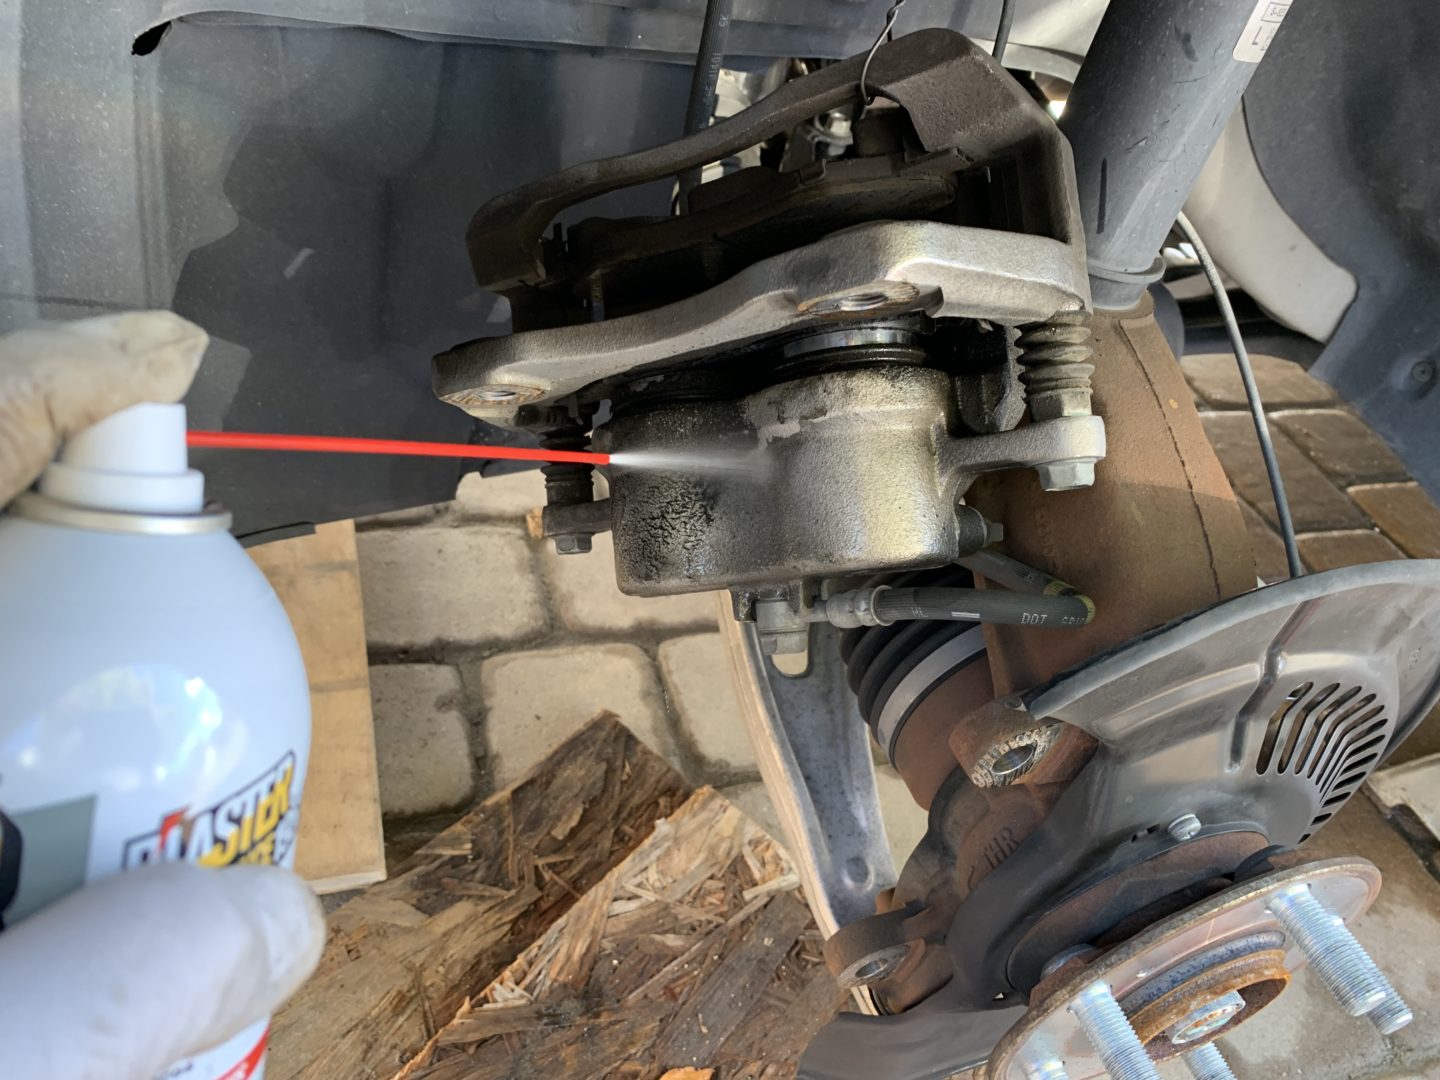
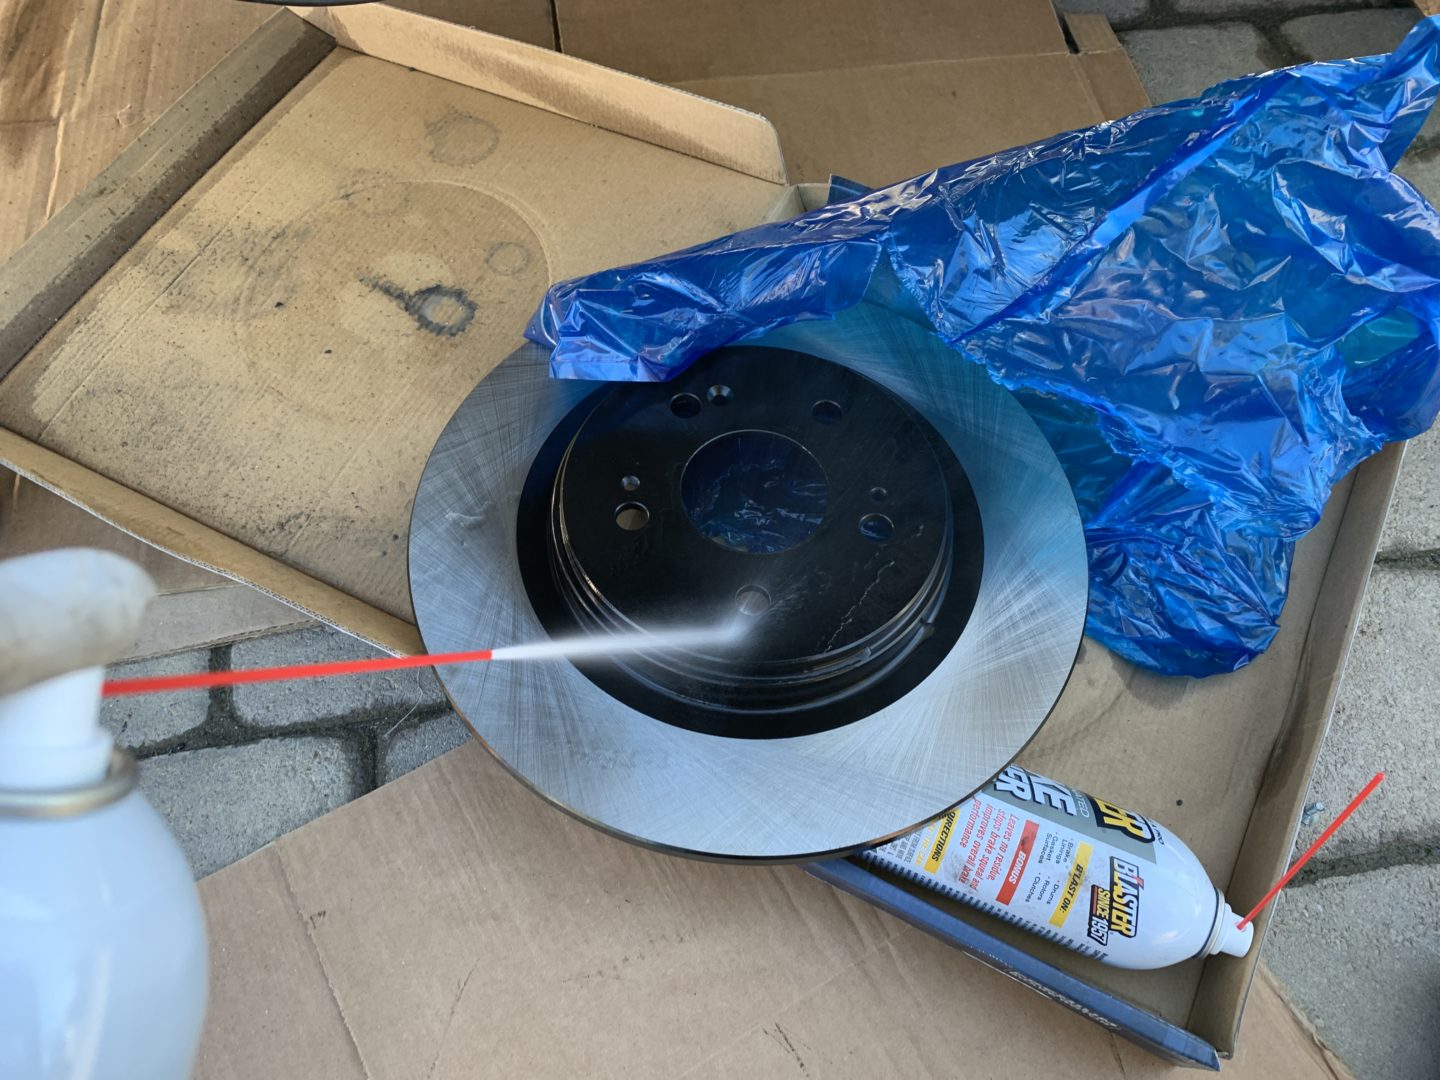
At this point, I like to generously spray down the brake hub with brake parts cleaner. I also use brake cleaner on the front and back of the new brake rotors as they are typically covered in oil to prevent rust. I then wipe it down with some shop towels.


Installing the new brake rotor is super easy. Simply put the new brake rotor on so that the wheel hub bolts go through the rotor mounting holes, but also ensuring that the securing screw hole is lined up with the hub as well (so that the flat Phillips head screw can hold the brake rotor to the hub.) Install the disc screw and tighten it. I simply used the same impact gun with the same large Phillips head bit and screwed it on tight. Give it a few ugga-duggas to secure (or tighten snug if you’re using hand tools.)

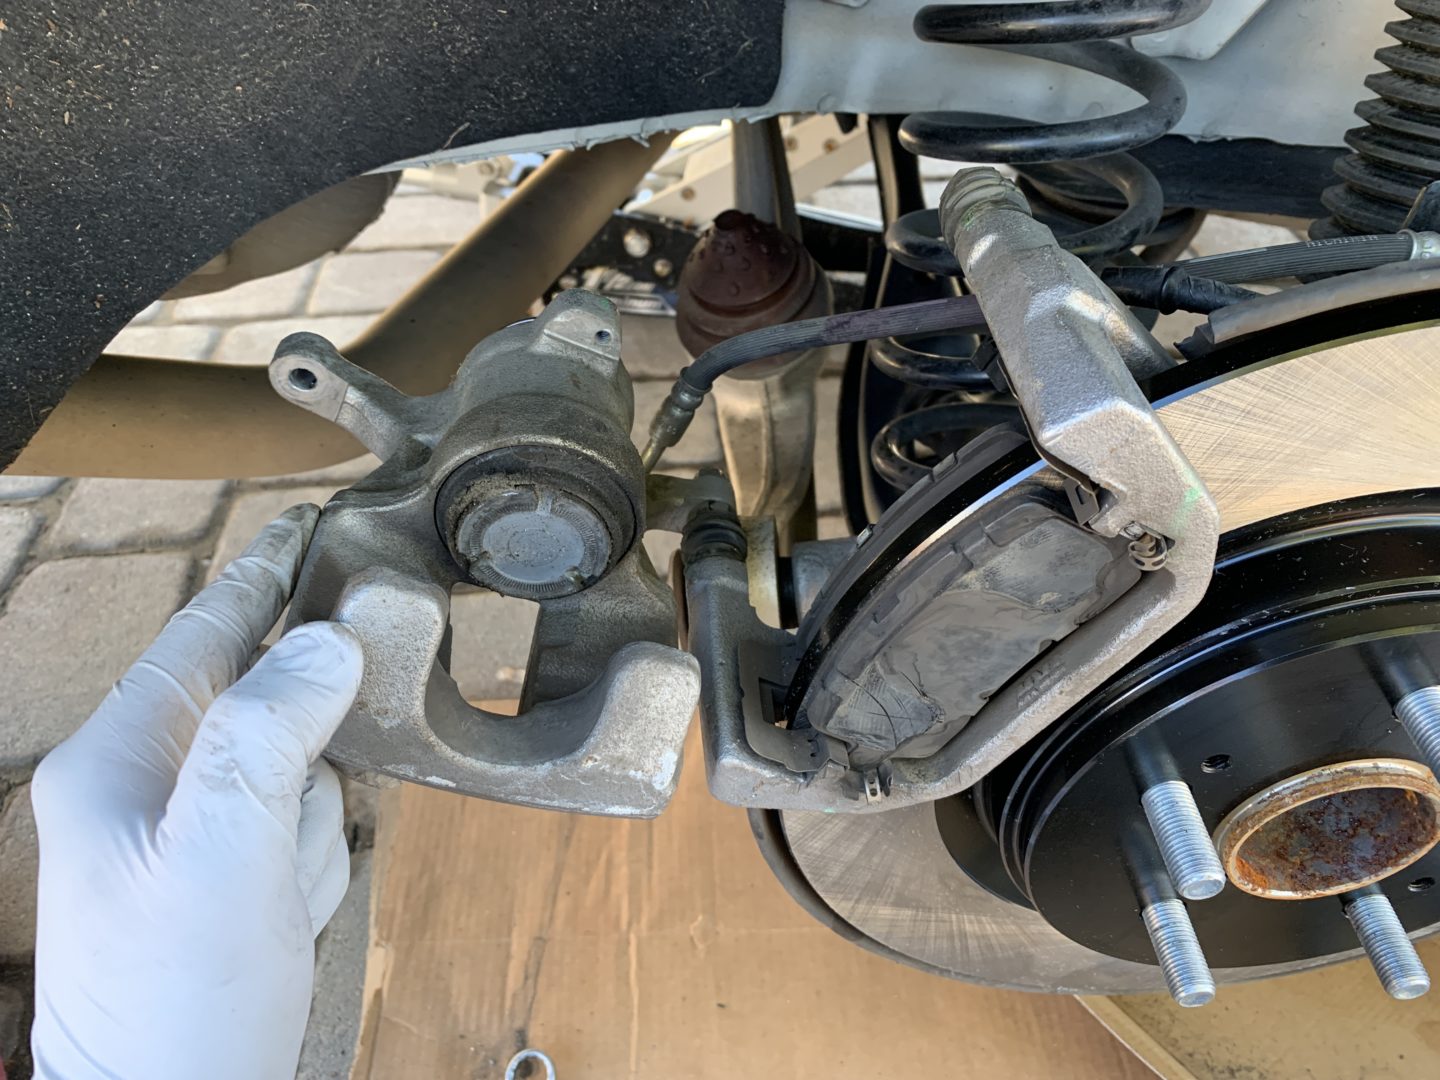
Next, replace the front brake caliper by lining up the mounting bolt holes and reinstalling the (2 qty) 19mm bolts. You can just hand-tighten them now and torque them after you replace the brake pads. It’s possible to replace the brake pads when you have the whole brake caliper off, but it’s much easier to re-mount the brake caliper and then swivel the caliper body to change out the brake pads.

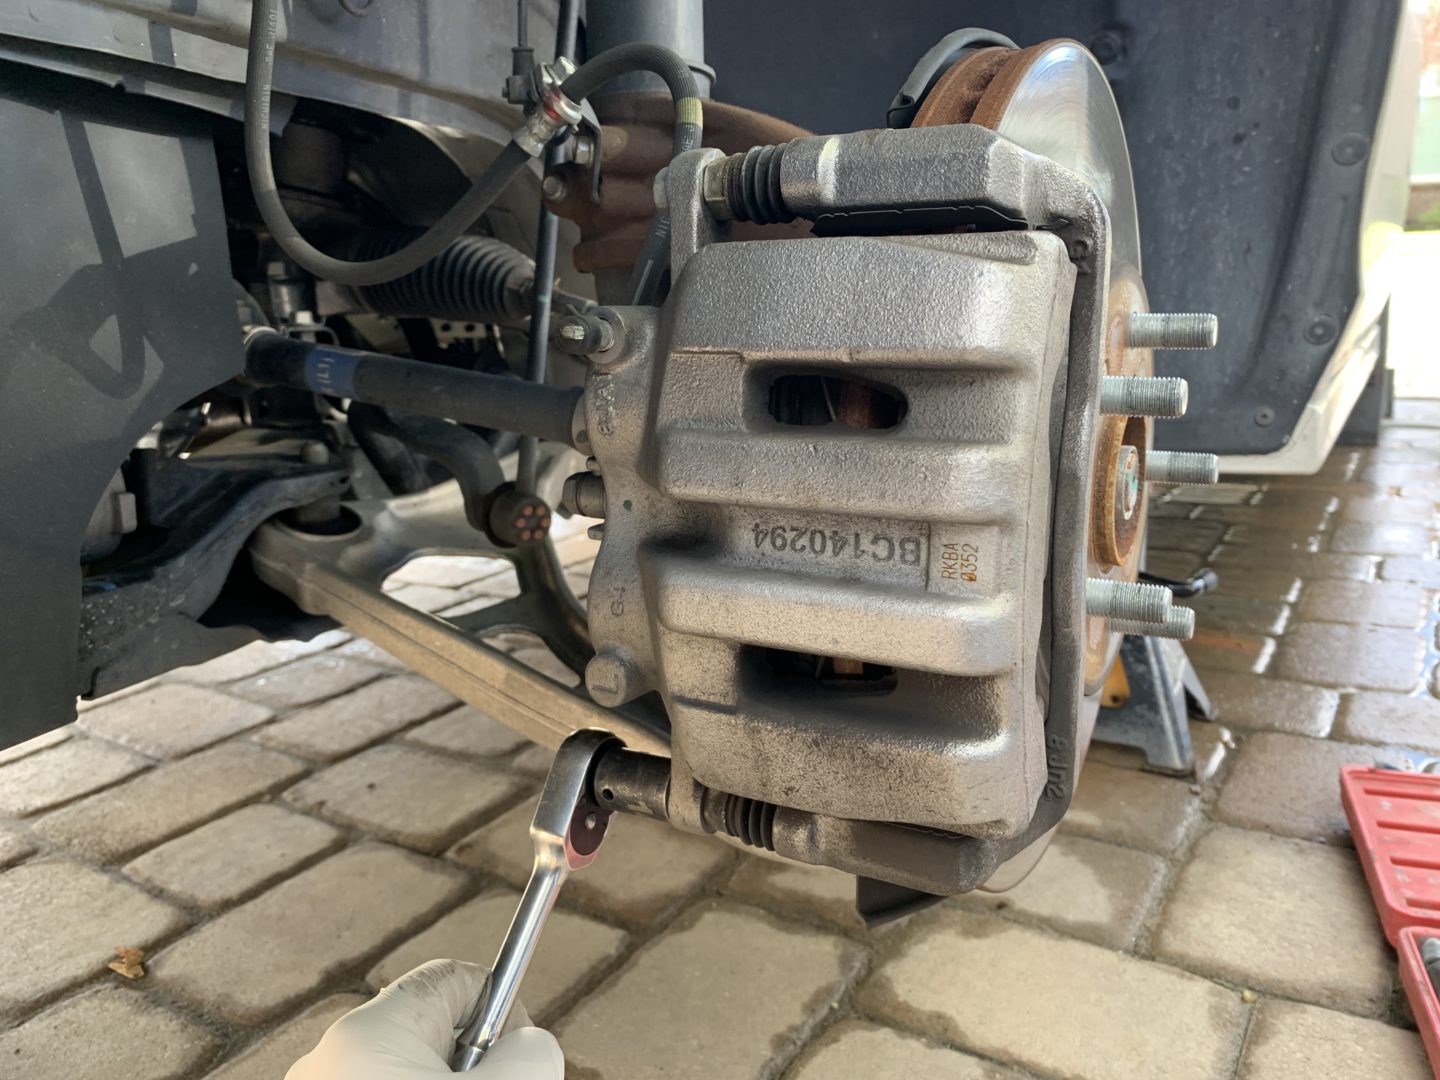
The brake caliper body can be swiveled upwards or downwards depending on which flange bolt you decide to undo. The best way to change out the front brake pads is to remove the bottom 14mm flange bolt and swivel the caliper body upwards.


With the caliper body swiveled up, remove the brake pad return springs, the brake pads, and then the brake clips. Once the return springs are squeezed together and pulled off, the brake pads can then be removed. Then, using a flat head screwdriver, you can pry off the brake clips.
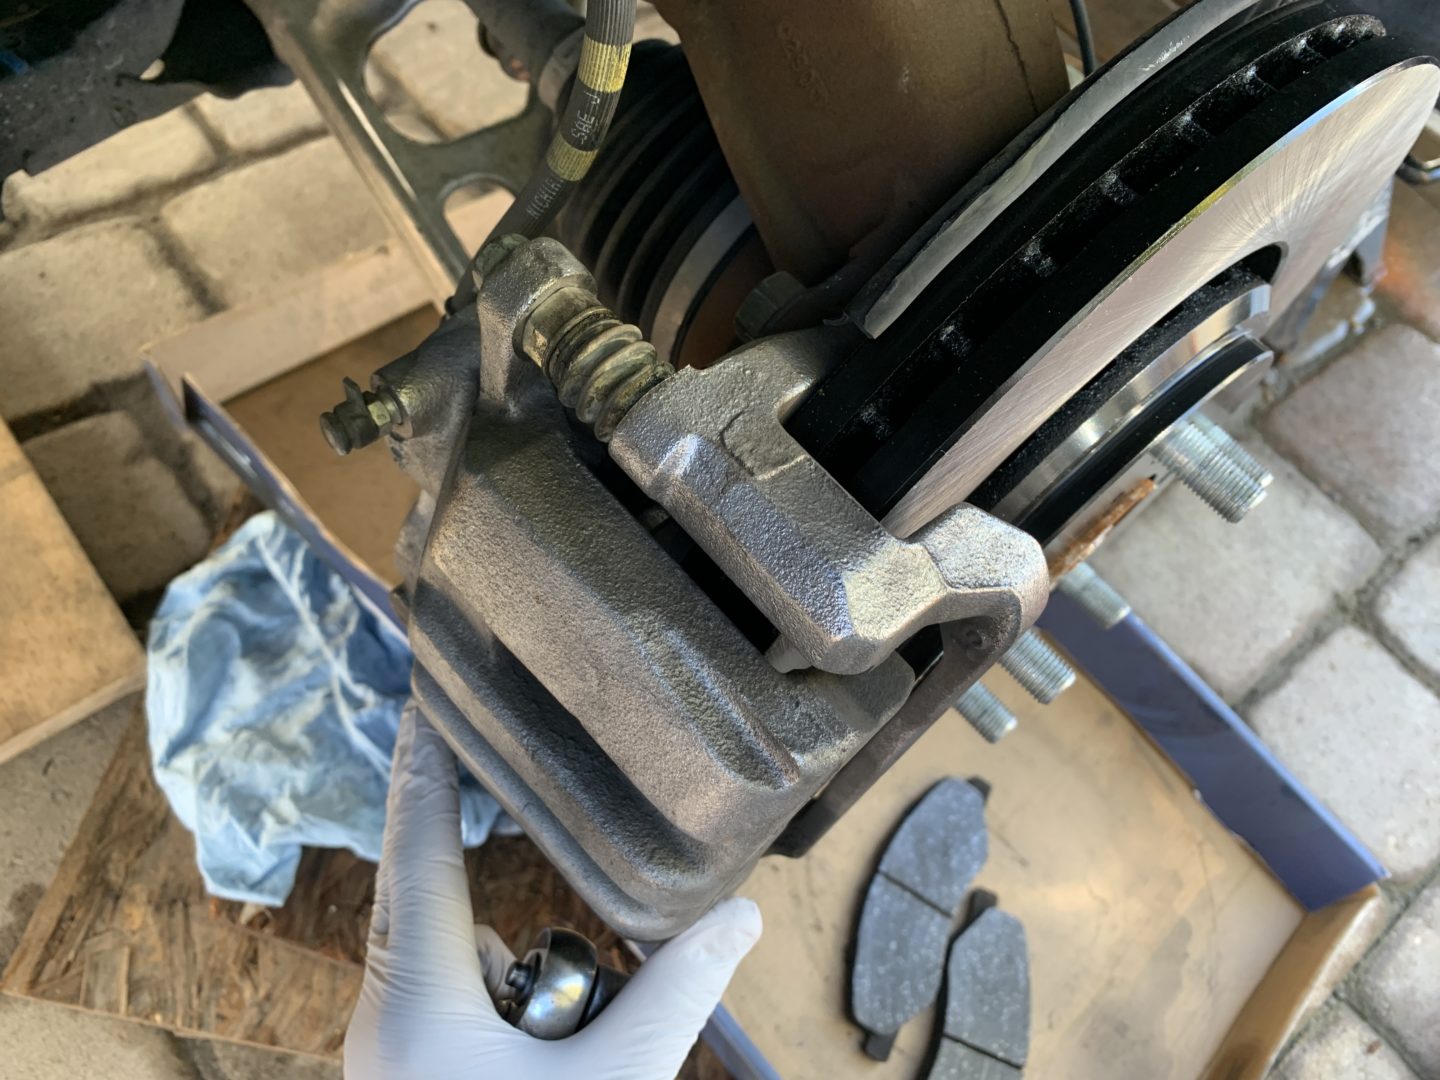
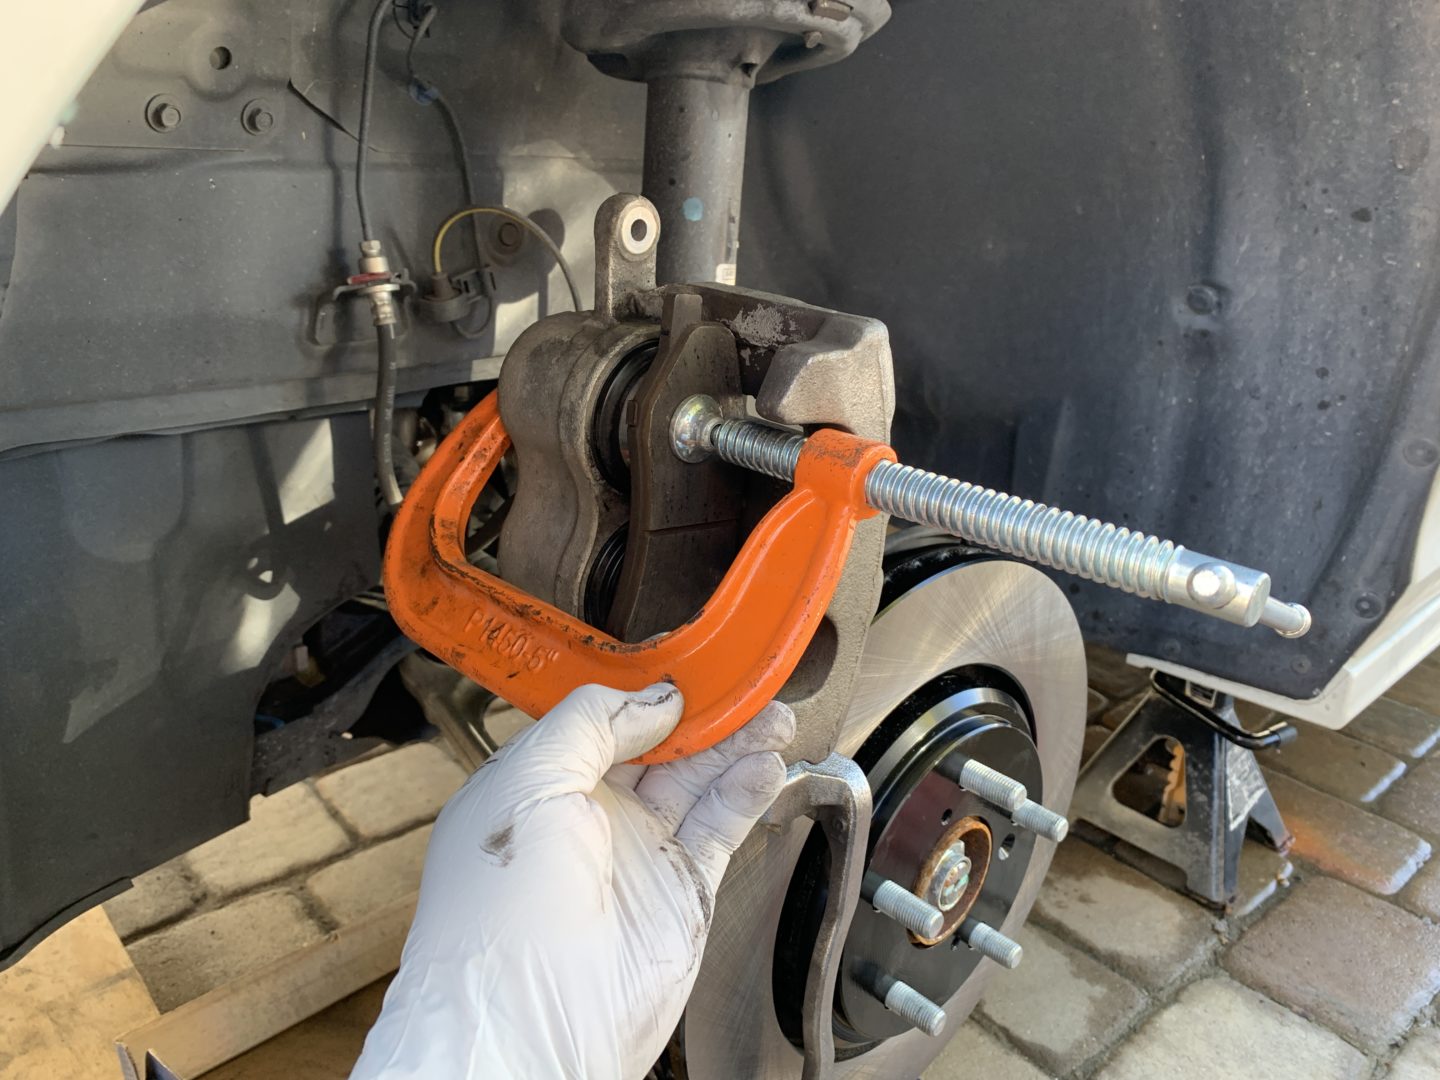
I’ll use a C-clamp (or even better, a dedicated caliper piston compressor tool) along with the old brake pad and compress the pistons so that the new brake pads will be able to be installed. The C-clamp is pressing against the old brake pads, which is pushing the caliper pistons in.
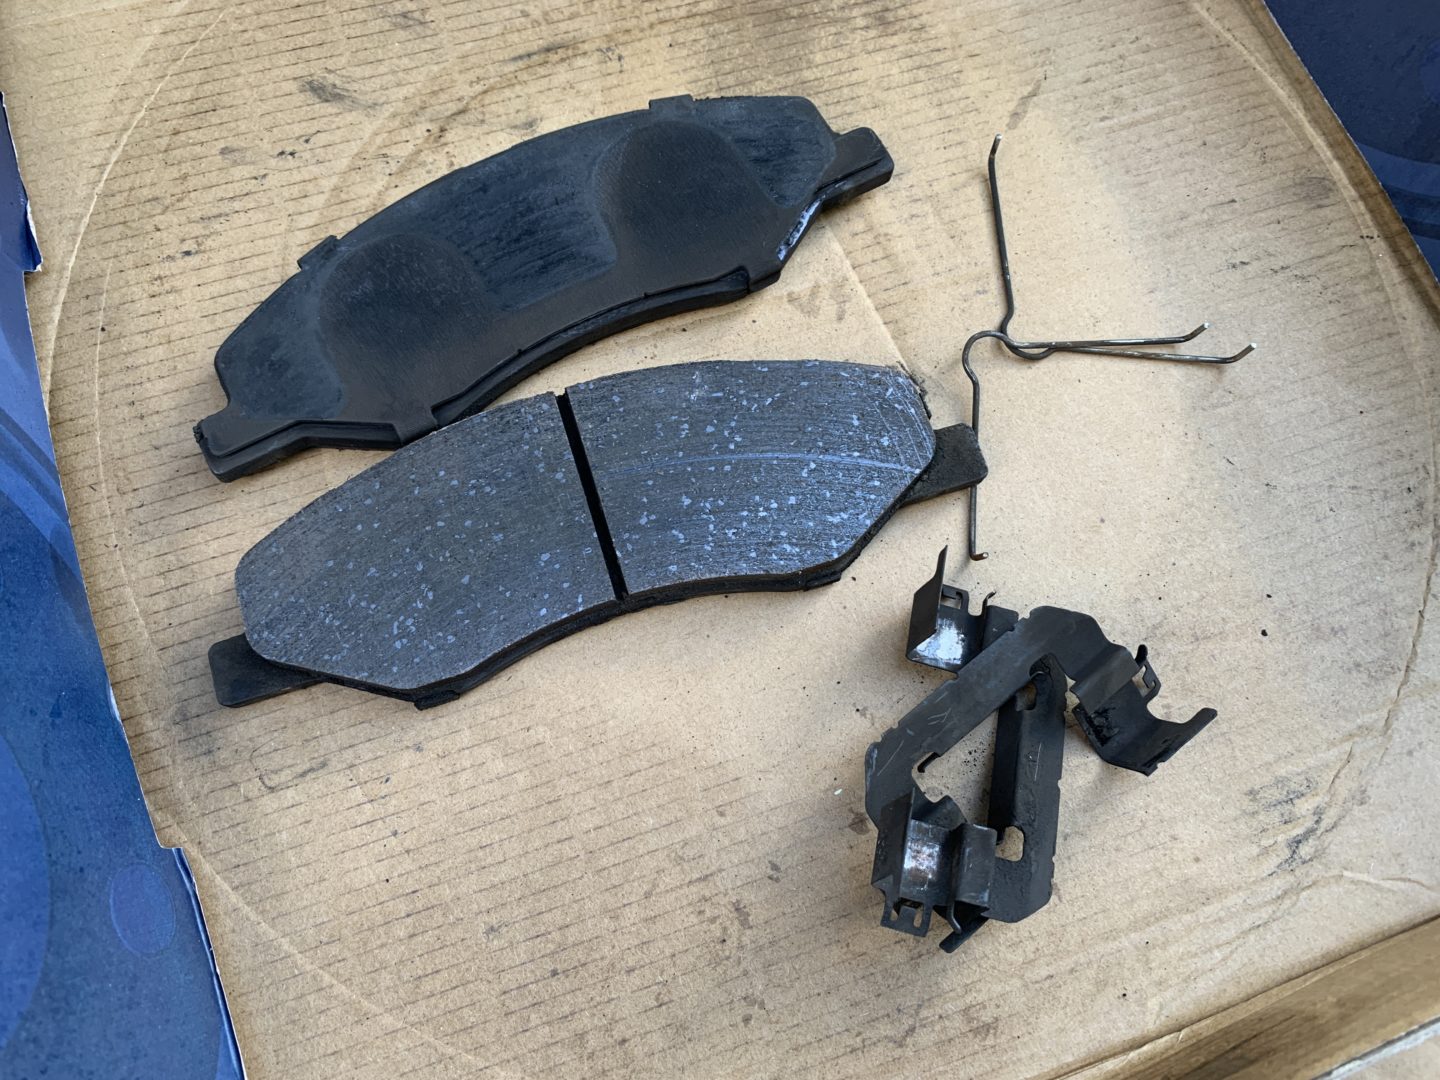

Next, clean the return springs and brake clips with brake cleaner and lube them up with brake caliper lube.

Reinstall the brake clips, the new brake pads, and then the return springs. Wipe away any lube that ends up getting onto the brake rotor.


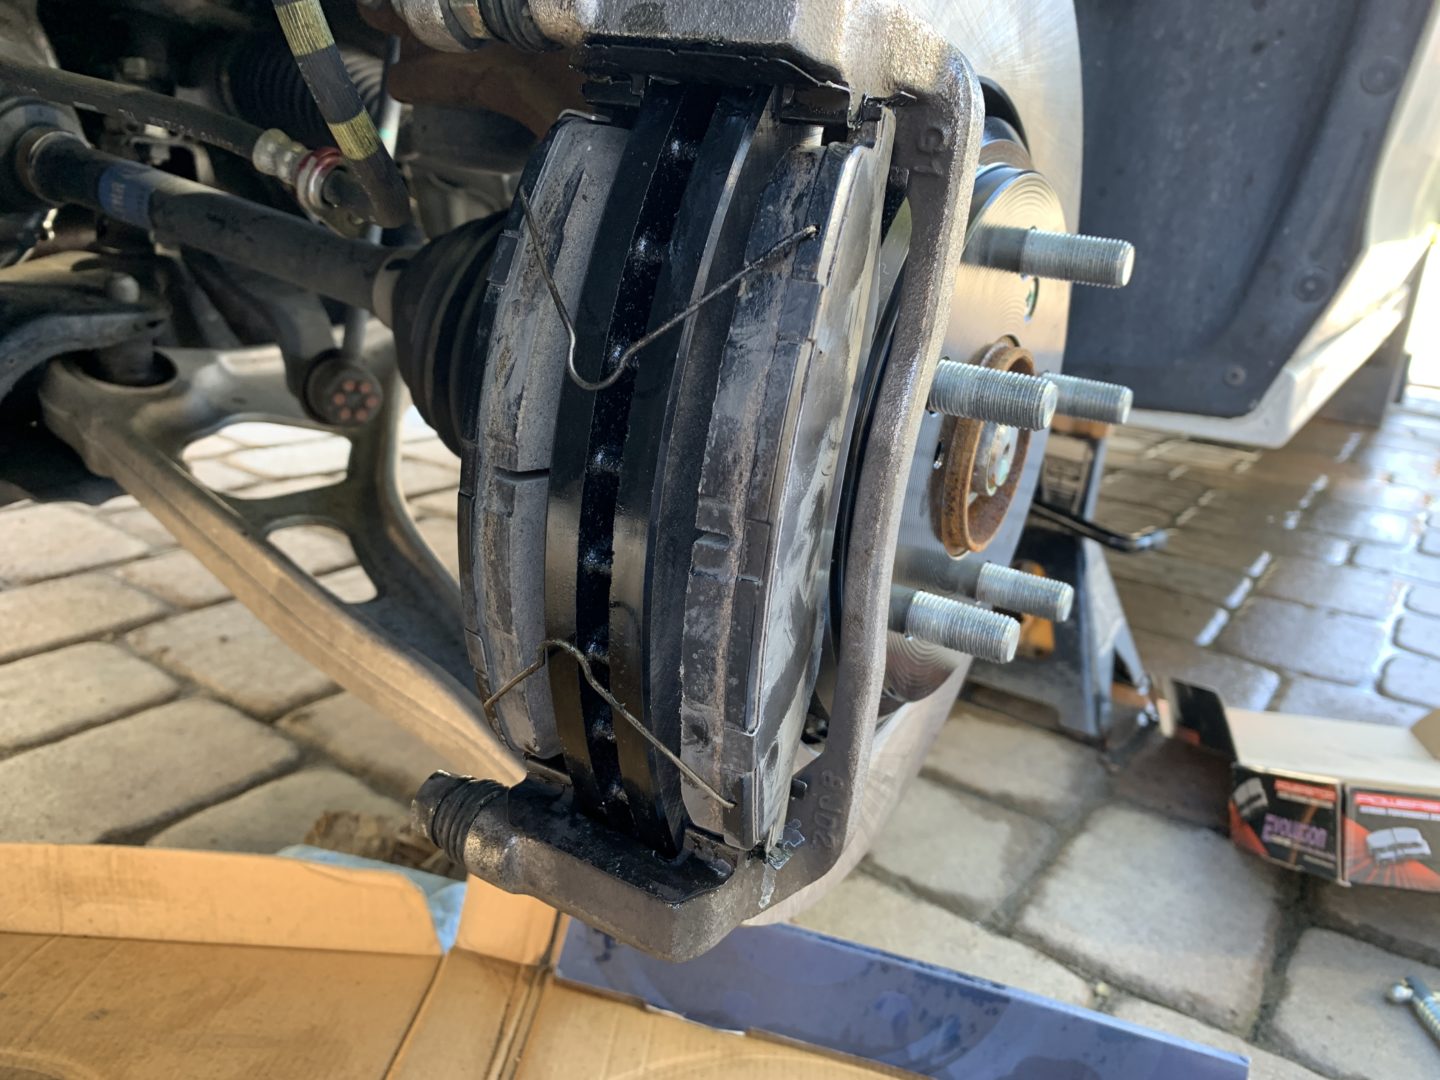
Swivel the caliper body back down and reinstall the bottom 14mm flange bolt.
I like to torque all of the bolts at this point before I reinstall the wheel so that previously removed bolts are now installed to torque. The 14mm flange bolt should be torqued to 30 ft-lbs torque.


The (2 qty) front caliper mounting bolts should be torque down to 101 ft-lbs torque.


If you previously removed the 12mm bolt that holds the brake hose to the mount, reinstall and tighten that bolt snug.
Finally, I like to spray down everything with brake parts cleaner once again and wipe away any residue or lube that has gotten onto the brake rotor before reinstalling the wheel.
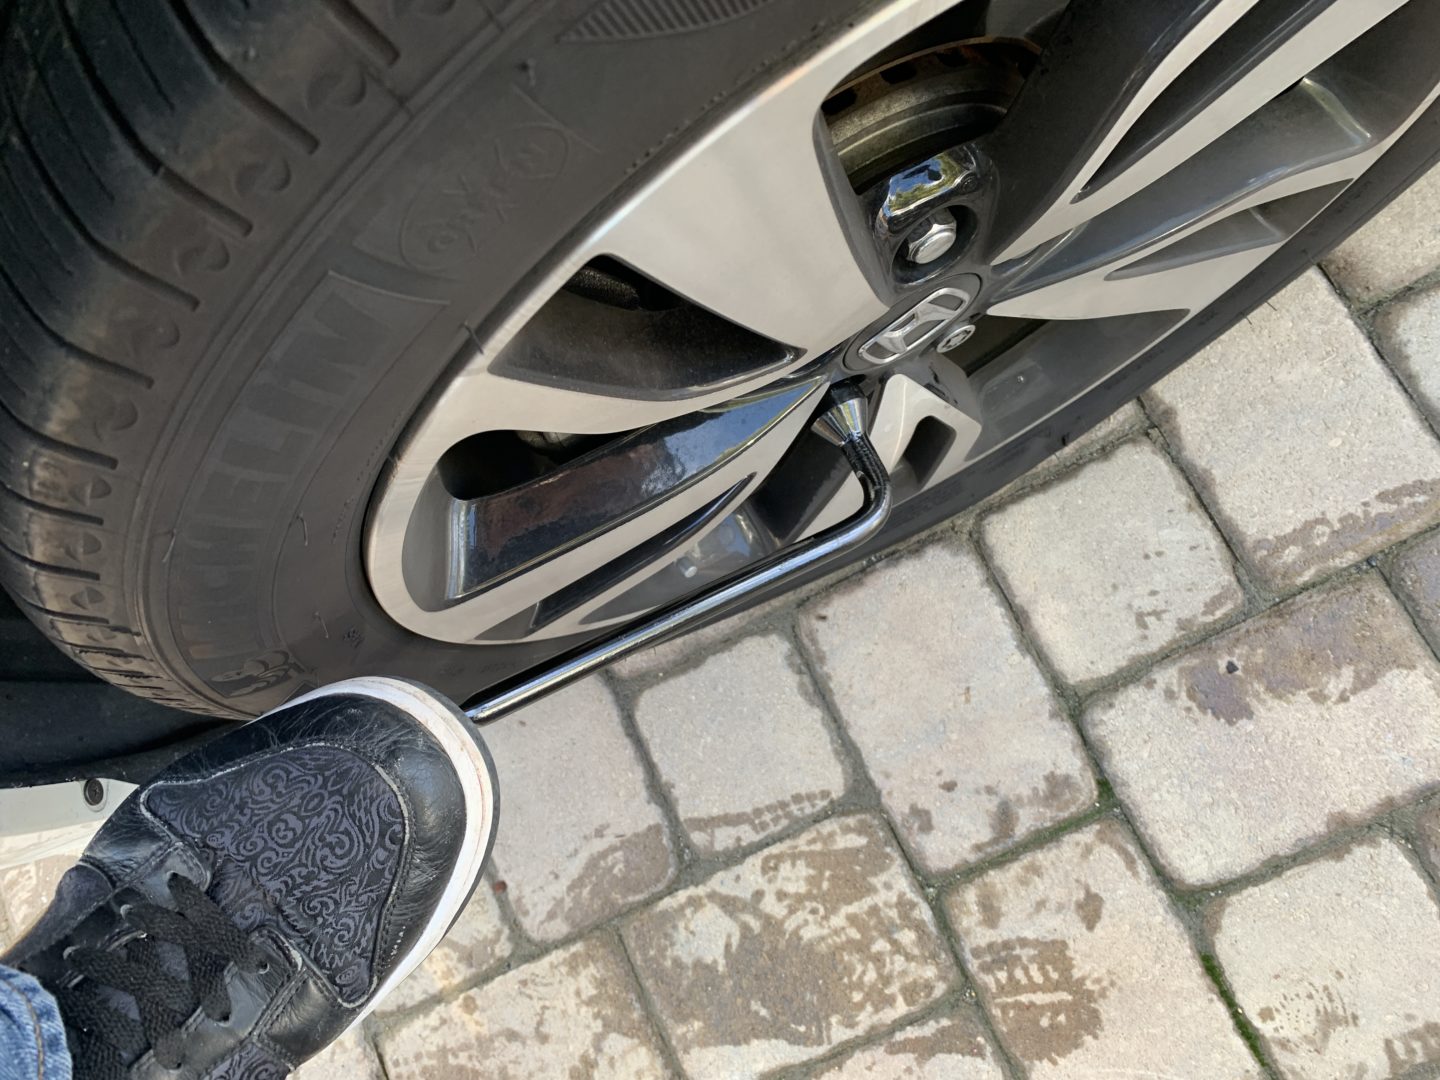
Then reinstall the wheel and lug nuts. Tighten the lug nuts snug with the lug wrench ensuring that the wheel is completely centered, remove the jack stands, then lower the vehicle back down. When the tires just touch the ground, tighten down the lug nuts with your lug wrench and your foot to tighten them fully. Then, lower the vehicle completely and remove the floor jack.


Next, we’ll move onto replacing the rear brake pads and rotors. The rear differs from the front in that you’ll have to deal with the Electronic Parking Brake (EPB), which requires a specific procedure to safely remove and retract the EPB before replacing the rear brake pads or rotors. Besides that, the procedure will be similar to the front except that the torque values are slightly lower than the front.
Replacing the Rear Brake Pads and Rotors
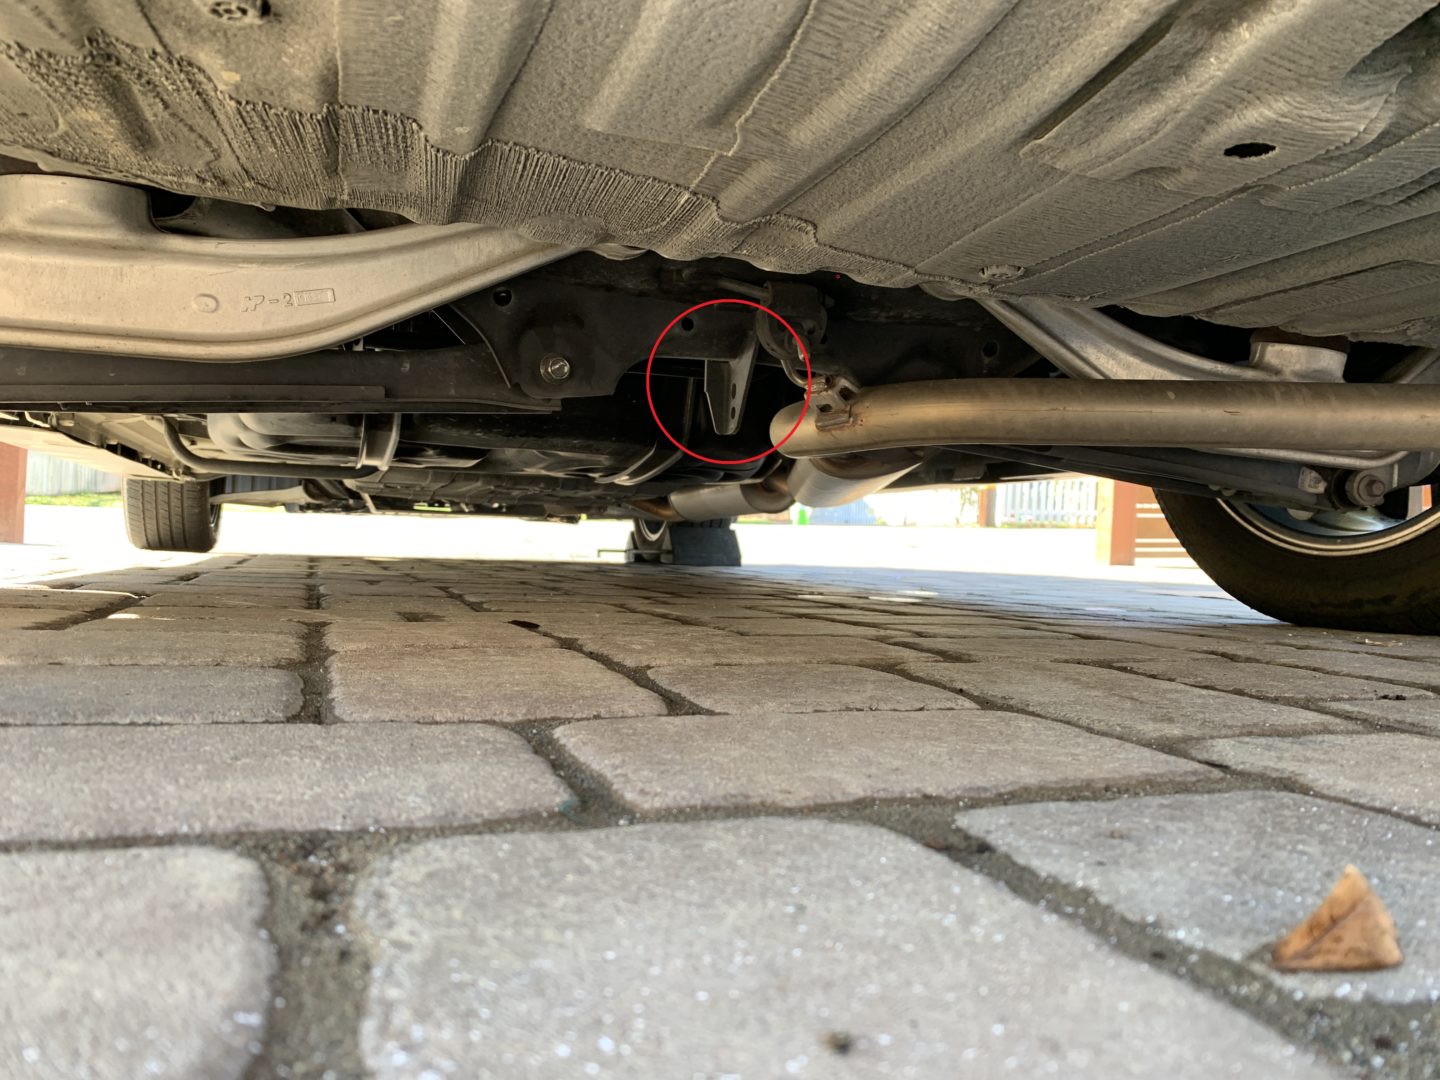
When lifting the rear end with a floor jack, something you should know is that at the time of this post, the service repair manual for this vehicle says that there is no rear jacking point on this car. Long story short, I personally believe this is due some issues that Honda has had on other models being lifted on the dedicated rear jack point. However, I as well as other 5th Gen Honda Odyssey owners have had no issues lifting the rear of the vehicle at this jack point. If you want to read more on the proper jacking points on the 5th gen Honda Odyssey, I wrote a little more in-depth on this topic on another post.
Jacking Up The Rear of the Vehicle
Follow the same procedure for removing the wheel, lifting the vehicle, and removing the wheel. Chock the front wheels, break loose the lug nuts, lift the vehicle, install jack stands, and remove the lug nuts and rear wheel.


About the The Electric Parking Brake (EPB)
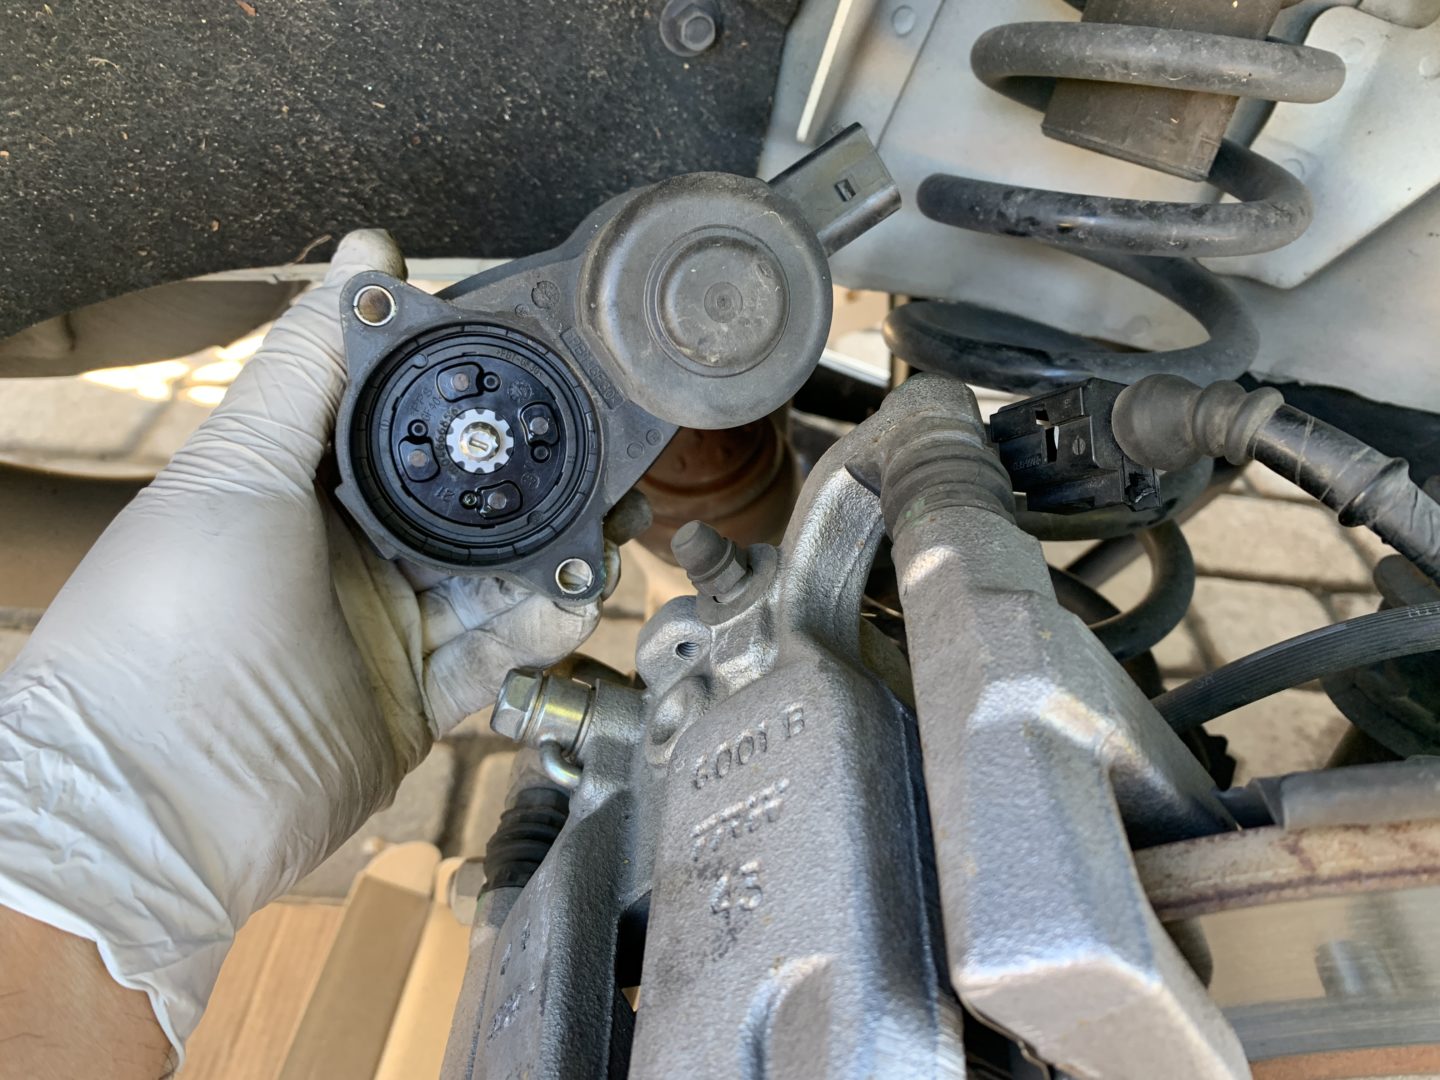
The rear brakes have an Electric Parking Brake (EPB) system. So on the rear brakes, you’ll see an EPB actuator mounted onto each rear brake caliper. The EPB needs to be placed into maintenance mode in order to safely replace the brake pads.
Essentially what maintenance mode does is retract the EPB spindle, so that you can safely compress the brake caliper pistons and then install the new brake pads. If you tried to compress the brake pistons without retracting the EPB spindle, you risk damaging the EPB actuator. Finally, the vehicle should be placed back into normal mode, which spins the EPB spindle back into place.
To put the Electric Parking Brake into maintenance mode, there are two ways of doing it:
- Using the HDS (Honda Diagnostic System) which is a diagnostic tool that connects to your OBDII port and can electronically put the vehicle into and take it out of maintenance mode. You might be able to find some other OBDII diagnostic tools that have this capability and can do the same thing.
- The second way of doing it is physically removing the EPB actuator and manually turning the spindle out. After you’ve replaced the brake pads, you can press the parking brake button in the vehicle two times to readjust the Electric Parking Brake.
Both ways are acceptable ways of handling the EPB as both procedures are outlined in the official service manual for this vehicle. On this guide, I will go through the process of manually removing the EPB as most people typically won’t own the proprietary HDS diagnostic tool.
Manually Removing the Electronic Parking Brake (EPB)
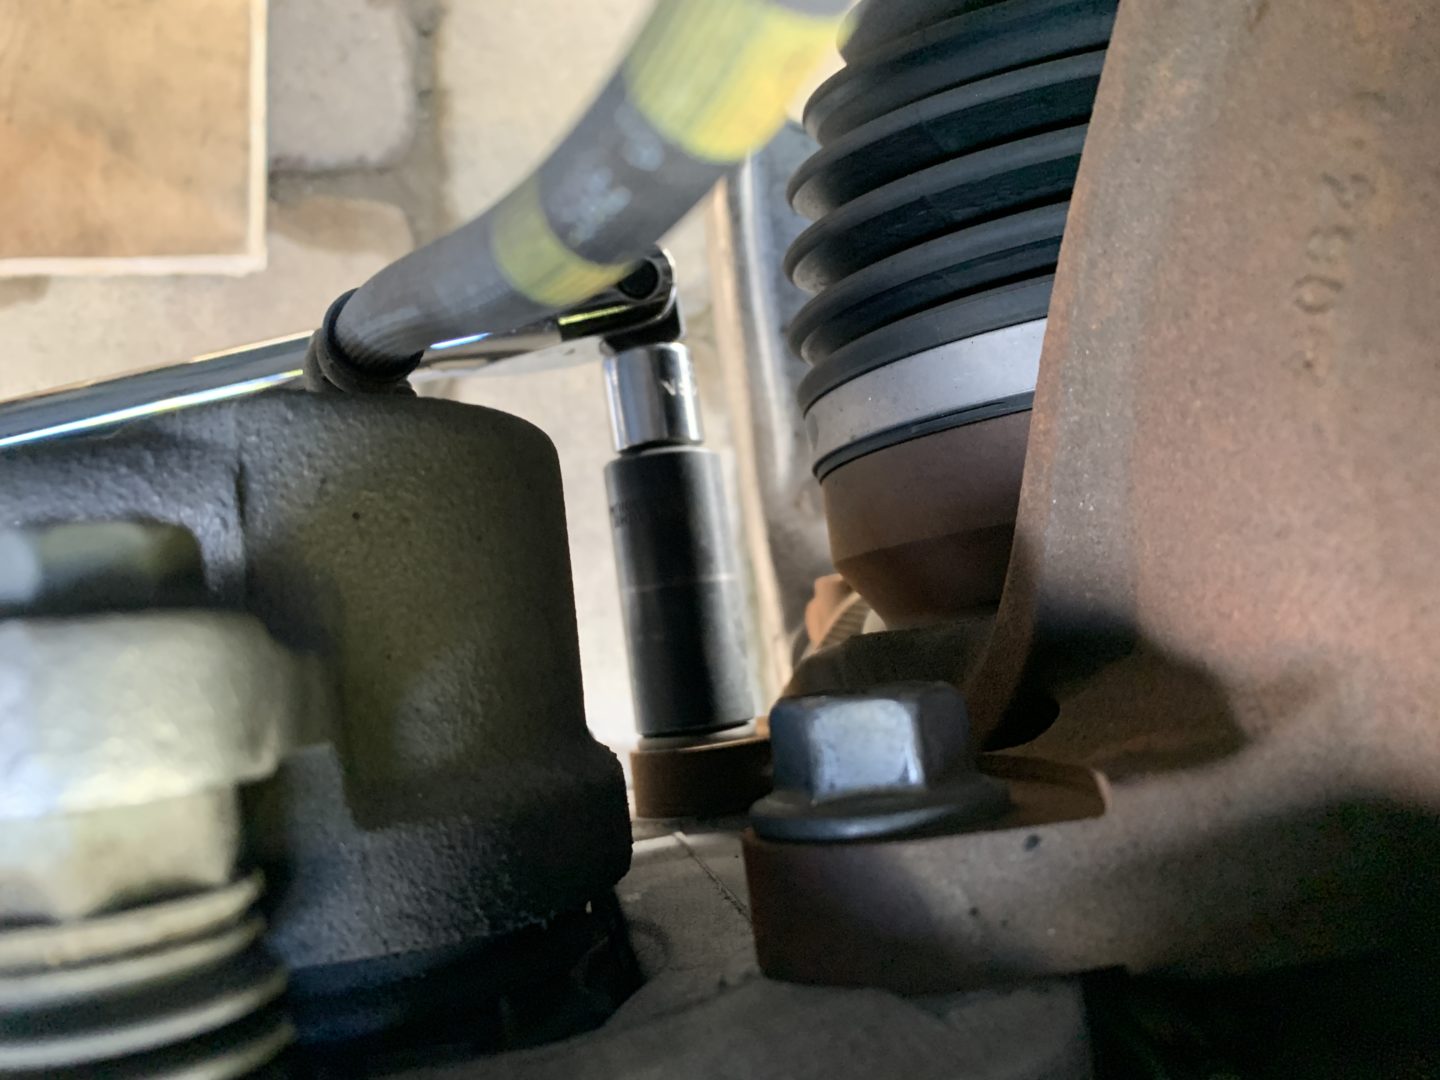
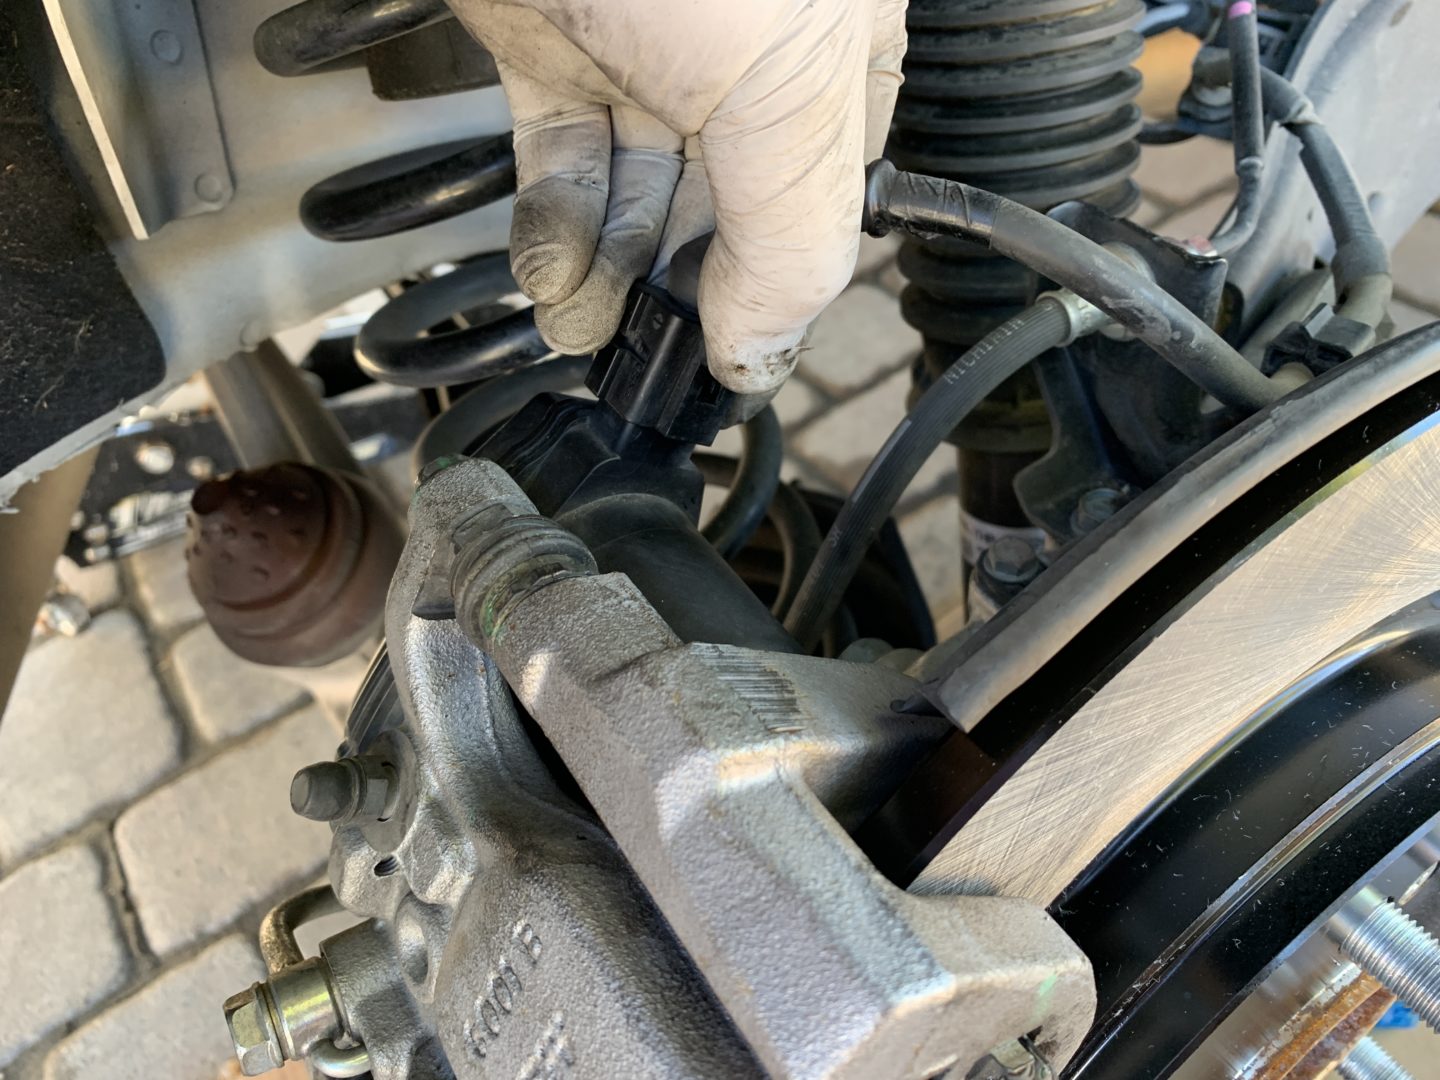
First, remove EPB electrical connector. I had a lot of trouble with removing this connector but eventually I was able to using a flat head screwdriver to press in on the connector. The instruction given in the service manual suggests pressing in on the connector and then pushing on the release lock if you’re having a hard time removing the connector.
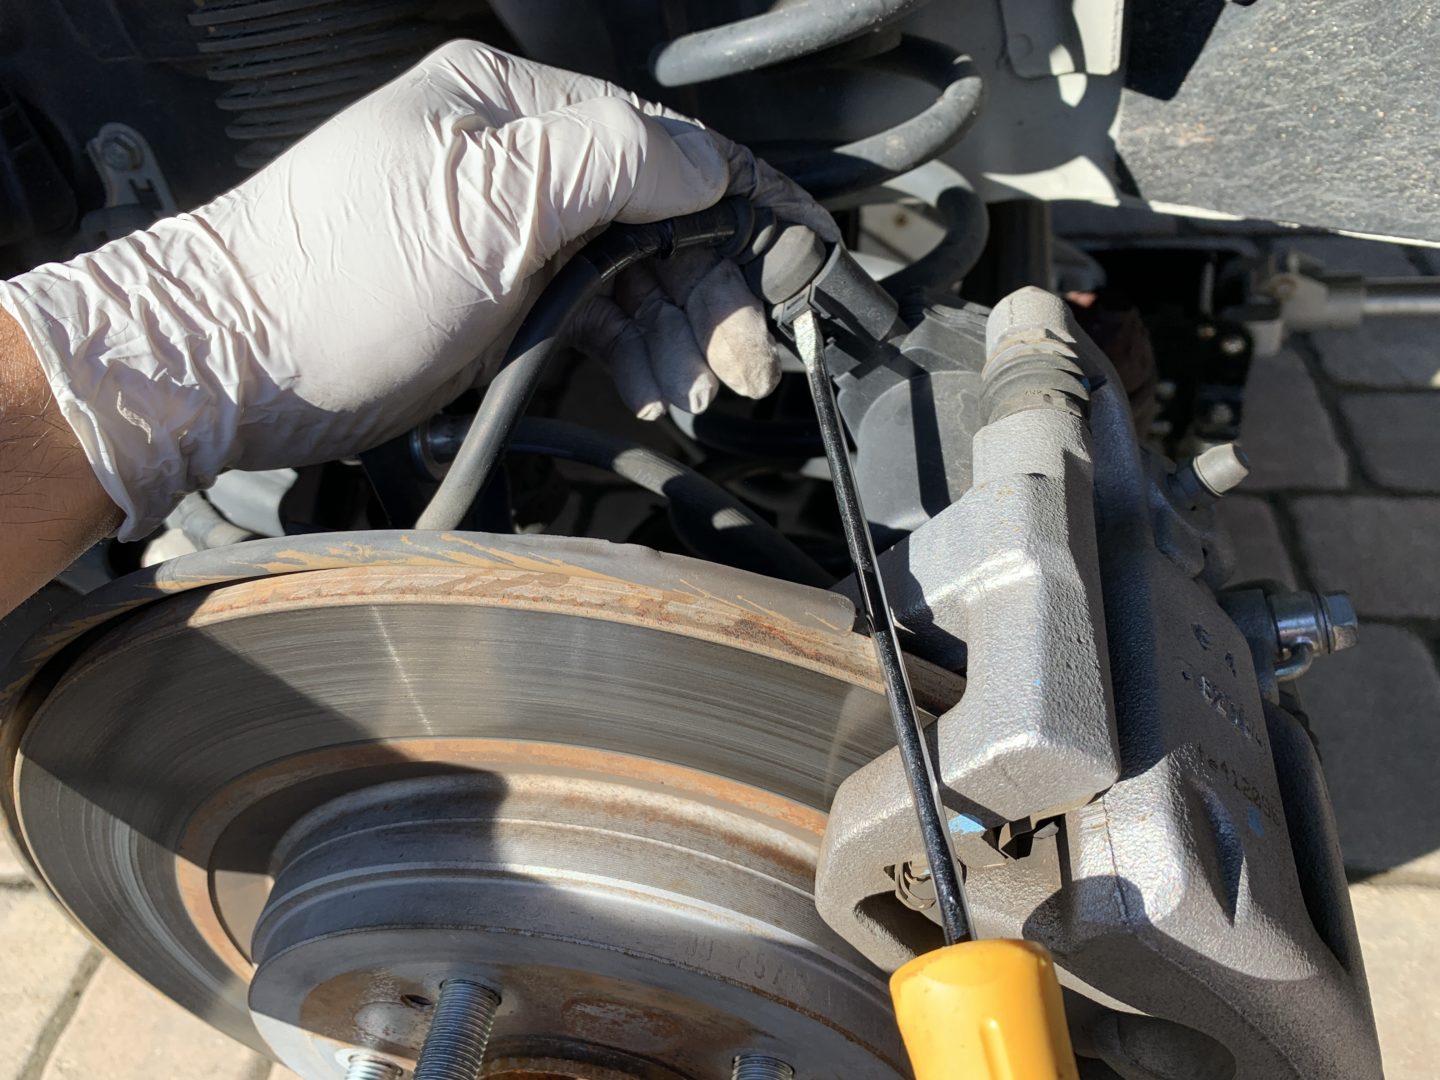

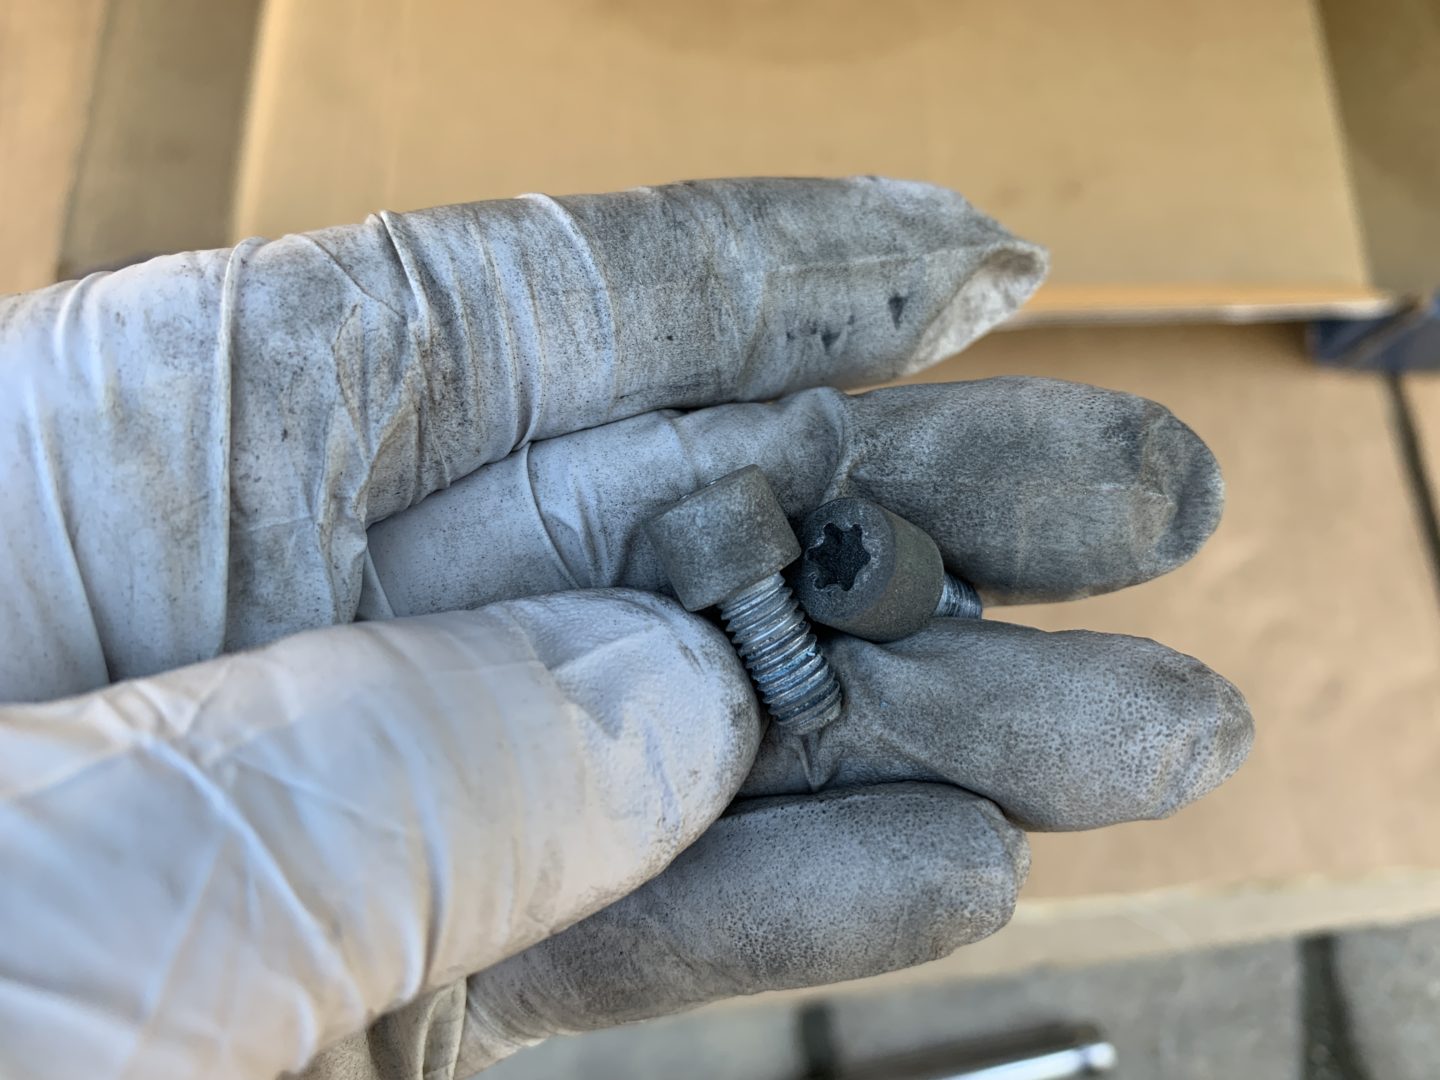
Next, using a T30 Torx bit and unscrew the (2 qty) Torx screws that hold the EPB to the brake caliper.


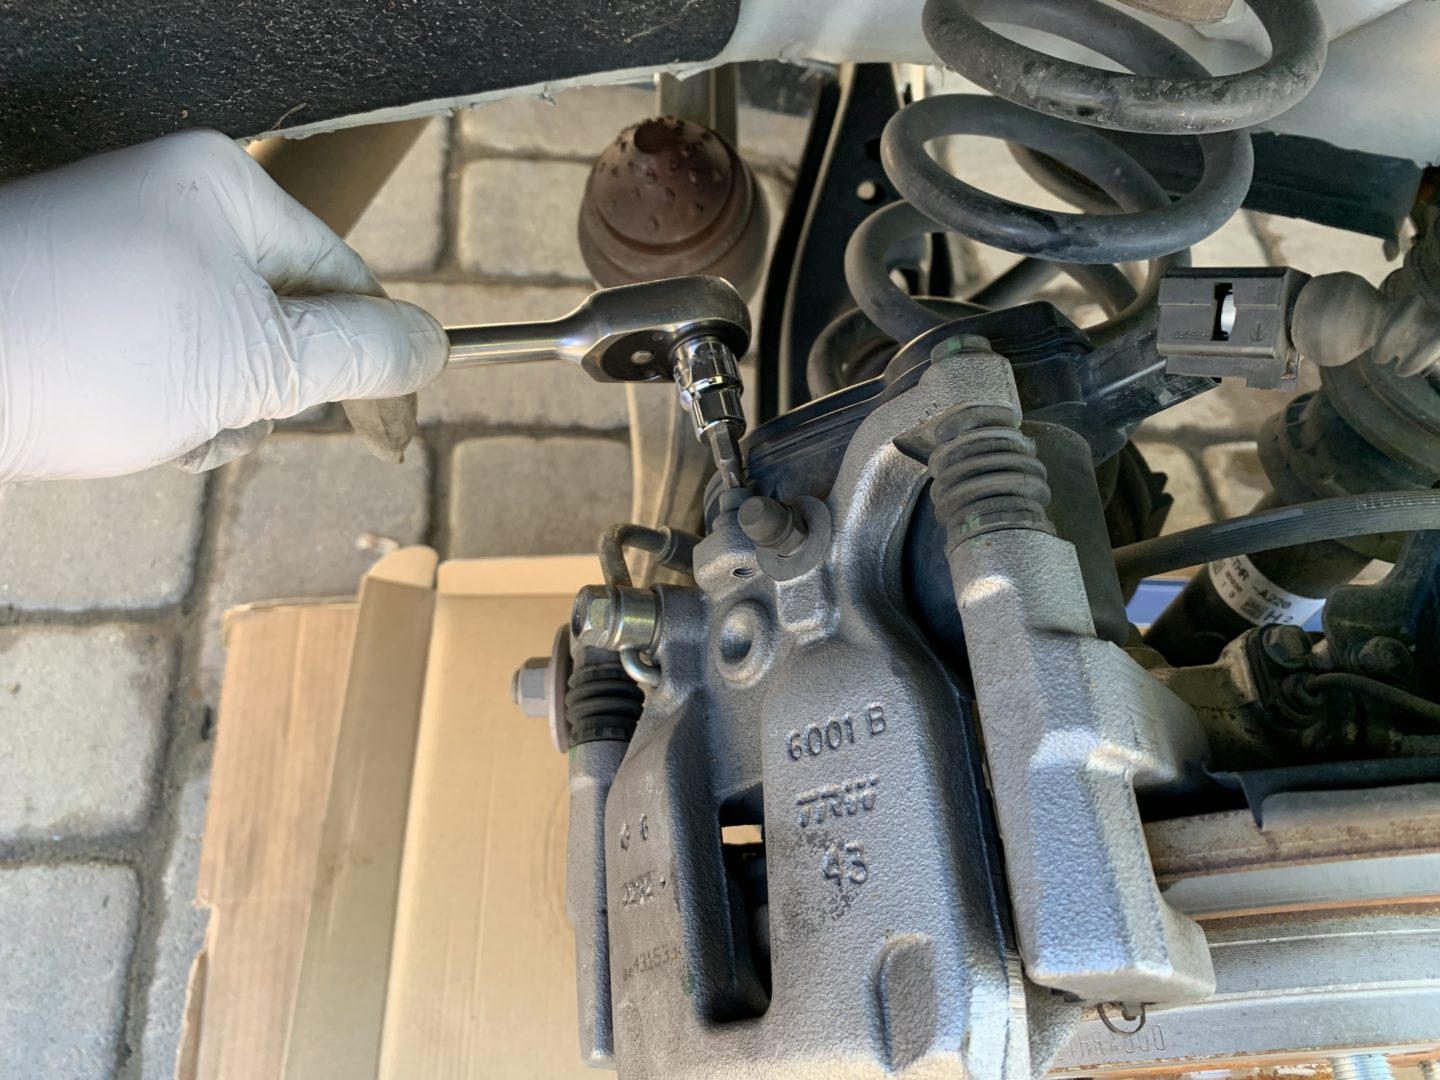
Now, you can pull the EPB actuator away from the brake caliper. Set the EPB actuator aside.
Next, use a large flat head screwdriver to turn the EPB spindle (that is still on the brake caliper). I believe you can also use a larger Torx bit to fit inside of the spindle opening to turn it.
If you use a flat head screwdriver, it should be large enough to fit into the teeth of the spindle. Turn the spindle clockwise. Turn it clockwise all the way until it comes to lock.


Turning the EPB spindle clockwise will cause the spindle to retract. Turning it clockwise to full lock will allow you to later safely compress the brake caliper pistons. We need to compress the brake caliper pistons so that the new brake pads will fit.
Replacing the Rear Brake Pads and Rotors
If you are only replacing the rear brake pads and not the brake rotors, skip down to the section where we swivel up the brake caliper body to access the brake pads. Otherwise, continue on if you are replacing the rear brake rotors as well.
Using a breaker bar, remove the (2 qty) 17mm rear caliper mounting bolts. Prepare to hold the caliper up to keep it from falling. Tie the brake caliper to something to support it and keep the rubber brake hose from being pulled taut (which could cause damage to it.)


Just like the front brake rotors, use the largest/thickest Phillips bit you have along with an impact gun or drill to break the screw loose. I wasn’t able to remove this screw with a screwdriver alone, so I recommend using an impact gun. Tap the brake rotor off with a mallet from behind going all around the rotor. If it won’t budge, screw in (2 qty) 8 x 1.25mm bolts into the threads in the middle of the rotor to push it off of the brake hub.

Use brake parts cleaner to spray down the brake hub, as well as the new brake rotor. I’ll also use shop towels to wipe down the new brake rotor, as new rotors will have oil on the surface. Install the new brake rotor and flathead screw. Tighten the flathead screw with an impact gun or tighten snug if using hand tools. Then reinstall the brake caliper and (2 qty) 17mm brake caliper mounting bolts and hand-tighten. I like to torque all the reinstalled bolts later after I’ve installed the new brake pads.


Now, we will replace the brake pads by swiveling the brake caliper body out of the way. It works best to swivel the caliper body down (rather than up with the front caliper body) due to the way the brake hose is connected to the brake caliper. You may need to use a 17mm combination wrench to hold the nut in place while you remove the top 13mm retaining bolt. Then, swivel the caliper body downwards.


With the caliper body swiveled down and out of the way, remove the brake pads and brake clips. Then use a caliper piston compression tool (or a C-clamp) and compress the pistons so that there will be enough room for the new brake pads. As you can see below, I’m using a C-clamp to compress between the back of the brake caliper and the old brake pad pressing against the pistons. Remember that the Electric Parking Brake’s spindle should have been turned all the way in clockwise already, otherwise you risk damaging it when compressing the caliper pistons.
Now, clean the rear brake clips with brake parts cleaner and lube them up with brake caliper lube. Reinstall the brake clips and then new brake pads. Wipe away any lube that ends up getting onto the brake rotor.


Swivel the rear caliper body back up and reinstall the top 13mm flange bolt. Again, use a 17mm combination wrench to hold the nut in place while tightening the 13mm flange bolt.
With the new rear brake pads and rotors installed, I like to torque all of the previously removed/reinstalled bolts at this time. The 13mm flange bolt should be torqued to 26 ft-lbs of torque.

The (2 qty) 17mm rear caliper mounting bolts should be torqued down to 80 ft-lbs of torque.

Re-installing The Electric Parking Brake (EPB)
Now we must reinstall the EPB actuator. Technically, you’re supposed to replace the EPB O-ring because moisture and dirt can cause damage to the internal mechanism. If you wish to replace this part, it is OEM Honda Part Number: 43012-TY2-A00.
Personally, I didn’t feel the need to replace it as my O-ring was still in very good shape. At the time of this brake job, my Odyssey would be three years old so maybe that’s why the seal was still in decent shape. Perhaps when these cars get older, it would be better to be more prudent with the replacement this EPB O-ring.
Carefully replace the EPB actuator and reinstall the (2 qty) Torx screws. They are supposed to be torqued them down to 9 ft-lbs torque. This is a relatively low torque, so you might need to use a smaller 1/4″ torque wrench, or simply snugged them down with a regular ratchet. Finally, reconnect the EPB electrical connector and then replace the wheel and lug nuts appropriately.


Readjustment of Electric Parking Brake (EPB)
Finally, you need to reset the Electric Parking Brake. If you were using a plug-in diagnostic tool, you would select the option to place the EPB back into normal mode, which will essentially screw the EPB spindle back in, engaging the electric parking brake. The manual way of placing the EPB back to “back to normal” mode is as follows:
First, turn the vehicle to ON mode, but don’t start it. Apply the parking brake, then release it. Apply the parking brake again for a second time, then release it again. The brake system indicator on the instrument cluster (in red) should turn off. Turn the vehicle off.


Breaking in the New Brakes
Since we know that brake pad transfer can cause brake vibration, let’s make sure we bed the brakes to ensure we have smooth braking in the future. Bedding in the brakes is a procedure that involves driving the vehicle and performing a number of stops to ensure that an even layer of brake pad material transfers onto the new brake rotors. Here’s an article I wrote to show you how to do a standard brake pad bedding procedure.
I hope this DIY guide has helped you with replacing the front and rear brakes on your 5th Gen Honda Odyssey. It can be intimidating doing the brakes on this car if you haven’t worked with an Electric Parking Brake system before. However, once you understand how it works and how to manually remove, operate, and reinstall it, it makes it much easier to work with.
")
")
")
")
")
")
")
")

4 Comments
What rotor and pads did you end up getting for your Odyssey and how do you like them so far?
I either used Durago or Centric rotors, and Powerstop Z16 brakes. There are people out there that shun “economy” brake parts, but I personally have had really good experience with them especially on a daily driver.
This is such an awesome writeup. Thanks Scott. Cannot believe somebody took the time to create this page along with so much pics !
Thank you and you’re welcome! The job itself doesn’t take that long to do, but taking photos while doing it does. Thanks for taking the time to comment, it means a lot!